Here are the steps on how to create a new Recurring Journal
Option 1: By checking recurring template
- Create general journal and check the Recurring Template box. You can also open an existing transaction then click Duplicate.
- Add your account line entries in the details grid then Save.
- To add the recurring journal in the Recurring Transaction screen, click on Recurring button.
- When Recurring Transaction screen opens, it will automatically add the new recurring template.
- You are now ready to process journal based on the schedule set. See SM How To Process Recurring Transaction
Option 2: By creating recurring template
- Create general journal
- Add your account line entries in the details grid.
- Click Recurring toolbar button, Recurring Template box will be automatically checked.
- click Create/Edit
- When Recurring Transaction screen opens, it will automatically add the new recurring template.
- You are now ready to process journal based on the schedule set. See SM How To Process Recurring Transaction
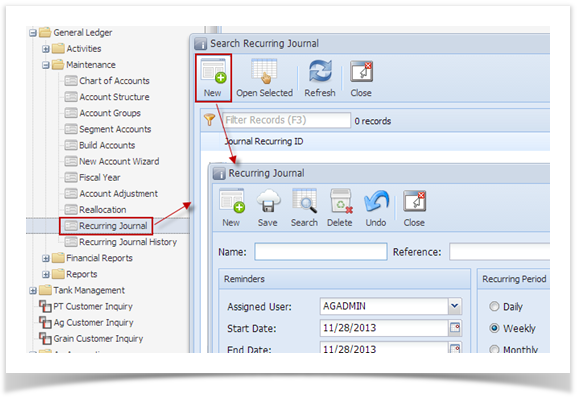
- From General Ledger Maintenance screen, click Recurring Journal. If there's an existing record, the Search Recurring Journal screen will open. Otherwise, Recurring Journal screen will open.
- If Search Recurring Journal screen opens, click on the New button to open a blank Recurring Journal screen.
- Enter a recurring Name and Reference.
- Enter Reverse Date if recurring journal will be reversed.
- User Mode by default is blank. Click on combo box button to open combo box list. Select from Editable or Locked mode.
- The Currency field is used to assign a currency to the Recurring Journal. By default, this is automatically filled in with the default Currency set in the Company Preference. To change it for a specific Recurring Journal entry, click combo box button and select different currency from the combo box list.

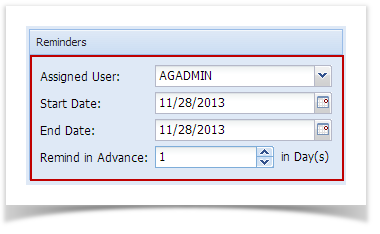
- Setup the Reminders.
- By default, user defaults to the current user. Click on Assigned User combo box button and select user from the list if you want to assign the recurring of journal to other users.
- Start and End Date fields for the recurring journal are populated with today's date, by default. To change the date, click on the combo box button to open the mini calendar and select a different date. Manual entering of dates are also allowed.
- Enter number of days when the reminder will be displayed in advance on Remind in Advance field.
- Select Recurring Period of your Recurring Journal by clicking the corresponding radio button. This will be the interval when the journals will be recurred.
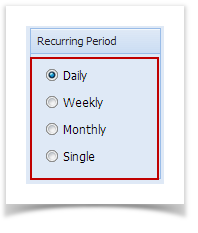
- Select the Frequency of the period you selected for your recurring journal.
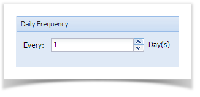
- Frequency for Daily - select day interval of recurring journals.
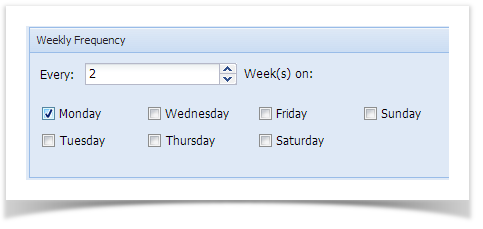
- Frequency for Weekly - select week interval and the day of the week when journals will be recurred.
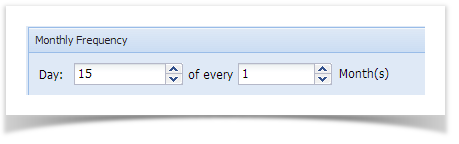
- Frequency for Monthly - select day of the month and the month interval when the journals will be reccured.
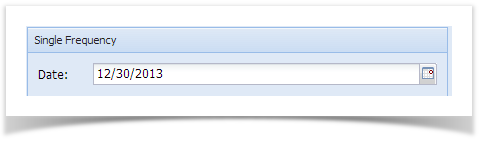
- Frequency for Single – Click on the combo box button to open mini calendar and select date when the journal will be recurred. Manual entering of date is also allowed. Journal will be recurred only on the selected date.
- Frequency for Daily - select day interval of recurring journals.
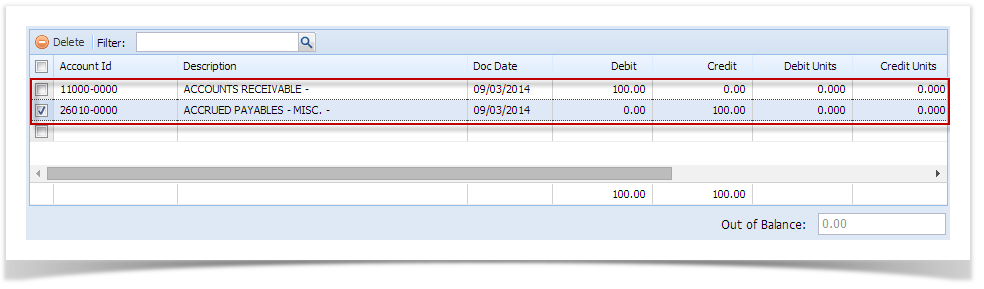
- Click the empty row on the grId and start adding details.
- Add Account Id on the grId by clicking the combo box button and select account Id from the list. Description field will be automatically filled in with the accounts description of the selected Account Id.
- Doc Date by default is set to today's date. But you can change the transaction date by clicking the combo box button to open the mini calendar and select a different date. Manual entering of date is also allowed. The next time you enter another account Id, transaction date selected on the previous row will now be copied.
- For the selected account, you can either enter a Debit or a Credit amount.
- If needed, enter Debit Unit or a Credit Unit. But this is only possible if accounts used have a unit setup. Else, you will receive an error message when posting the transaction.
- Document, Reference and Comment fields are optional fields. You can either enter values in these fields or you can leave it blank. But in case you enter values on the previous row, succeeding rows will copy its values.
- You can enter as many lines as you wish by repeating steps 10 to 15. Just remember that amounts have to be balanced or having equal dollars in the debit and the credit amount when you are finished entering accounts. The Out of Balance field will display the amount if debit and credit is balanced or not.
- Save and Close screen.
Overview
Content Tools