To open GL Account Adjustment screen, click Account Adjustment from General Ledger Maintenance menu and then click New toolbar button.
Move an Account ID
- To move an account Id, click Add action button.
- Select Move in Action combo box then select an Account Id in Type combo box. In the Original combo box, select the account Id that you would want to move and select in the New field the Account Group where it will be moved.
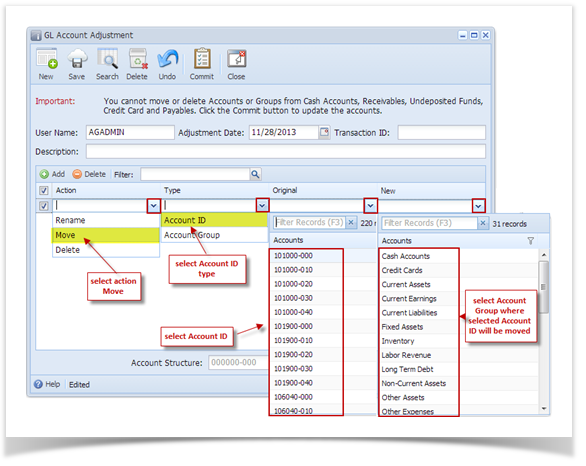
- Click the Commit button. Clicking the Commit button will cascade update all the affected tables and move the account Id to the new account group.
- After GL Account Adjustment is committed, the screen is marked as Committed.
Limitations in Moving an Account ID
- You cannot move an Account ID that is already used in a posted or unposted transaction and other non-transactional records.
Move an Account Group
- To move an Account Group, click Add action button.
- Select Move in Action combo box then select Account Group in Type combo box. In the Original combo box, select the Account Group that you would want to move and select in the New field the Account Group where it will be moved.
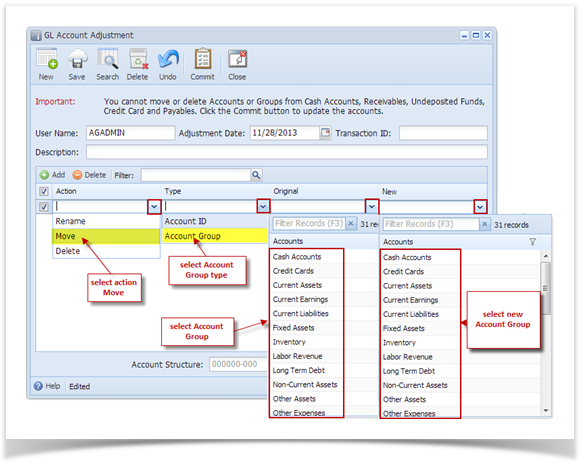
- Click the Commit button. Clicking the Commit button will cascade update all the affected tables and move the Account Group to the new Account Group.
- After GL Account Adjustment is committed, the screen is marked as Committed.
Limitations in Moving an Account Group
- You cannot move a System Account Group. These are the account groups automatically loaded into all new installations for new customers.
- You cannot move an Account Group if any of the Account Id under this group is already used in a posted or unposted transaction and other non-transactional records.
Once the Commit button is clicked, there will be no way you can Uncommit or Undo this change. If you need to revert your changes, then you must create a new COA Adjustment transaction for that.
Overview
Content Tools