The Filter Accounts row is intended to show balances of your General Ledger accounts, that is why to complete this row setup, you will need to configure your account filter/s.
Follow these steps to add a Filter Accounts row.
- From the Row Type section select Filter Accounts and drag it to the grid area, in the position you want that row be added.
- Enter a value in the Row Name field. This value should be as descriptive as possible so it would be easy to read what row is that for.
- Leave out Row Calculation field.
- By default Balance Side field will show Debit.
- Leave it as is - Debit if the row is intended to filter accounts under Asset or Expenses account types.
- Select Credit if the row is intended to filter accounts under Liability, Equity or Revenue account types.
- In the Filter Accounts field, you will have to configure your account filter. There are 2 ways to do this and each is explained in the topics below.
- How to Configure Account Filter using Chart of Accounts screen - this is the drag and drop method
- How to Configure Account Filter using Filter Accounts - this is a one-row-at-a-time method wherein each row is setup one by one.
This is how Filter Accounts row will look like when you follow the above steps.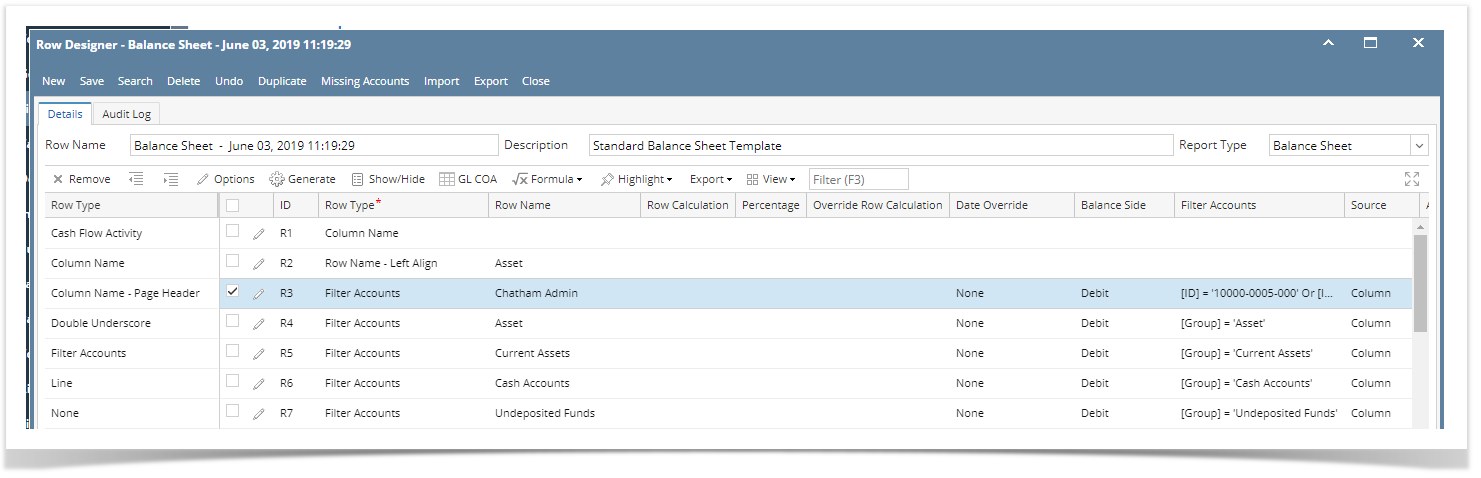
This is how it will be shown when you print your financial report.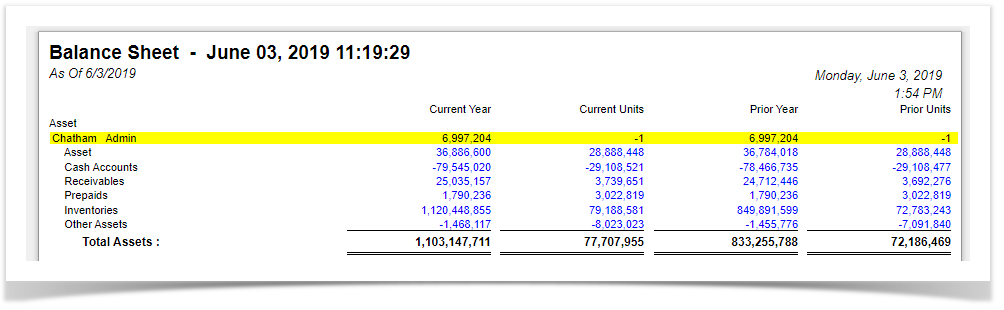
You can enhance this row by setting its Font Properties and Row Height. See How to Configure Row Font Properties and Row Height topic to guide you on how to do this.
The Filter Accounts row is intended to show balances of your General Ledger accounts, that is why to complete this row setup, you will need to configure your account filter/s.
Follow these steps to add a Filter Accounts row.
- From the Row Type section select Filter Accounts and drag it to the grid area, in the position you want that row be added.
- Enter a value in the Row Name field. This value should be as descriptive as possible so it would be easy to read what row is that for.
- Leave out Row Calculation field.
- By default Balance Side field will show Debit.
- Leave it as is - Debit if the row is intended to filter accounts under Asset or Expenses account types.
- Select Credit if the row is intended to filter accounts under Liability, Equity or Revenue account types.
- In the Filter Accounts field, you will have to configure your account filter. There are 2 ways to do this and each is explained in the topics below.
- How to Configure Account Filter using Chart of Accounts screen - this is the drag and drop method
- How to Configure Account Filter using Filter Accounts - this is a one-row-at-a-time method wherein each row is setup one by one.
This is how Filter Accounts row will look like when you follow the above steps.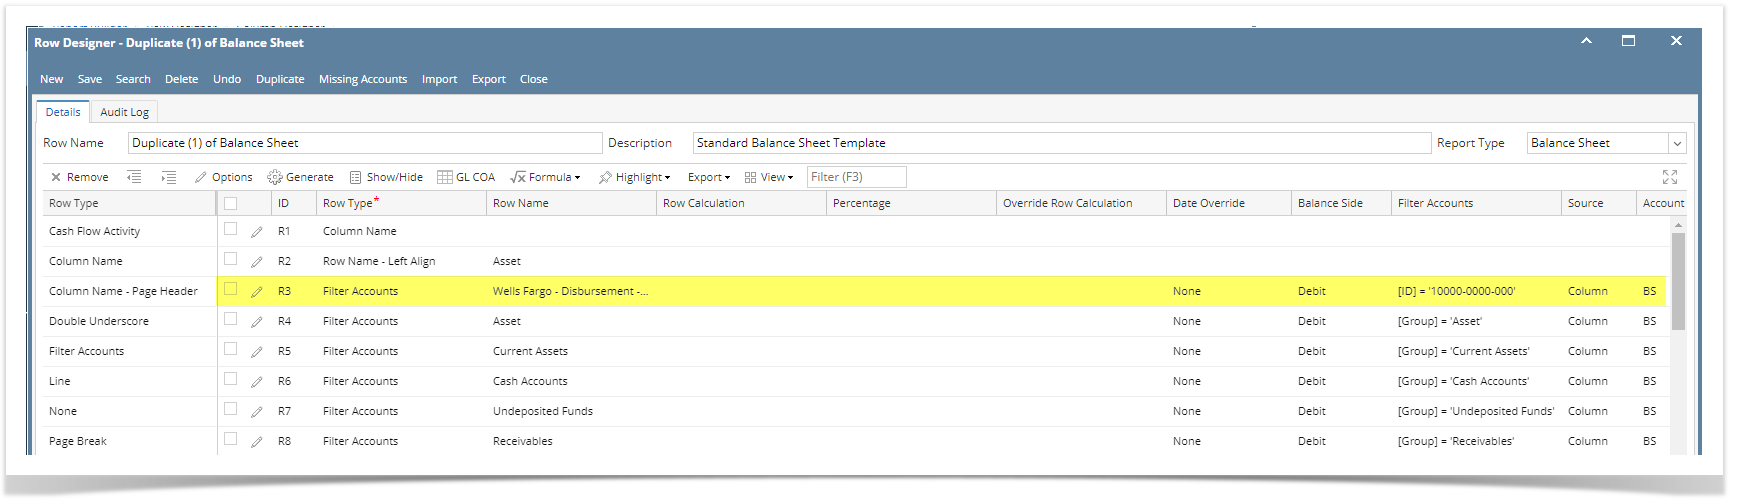
This is how it will be shown when you print your financial report.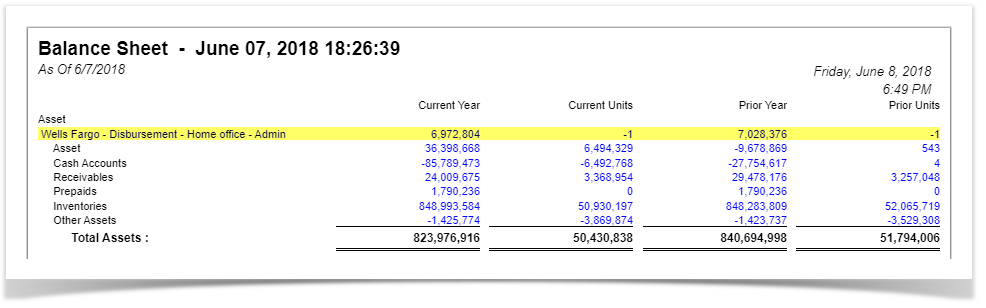
You can enhance this row by setting its Font Properties and Row Height. See How to Configure Row Font Properties and Row Height topic to guide you on how to do this.
The Filter Accounts row is intended to show balances of your General Ledger accounts, that is why to complete this row setup, you will need to configure your account filter/s.
Follow these steps to add a Filter Accounts row.
- From the Row Type section select Filter Accounts and drag it to the grid area, in the position you want that row be added.
- Enter a value in the Row Name field. This value should be as descriptive as possible so it would be easy to read what row is that for.
- Leave out Row Calculation field.
- By default Balance Side field will show Debit.
- Leave it as is - Debit if the row is intended to filter accounts under Asset or Expenses account types.
- Select Credit if the row is intended to filter accounts under Liability, Equity or Revenue account types.
- In the Filter Accounts field, you will have to configure your account filter. There are 2 ways to do this and each is explained in the topics below.
- How to Configure Account Filter using Chart of Accounts screen - this is the drag and drop method
- How to Configure Account Filter using Filter Accounts - this is a one-row-at-a-time method wherein each row is setup one by one.
This is how Filter Accounts row will look like when you follow the above steps.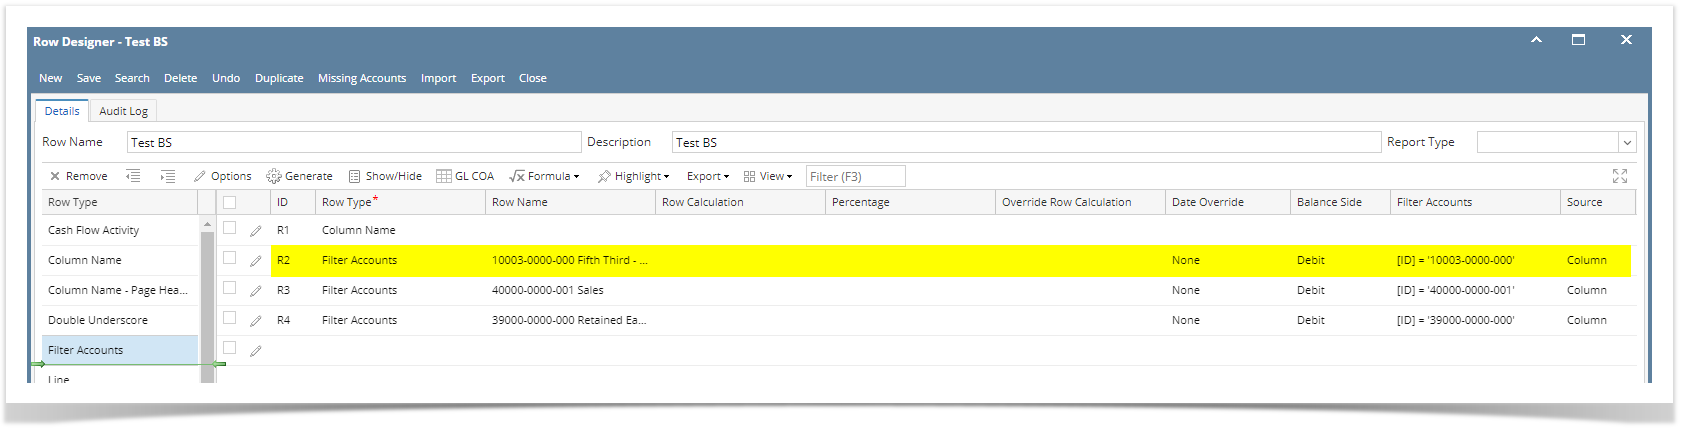
This is how it will be shown when you print your financial report.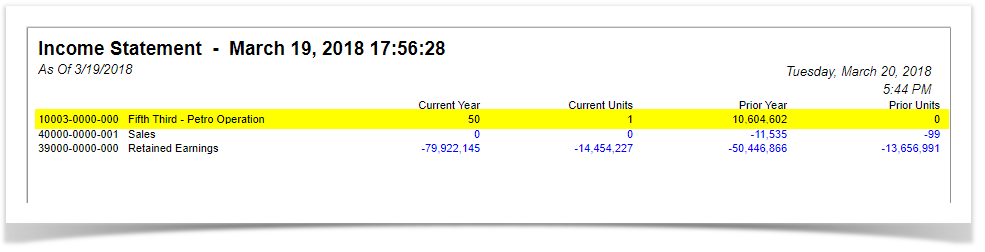
You can enhance this row by setting its Font Properties and Row Height. See How to Configure Row Font Properties and Row Height topic to guide you on how to do this.
The Filter Accounts row is intended to show balances of your General Ledger accounts, that is why to complete this row setup, you will need to configure your account filter/s.
Follow these steps to add a Filter Accounts row.
- From the Row Type section select Filter Accounts and drag it to the grid area, in the position you want that row be added.
- Enter a value in the Row Name field. This value should be as descriptive as possible so it would be easy to read what row is that for.
- Leave out Row Calculation field.
- By default Balance Side field will show Debit.
- Leave it as is - Debit if the row is intended to filter accounts under Asset or Expenses account types.
- Select Credit if the row is intended to filter accounts under Liability, Equity or Revenue account types.
- In the Filter Accounts field, you will have to configure your account filter. There are 2 ways to do this and each is explained in the topics below.
- How to Configure Account Filter using Chart of Accounts screen - this is the drag and drop method
- How to Configure Account Filter using Filter Accounts - this is a one-row-at-a-time method wherein each row is setup one by one.
This is how Filter Accounts row will look like when you follow the above steps.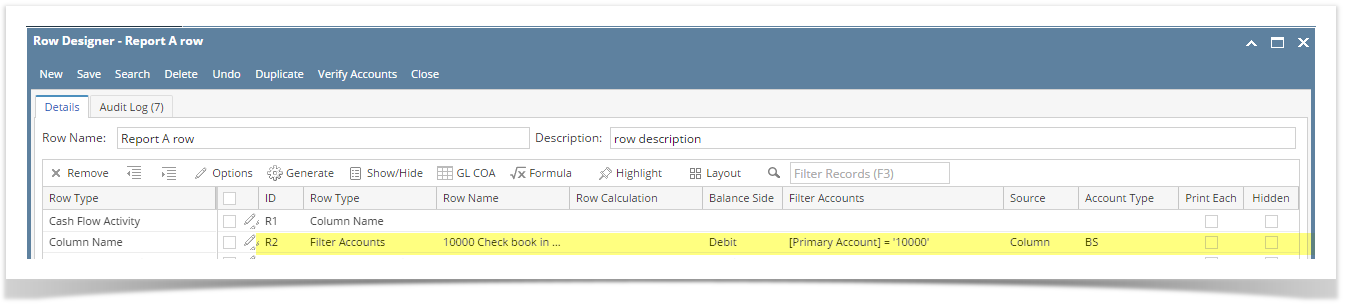
This is how it will be shown when you print your financial report.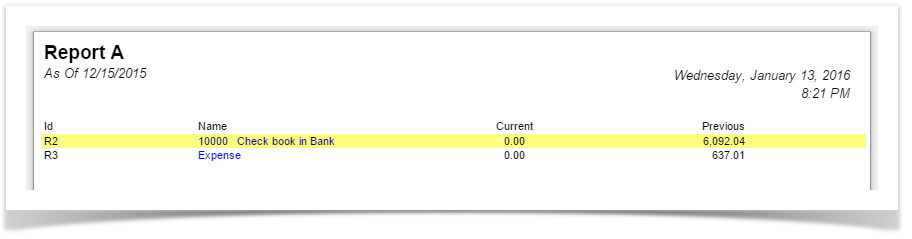
You can enhance this row by setting its Font Properties and Row Height. See How to Configure Row Font Properties and Row Height topic to guide you on how to do this.
The Calculation row is intended to show balances of your General Ledger accounts, that is why to complete this row setup, you will need to configure your account filter/s.
Follow these steps to add a Calculation row.
- A new row will be available in the grid section.
- Enter a value in the Description field. This value should be as descriptive as possible so it would be easy to read what row is that for.
- In the Row Type field, select Calculation.
- Filter Accounts screen will automatically be opened. See How to Configure Account Filter using Filter Accounts to guide you on how to use Filter Accounts screen.
- In the Balance Side field,
- Select Debit if the row is intended to filter accounts under Asset or Expenses account types.
- Select Credit if the row is intended to filter accounts under Liability, Equity or Revenue account types.
This is how Calculation row will look like when you follow the above steps.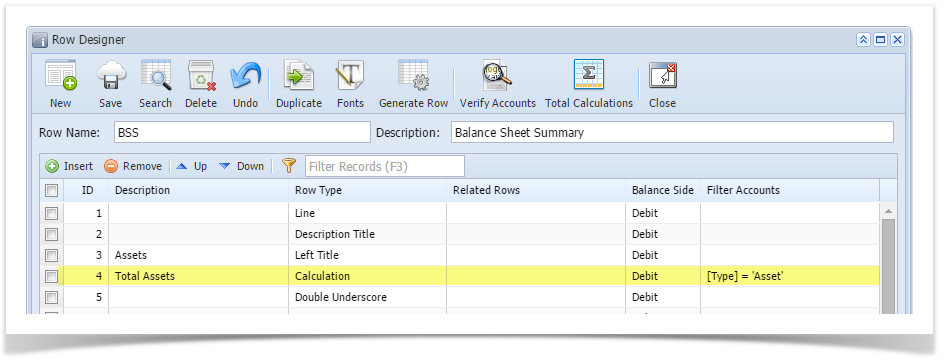
This is how it will be shown when you print your financial report.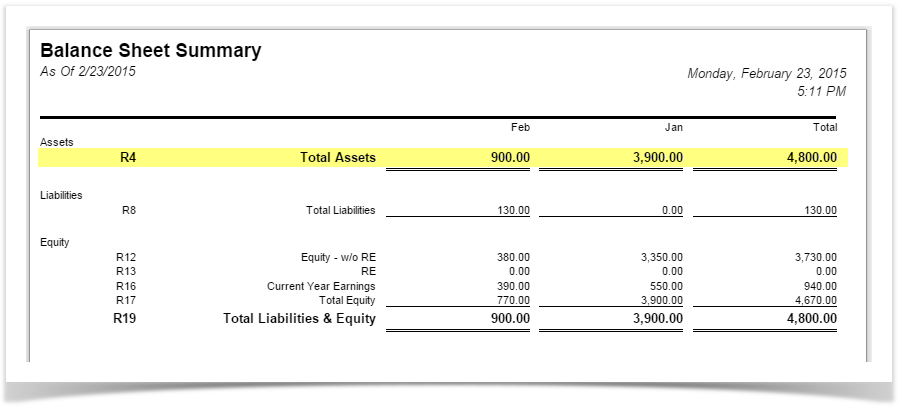
You can enhance this row by setting its Font Properties and Row Height. See How to Configure Row Font Properties and Row Height topic to guide you on how to do this.
The Calculation row is intended to show balances of your General Ledger accounts, that is why to complete this row setup, you will need to configure your account filter.
Follow these steps to add a Calculation row.
- A new row will be available in the grid section.
- Enter a value in the Description field. This value should be as descriptive as possible so it would be easy to read what row is that for.
- In the Row Type field, select Calculation.
- Leave out Related Rows field.
- In the Balance Side field,
- Select Debit if the row is intended to filter accounts under Asset or Expenses account types.
- Select Credit if the row is intended to filter accounts under Liability, Equity or Revenue account types.
- In the Filter Accounts field, you will have to configure your account filter. There are 2 ways to do this and each is explained in the topics below.
- How to Configure Account Filter using Filter Accounts - this method is being used if Account Filter is configured, one at a time, as you add rows
- How to Configure Account Filter using Advance Filter Accounts - this method is being used if Account Filter is configured after all rows were added
This is how Calculation row will look like when you follow the above steps.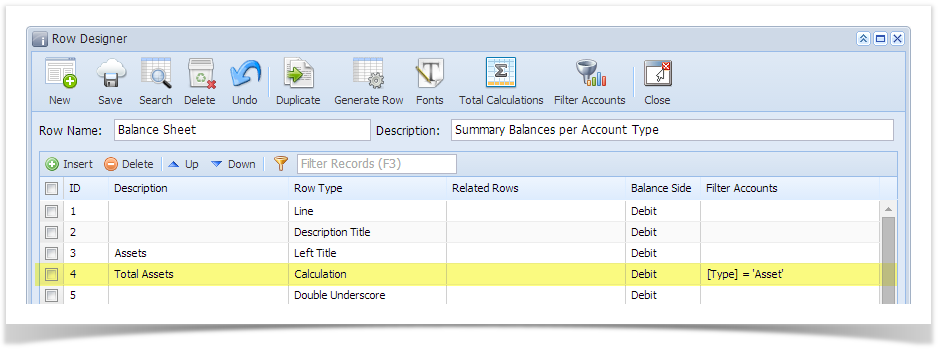
This is how it will be shown when you print your financial report.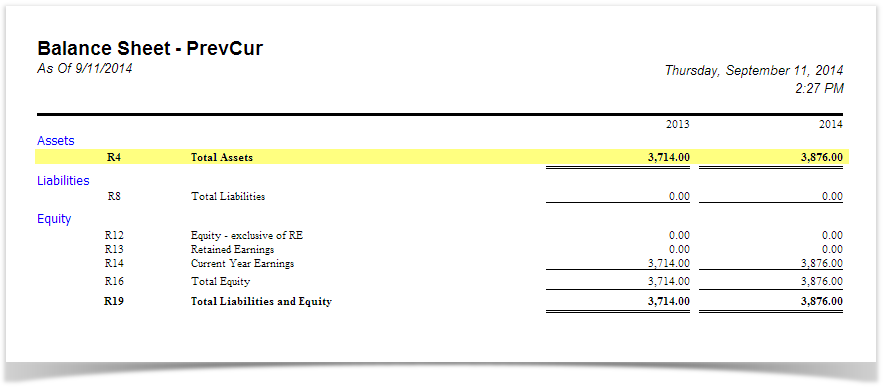
You can enhance this row by setting its Font Properties and Row Height. See How to Configure Row Font Properties and Row Height topic to guide you on how to do this.
Overview
Content Tools