- By directly entering the new reading in the Clock Reading grid:
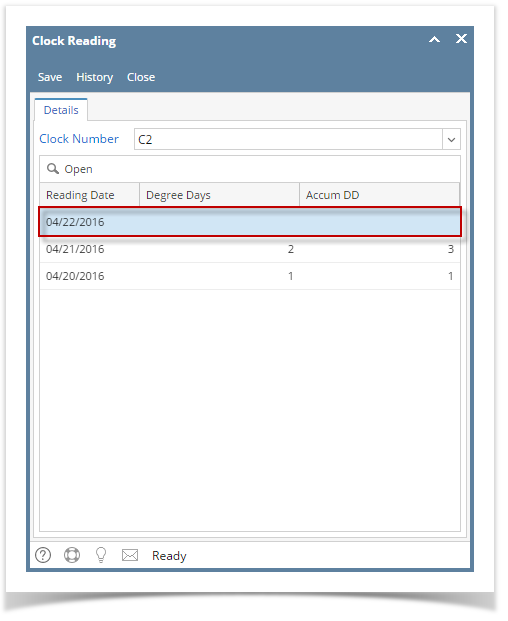
- Open the Clock Reading record. The blank row is where you can enter the details. This row automatically displays the next clock date where you can leave it as is or enter the date needed.
- Enter a Reading Date.
- Enter either a Degree Days or an Accum DD.
- Hit the Enter or Tab key. The new clock reading will be added in the uppermost row of the grid.
- Open the Clock Reading record. The blank row is where you can enter the details. This row automatically displays the next clock date where you can leave it as is or enter the date needed.
- By using the Calculate Degree Day screen:
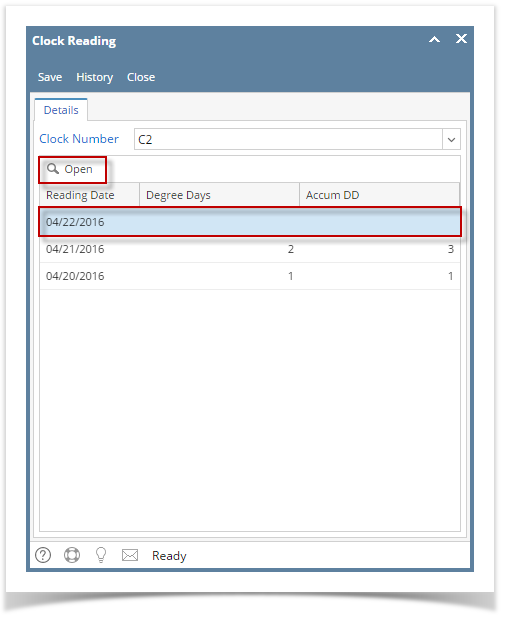
When using the Calculate Degree Day screen to compute the next Degree Day reading, make sure that the Base Temperature of the Degree Day Clock screen is correctly configured.- Select the empty row in the grid, and then click the Open button. This will open the Calculate Degree Day screen.
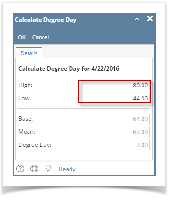
- Enter the High and Low value. This will automatically compute the Degree Day. Click the OK button.
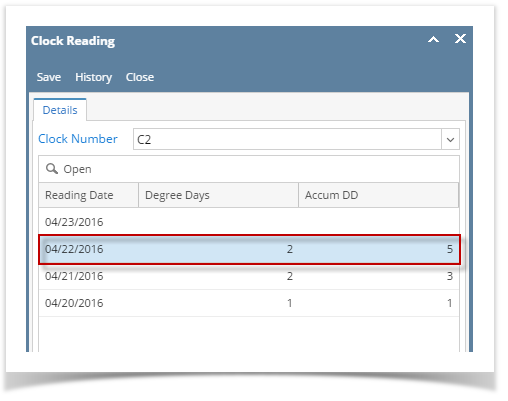
- The new degree day reading will be added in the Clock Reading grid.
- Save then Close the Clock Reading record.
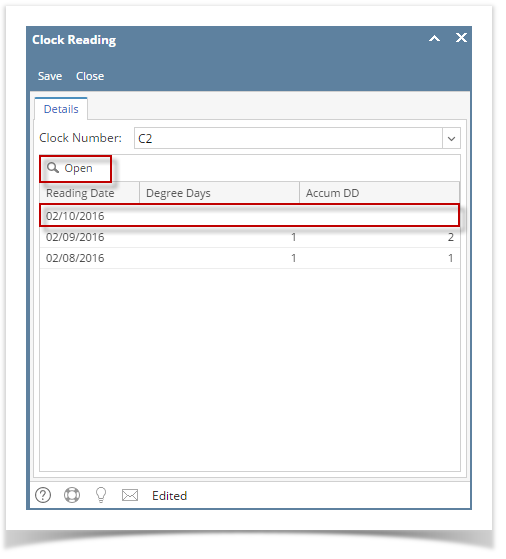
- Select the empty row in the grid, and then click the Open button. This will open the Calculate Degree Day screen.
- By directly entering the new reading in the Clock Reading grid:
- Open the Clock Reading record. The blank row is where you can enter the details. This row automatically display the next clock date where you can leave it as is or enter the date needed.

- Enter a Reading Date.
- Enter either a Degree Days or an Accum DD.
- Hit the Enter or Tab key. The new clock reading will be added in the uppermost row of the grid.
- Open the Clock Reading record. The blank row is where you can enter the details. This row automatically display the next clock date where you can leave it as is or enter the date needed.
- By using the Calculate Degree Day screen:
When using the Calculate Degree Day screen to compute the next Degree Day reading, make sure that the Base Temperature of the Degree Day Clock screen is correctly configured.- Select the empty row in the grid, and then click the Open button. This will open the Calculate Degree Day screen.
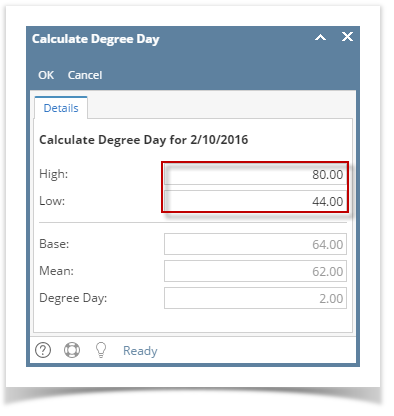
- Enter the High and Low value. This will automatically compute the Degree Day. Click the OK button.
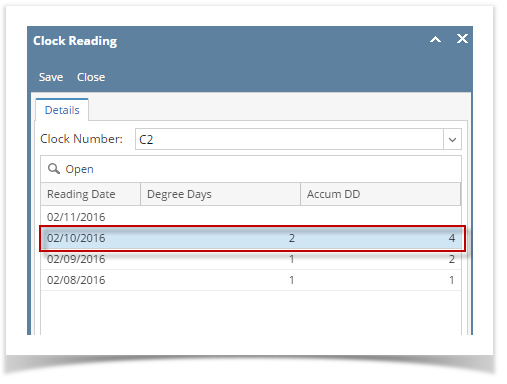
- The new degree day reading will be added in the Clock Reading grid.
- Save then Close the Clock Reading record.
- Select the empty row in the grid, and then click the Open button. This will open the Calculate Degree Day screen.
- By directly entering the new reading in the Clock Reading grid:
- Open the Clock Reading record. The blank row is where you can enter the details. This row automatically display the next clock date where you can leave it as is or enter the date needed.
- Enter a Reading Date.
- Enter either a Degree Days or an Accum DD.
- Hit the Enter or Tab key. The new clock reading will be added in the uppermost row of the grid.
- Open the Clock Reading record. The blank row is where you can enter the details. This row automatically display the next clock date where you can leave it as is or enter the date needed.
- By using the Calculate Degree Day screen:
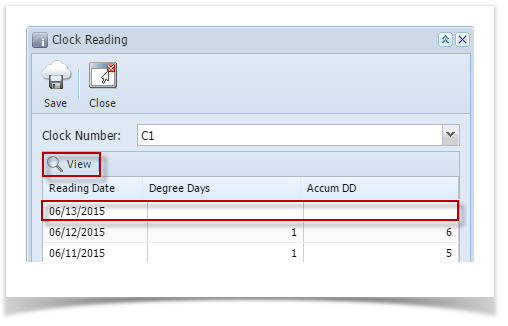
When using the Calculate Degree Day screen to compute the next Degree Day reading, make sure that the Base Temperature of the Degree Day Clock screen is correctly configured.- Select the empty row in the grid, and then click the View button. This will open the Calculate Degree Day screen.
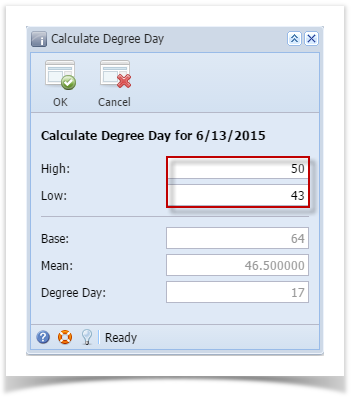
- Enter the High and Low value. Click the OK toolbar button.
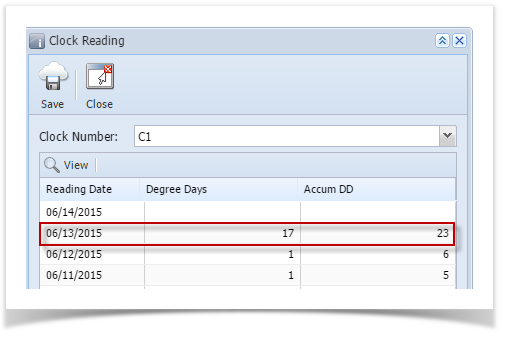
- The new degree day reading will be added in the Clock Reading grid.
- Save then Close the Clock Reading record.
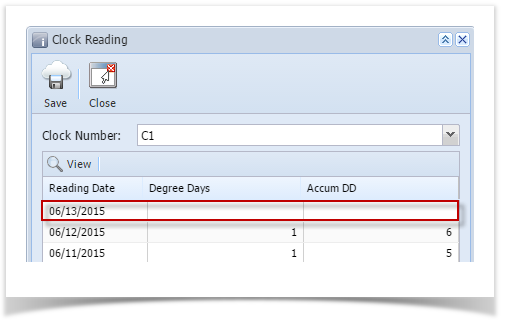
- Select the empty row in the grid, and then click the View button. This will open the Calculate Degree Day screen.
- By directly entering the new reading in the Clock Reading grid:
- Open the Clock Reading record. The blank row is where you can enter the details. This row automatically display the next clock date where you can leave it as is or enter the date needed.
- Enter a Reading Date.
- Enter either a Degree Days or an Accum DD.
- Hit the Enter or Tab key. The new clock reading will be added in the uppermost row of the grid.
- Open the Clock Reading record. The blank row is where you can enter the details. This row automatically display the next clock date where you can leave it as is or enter the date needed.
- By using the Calculate Degree Day screen:
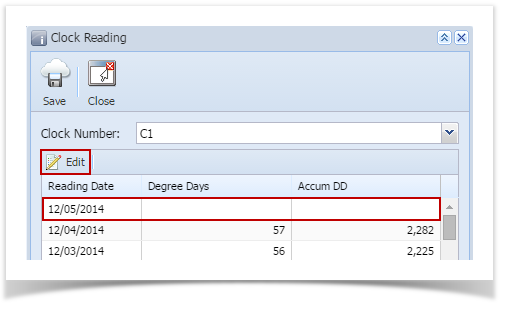
When using the Calculate Degree Day screen to compute the next Degree Day reading, make sure that the Base Temperature of the Degree Day Clock screen is correctly configured.- Select the empty row in the grid, and then click the Edit button. This will open the Calculate Degree Day screen.
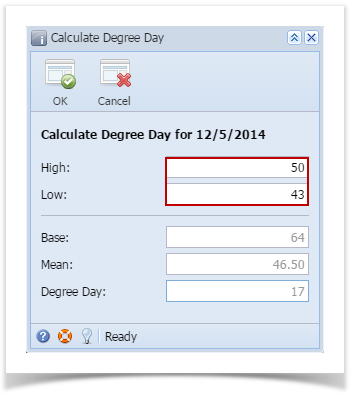
- Enter the High and Low value. Click the OK toolbar button.
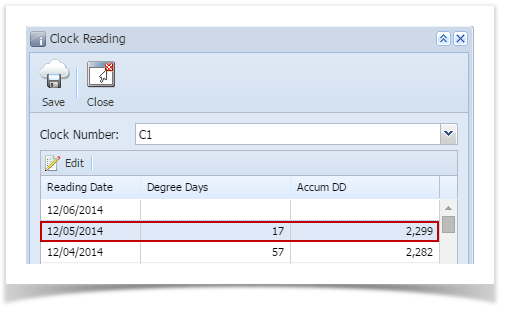
- The new degree day reading will be added in the Clock Reading grid.
- Save then Close the Clock Reading record.
- Select the empty row in the grid, and then click the Edit button. This will open the Calculate Degree Day screen.
Overview
Content Tools