The Percentage column is used to build formula for your column that would work with the Percentage row.
Follow these steps to add a Percentage column.
- A new row will be available in the grid section.
- In the Column Type field, select Percentage.
- In the Column Name field, enter the name you would like to call the column. The value entered in this field may show on your financial report, granted the caption for that column is set to Column Header. This is discussed more on How to Add Column Name Row.
- In the Caption field, select the type of caption you want for the column. This is discussed more on How to Add Column Name Row.
- In the Segment Filter field assign a Location filter if you want to filter by location/s, else leave it blank. This is discussed more on How to Configure Segment Filter.
- In the Percentage field, assign the column you want to be the base column where the the formula configured from Percentage row be computed. See How to Add Percentage row to guide you on how to create the percentage row to match this percentage column.
- In the Width field, set it to your desired column width. By default it is set to 160 pixels, which is approximately 1 1/4 inches.
- In the Alignment field, set how the value for the column be displayed.
- Select Center if you want it Centered
- Select Left if you want it Left Aligned
- Select Right if you want it Right aligned
- In the Format field, assign how the numbers be shown in the column. Since this is a percentage column, select from these percent format available.
- 0%
- 0.00%
- 0.000000%
- Leave Hidden checkbox unchecked. See How Hidden checkbox works when enabled.
This is how Percentage column will look like when you follow the above steps.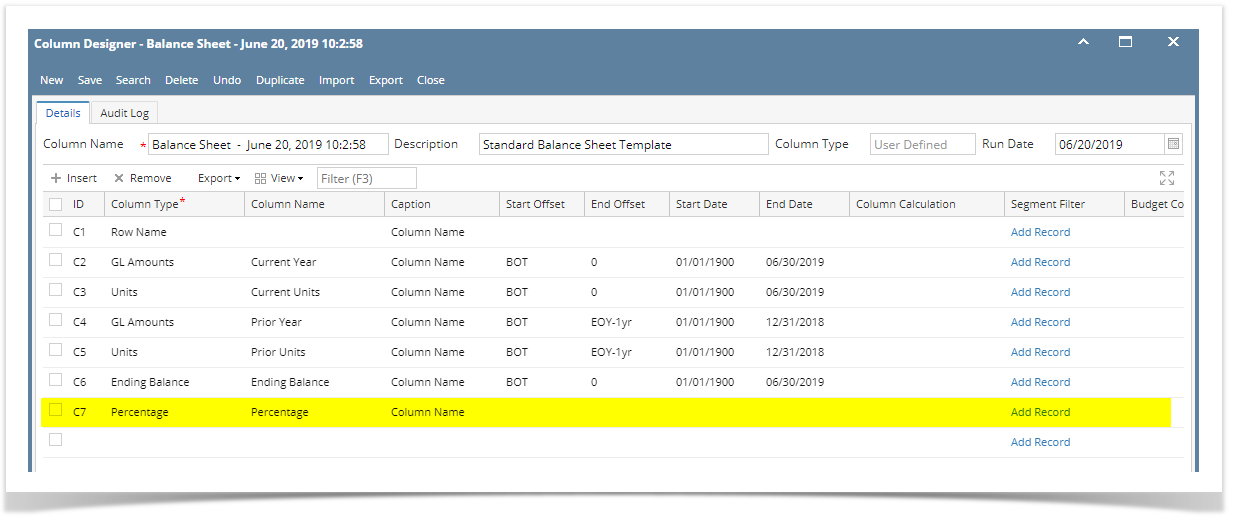
See also How to Add Percentage row to guide you on how to create the percentage row to match this percentage column.
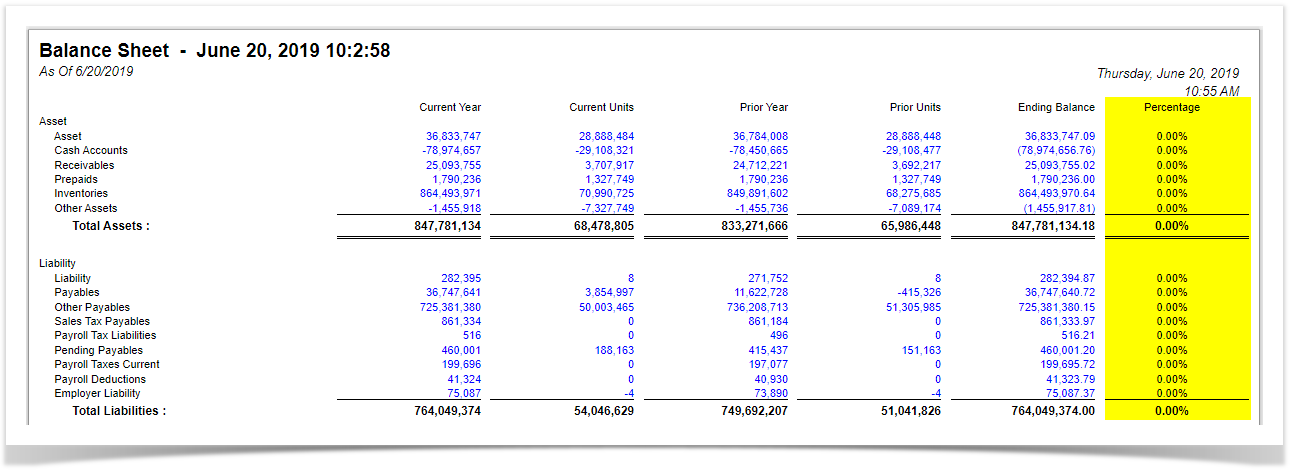
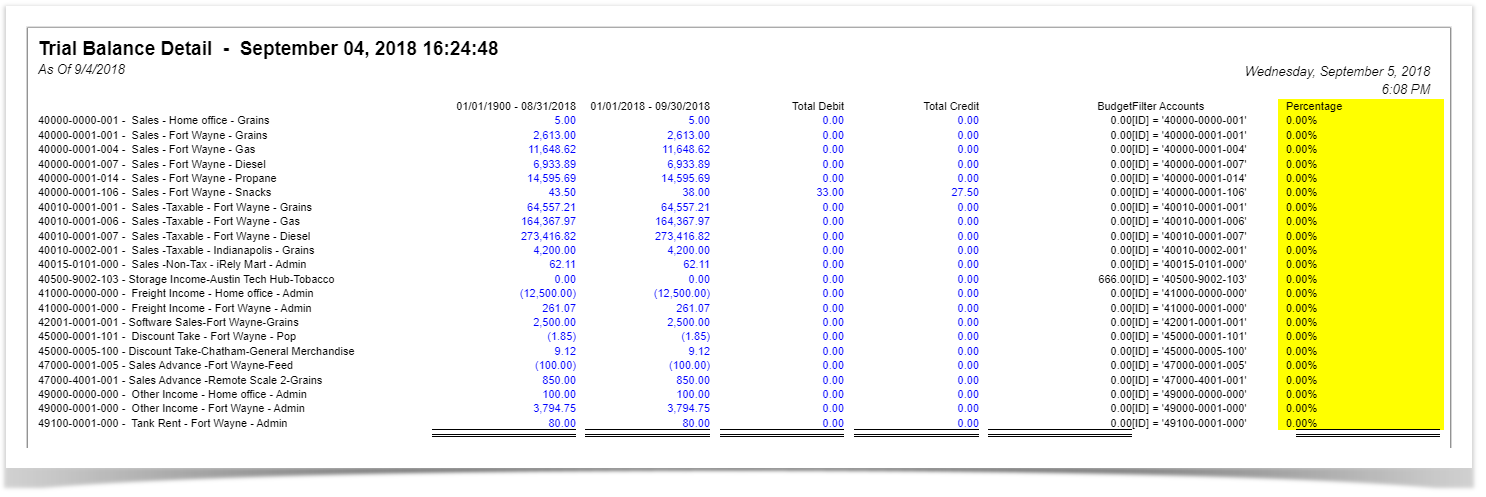
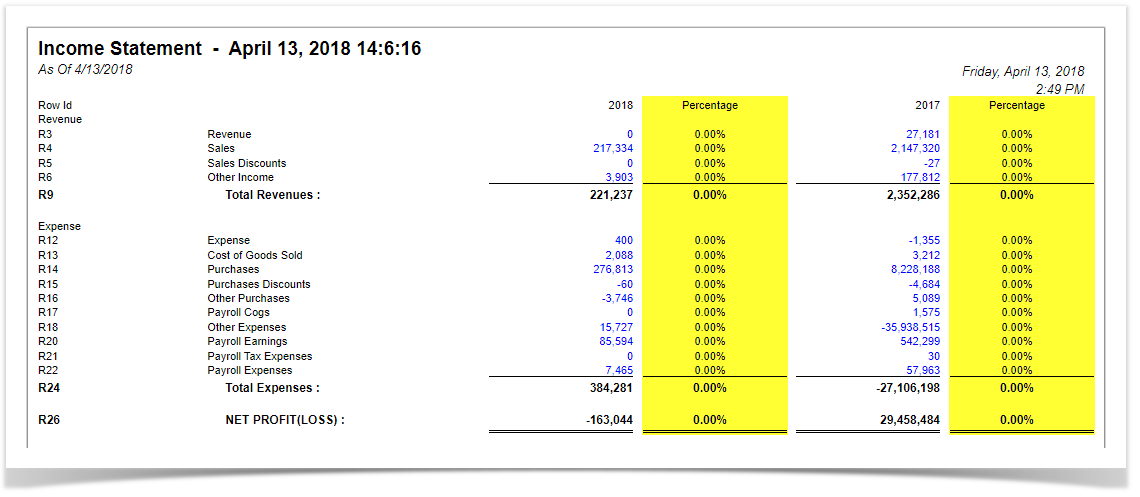
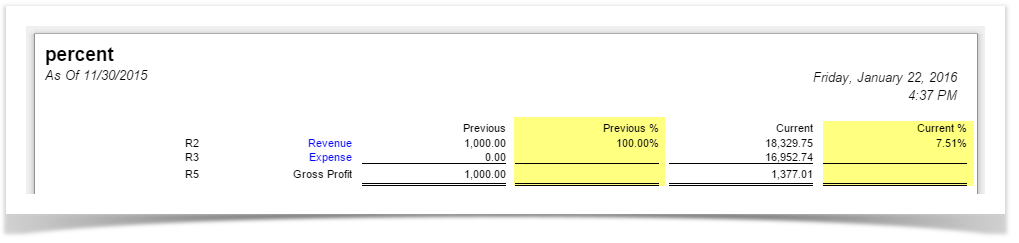
Here's how it is shown when report is previewed/printed.
The Percentage column is used to build formula for your column that would work with the Percentage row.
Follow these steps to add a Percentage column.
- A new row will be available in the grid section.
- In the Column Type field, select Percentage.
- In the Column Name field, enter the name you would like to call the column. The value entered in this field may show on your financial report, granted the caption for that column is set to Column Header. This is discussed more on How to Add Column Name Row.
- In the Caption field, select the type of caption you want for the column. This is discussed more on How to Add Column Name Row.
- In the Segment Filter field assign a Location filter if you want to filter by location/s, else leave it blank. This is discussed more on How to Configure Segment Filter.
- In the Percentage field, assign the column you want to be the base column where the the formula configured from Percentage row be computed. See How to Add Percentage row to guide you on how to create the percentage row to match this percentage column.
- In the Width field, set it to your desired column width. By default it is set to 160 pixels, which is approximately 1 1/4 inches.
- In the Alignment field, set how the value for the column be displayed.
- Select Center if you want it Centered
- Select Left if you want it Left Aligned
- Select Right if you want it Right aligned
- In the Format field, assign how the numbers be shown in the column. Since this is a percentage column, select from these percent format available.
- 0%
- 0.00%
- 0.000000%
- Leave Hidden checkbox unchecked. See How Hidden checkbox works when enabled.
This is how Percentage column will look like when you follow the above steps.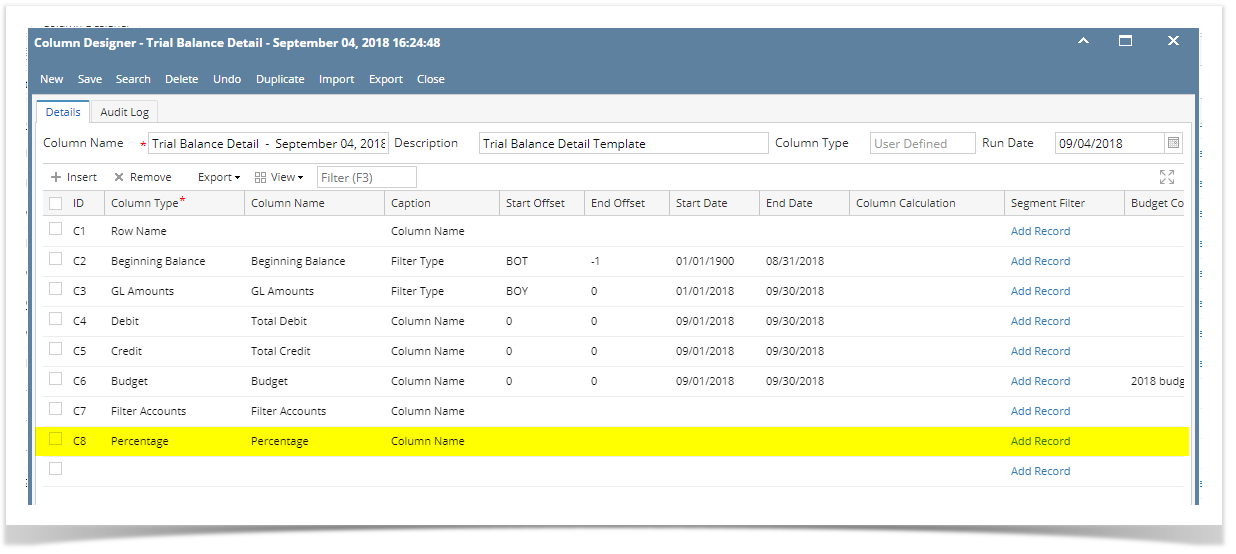
See also How to Add Percentage row to guide you on how to create the percentage row to match this percentage column.
Here's how it is shown when report is previewed/printed.
The Percentage column is used to build formula for your column that would work with the Percentage row.
Follow these steps to add a Percentage column.
- A new row will be available in the grid section.
- In the Column Type field, select Percentage.
- In the Column Name field, enter the name you would like to call the column. The value entered in this field may show on your financial report, granted the caption for that column is set to Column Header. This is discussed more on How to Add Column Name Row.
- In the Caption field, select the type of caption you want for the column. This is discussed more on How to Add Column Name Row.
- In the Segment Filter field assign a Location filter if you want to filter by location/s, else leave it blank. This is discussed more on How to Configure Segment Filter.
- In the Percentage field, assign the column you want to be the base column where the the formula configured from Percentage row be computed. See How to Add Percentage row to guide you on how to create the percentage row to match this percentage column.
- In the Width field, set it to your desired column width. By default it is set to 160 pixels, which is approximately 1 1/4 inches.
- In the Alignment field, set how the value for the column be displayed.
- Select Center if you want it Centered
- Select Left if you want it Left Aligned
- Select Right if you want it Right aligned
- In the Format field, assign how the numbers be shown in the column. Since this is a percentage column, select from these percent format available.
- 0%
- 0.00%
- 0.000000%
- Leave Hidden checkbox unchecked. See How Hidden checkbox works when enabled.
This is how Percentage column will look like when you follow the above steps.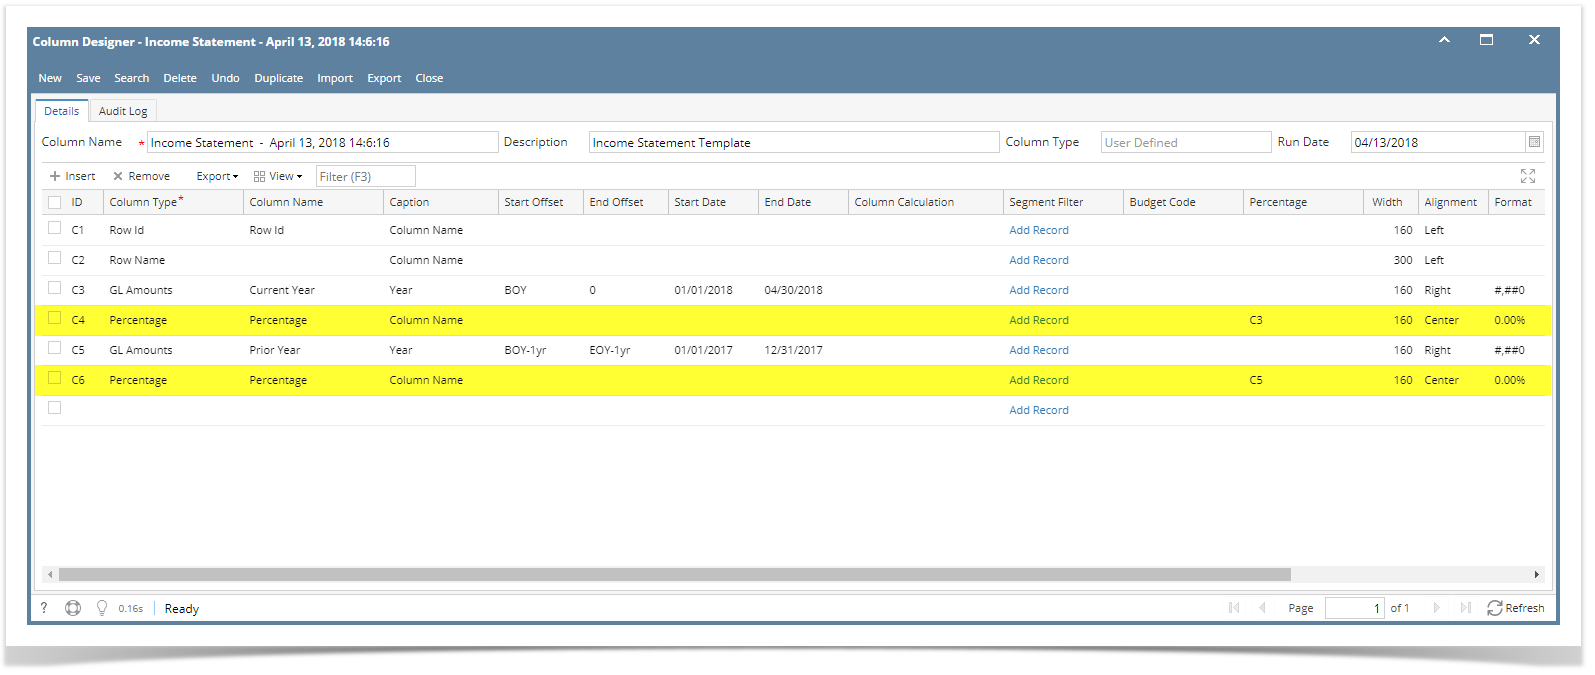
See also How to Add Percentage row to guide you on how to create the percentage row to match this percentage column.
Here's how it is shown when report is previewed/printed.
The Percentage column is used to build formula for your column that would work with the Percentage row.
Follow these steps to add a Percentage column.
- A new row will be available in the grid section.
- In the Column Type field, select Percentage.
- In the Column Name field, enter the name you would like to call the column. The value entered in this field may show on your financial report, granted the caption for that column is set to Column Header. This is discussed more on How to Add Column Name Row.
- In the Caption field, select the type of caption you want for the column. This is discussed more on How to Add Column Name Row.
- In the Segment Filter field assign a Location filter if you want to filter by location/s, else leave it blank. This is discussed more on How to Configure Segment Filter.
- In the Percentage field, assign the column you want to be the base column where the the formula configured from Percentage row be computed. See How to Add Percentage row to guide you on how to create the percentage row to match this percentage column.
- In the Width field, set it to your desired column width. By default it is set to 160 pixels, which is approximately 1 1/4 inches.
- In the Alignment field, set how the value for the column be displayed.
- Select Center if you want it Centered
- Select Left if you want it Left Aligned
- Select Right if you want it Right aligned
- In the Format field, assign how the numbers be shown in the column. Since this is a percentage column, select from these percent format available.
- 0%
- 0.00%
- 0.000000%
- Leave Hidden checkbox unchecked. See How Hidden checkbox works when enabled.
This is how Percentage column will look like when you follow the above steps.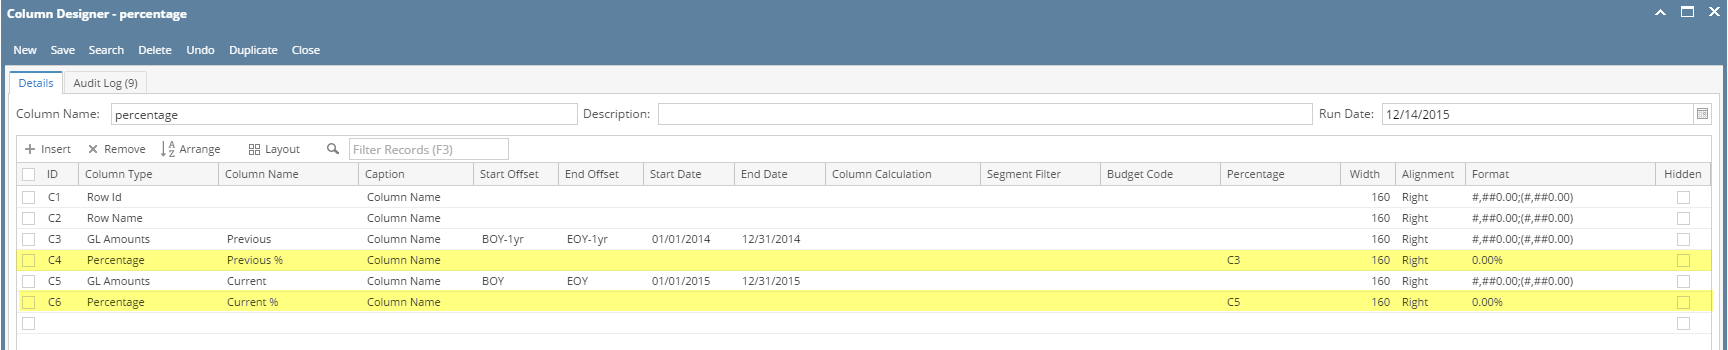
See also How to Add Percentage row to guide you on how to create the percentage row to match this percentage column.
Here's how it is shown when report is previewed/printed.
Overview
Content Tools