- A new row will be available in the grid section.
- In the Column Type field, select a type for the column.
- In the Column Name field, enter the name you would like to call the column. The value entered in this field may show on your financial report, granted the Caption field for that column is set to Column Name. This is discussed more on How to Add Column Name Row.
- In the Caption field, select the type of caption you want for the column. This is discussed more on How to Add Column Name Row.
- In the Start Offset field select the Start Date Offset from the available options to select from. This is discussed more on How Start and End Offset works.
- The Start Date field will show the date based on the Start Offset selected and the Run Date. This gives you a preview of what the Start Date will be. It is only when Custom is selected in the Start Offset field where you need to specify the date. The rest are computed by the system.
- The End Date field will show the date based on the End Offset selected and the Run Date. This gives you a preview of what the End Date will be. It is only when Custom is selected in the End Offset field where you need to specify the date. The rest are computed by the system.
- The Column Calculation field is used only on Column Calculation column type. This is discussed more on How to Configure Formula for Column Calculation column.
- The Segment Filter field is useful to the following column types since it allows you can specify location/s filter . This is discussed more on How to Use Segment Filter in the Column Designer.
- Beginning Balance
- Budget
- Credit
- Credit Units
- Debit
- Debit Units
- Ending Balance
- GL Amounts
- GL Trend
- Units
- The Budget Code field is used only on Budget column type. This is discussed more on How to Add Budget column.
- The Percentage field is used only on Percentage column type. This is discussed more on How to Add Percentage column.
- In the Width field, set it to your desired column width. By default it is set to 160 pixels, which is approximately 1 1/4 inches.
- In the Alignment field, set how the value for the column be displayed.
- Select Center if you want it Centered
- Select Left if you want it Left Aligned
- Select Right if you want it Right aligned
- In the Format field, assign how the numbers be shown in the column. Will it have decimals, money sign or in percentage format.
- Check Hidden checkbox if you don't want the column be shown on the report. This is useful if you need a column that will be part of the formula of another column and you just need to derive the numbers extracted from that column to build the formula. This is discussed more on How Hidden checkbox works when enabled .
This is a sample of column designer record where columns are added and configured. Boxed in red is the grid section.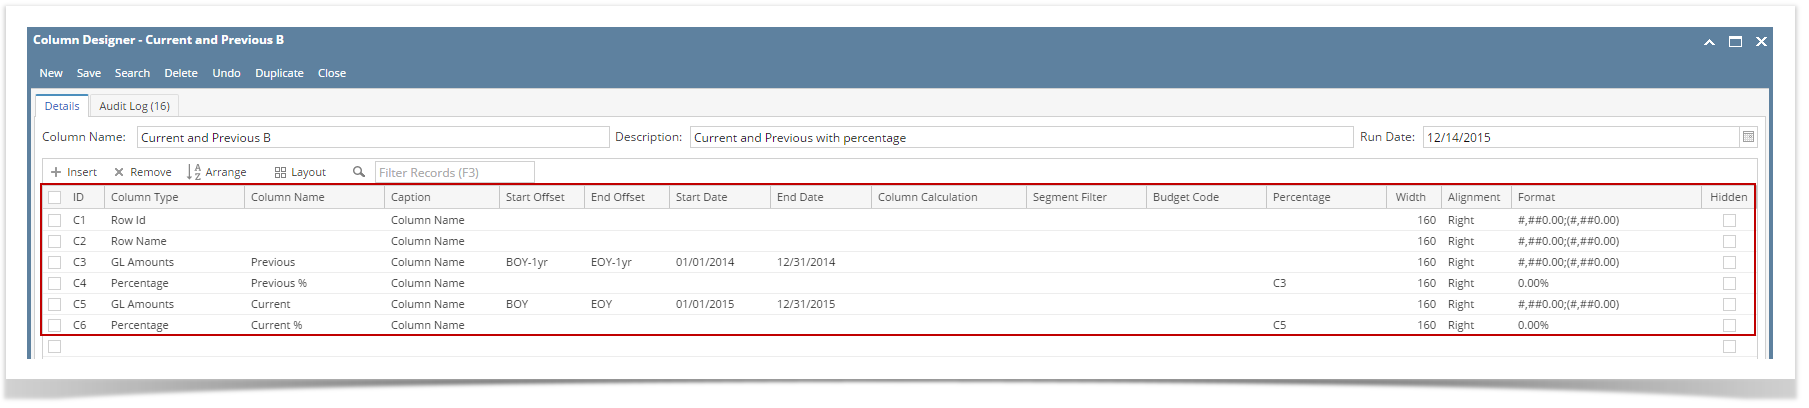
The following will guide you on how to add and configure columns of your column designer.
- How to Add None column
- How to Add Account Group column
- How to Add Account Type column
- How to Add Beginning Balance column
- How to Add Budget column
- How to Add Column Calculation column
- How to Add Credit column
- How to Add Credit Units column
- How to Add Debit column
- How to Add Debit Units column
- How to Add Ending Balance column
- How to Add Filter Accounts column
- How to Add GL Amounts column
- How to Add Percentage column
- How to Add Row ID column
- How to Add Row Name column
- How to Add Units column
- How to Add Units Description column
- A new row will be available in the grid section.
- In the Column Description field, enter the name you would like to call the column. The value entered in this field may show on your financial report, granted the caption for that column is set to Column Header. This is discussed more on How to Add Description Title Row.
- In the Caption field, select the type of caption you want for the column. This is discussed more on How to Add Description Title Row.
- In the Column Type field, select a type for the column.
- In the Filter Type field, select a date filter for the column. Notice, in the combo box list, the Start and End Dates are shown, which are based on the Run Date selected.
- The Related Columns field is relevant only on the Column Calculation and Ending Balance column types. This is discussed more on How to Configure Formula for Column Calculation column.
- The Segment Used field is relevant only on the Segment Filter column type. This is discussed more on How to add Segment Filter column.
- The Budget Code field is relevant only on the Budget column type. This is discussed more on How to add Budget column.
- The Start and End Date fields are to be used only on column that has Filter Type of Custom.
- In the Width field, set it to your desired column width. By default it is set to 160 pixels, which is approximately 1 1/4 inches.
- In the Alignment field, set how the value for the column be displayed.
- Select Center if you want it Centered
- Select Left if you want it Left Aligned
- Select Right if you want it Right aligned
- In the Format field, assign how the numbers be shown in the column. Will it have decimals, money sign or in percentage format.
- Check Hidden checkbox if you don't want the column be shown on the report. This is useful if you need a column that will be part of the formula of another column and you just need to derive the numbers extracted from that column to build the formula. This is discussed more on How Hidden checkbox works when enabled .
This is a sample of column designer record where columns are added and configured. Boxed in red is the grid section.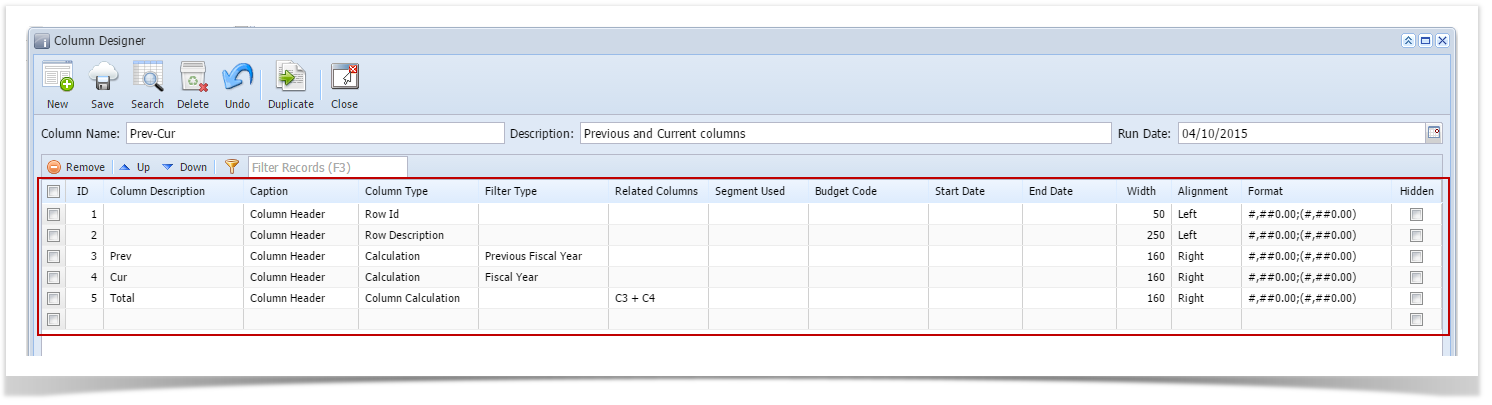
The following will guide you on how to add and configure columns of your column designer.
- How to Add None column
- How to Add Account Group column
- How to Add Account Type column
- How to Add Beginning Balance column
- How to Add Budget column
- How to Add Column Calculation column
- How to Add Credit column
- How to Add Credit Units column
- How to Add Debit column
- How to Add Debit Units column
- How to Add Ending Balance column
- How to Add Filter Accounts column
- How to Add GL Amounts column
- How to Add Percentage column
- How to Add Row ID column
- How to Add Row Name column
- How to Add Units column
- How to Add Units Description column
- A new row will be available in the grid section.
- In the Column Header field, enter the name you would like to call the column. The value entered in this field may show on your financial report, granted the caption for that column is set to Column Header. This is discussed more on How to Add Description Title Row.
- In the Caption field, select the type of caption you want for the column. This is discussed more on How to Add Description Title Row.
- In the Column Type field, select a type for the column.
- In the Filter Type field, select a date filter for the column. Notice that the Start and End Dates are shown, which are based on the Run Date selected.
- The Related Columns field is relevant only on the Column Calculation column type. This is discussed more on How to Configure Formula for Column Calculation column.
- The Start and End Date fields are to be used only on column that has Filter Type of Custom.
- In the Width field, set it to your desired column width. By default it is set to 160 pixels, which is approximately 1 1/4 inches.
- In the Alignment field, set how the value for the column be displayed.
- Select Center if you want it Centered
- Select Left if you want it Left Aligned
- Select Right if you want it Right aligned
- In the Format field, assign how the numbers be shown in the column. Will it have decimals, money sign or in percentage format.
- Check Hidden checkbox if you don't want the column be shown on report. This is useful if you need a column that will be part of the formula of another column and you just need to derive the numbers extracted from that column to build the formula. This is discussed more on How Hidden checkbox works when enabled .
This is a sample of column designer record where columns are added and configured. Boxed in red is the grid section.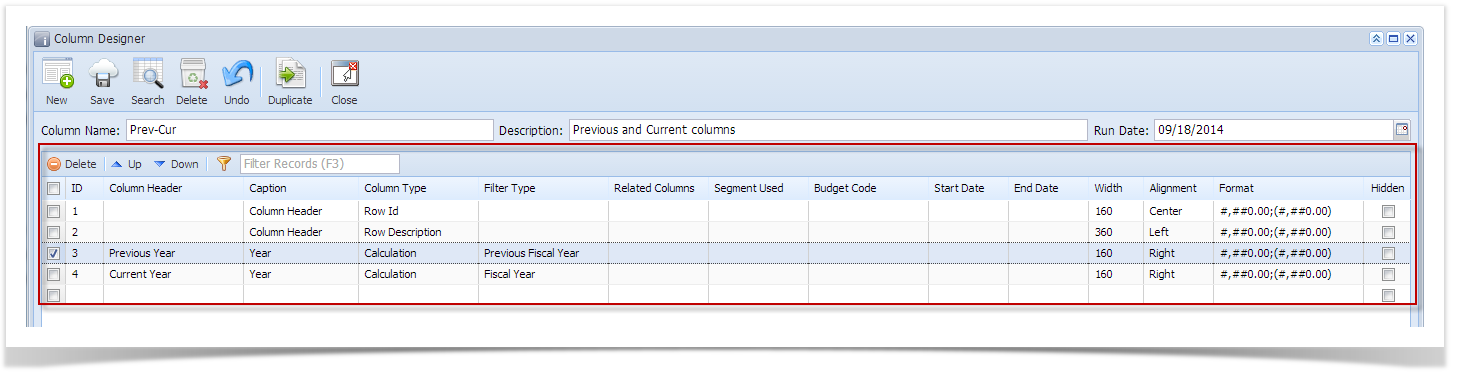
The following will guide you on how to add and configure columns of your column designer.
- How to Add None column
- How to Add Account Group column
- How to Add Account Type column
- How to Add Beginning Balance column
- How to Add Budget column
- How to Add Column Calculation column
- How to Add Credit column
- How to Add Credit Units column
- How to Add Debit column
- How to Add Debit Units column
- How to Add Ending Balance column
- How to Add Filter Accounts column
- How to Add GL Amounts column
- How to Add Percentage column
- How to Add Row ID column
- How to Add Row Name column
- How to Add Units column
- How to Add Units Description column
Overview
Content Tools