What is ACH?
It generally refers to Direct Deposit or other electronic payments.
The Automated Clearing House (ACH) is an electronic network for financial transactions. ACH processes large volumes of both credit and debit transactions which are originated in batches.
ACH credit transfers include direct-deposit payroll payments and payments to contractors and vendors. ACH debit transfers include consumer payments on insurance premiums, mortgage loans, and other kinds of bills. Businesses are also increasingly using ACH to collect from customers online, rather than accepting credit or debit cards.
- From Cash Management > click on Bank File Formats
- If this is a first record, it will default to new Bank File Formats screen to add the bank file format record. Otherwise, it will open the Search Bank File Formats search screen. Click the New toolbar button to open the new Bank File Formats screen.
- In new Bank File Formats screen,
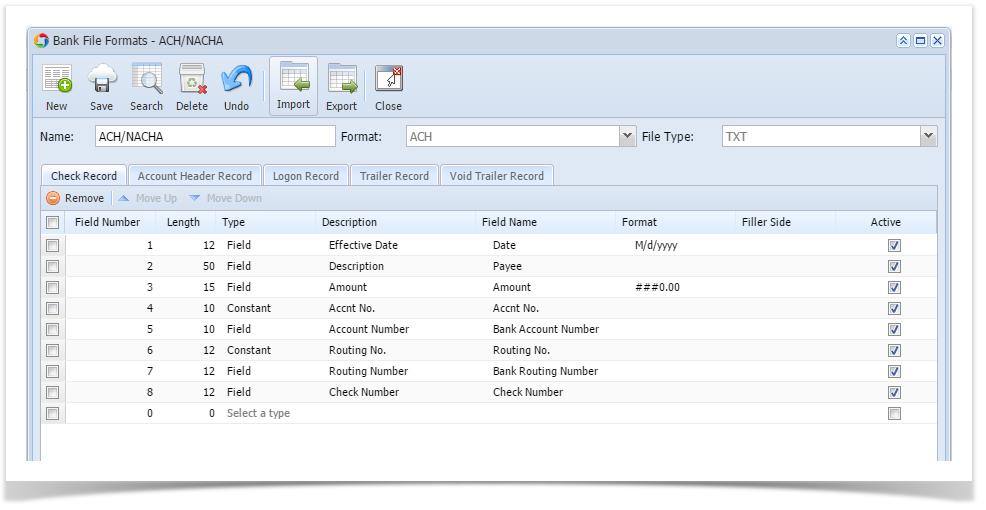
- Fill in the Name to call the Bank File Formats record in the Name field.
i.e. ACH/NACHA - In Format combo box field select ACH.
- In File Type combo box field select TXT.
- In the grid area > Check Record tab, specify your ACH setup. This is an example how a setup would be.
- In the grid area > Account Header Record tab, specify your ACH setup. This is an example of how a setup would be.

- Click Save toolbar button to save the bank file format record.
- Click Close toolbar button to close the screen.
4. From Cash Management > click on Bank Accounts.
a. Under Electronic Bank File Information, select the bank file format "ACH/NACHA" created from step 3.
b. Click Save toolbar button to save the bank accounts record.
c. Click Close toolbar button to close the screen.
5. From Common Info > click on Payment Methods, add ACH
a. Click Save toolbar button to save the bank accounts record.
b. Click Close toolbar button to close the screen.
6. From Purchasing > click on Vendors
7. If this is a first record, it will default to new Entity screen to add the entity type of the new record.
i.e. Vendor
Otherwise, it will open the Vendor Entity search screen.
8. Click the New toolbar button to open Create New Entity screen. Or select from the lists of vendors.
9. When the new entity is added, click on "Additional toolbar button", and select EFT Information.
10. In the EFT Information scree,
a. In Bank Name combo box field, select the Bank.
b. In Account No: box field, input the account number.
c. In Account Type combo box field, select either Checking or Savings.
d. In Account Classification combox box field, select either Corporate or Personal.
e. In Effetive Date combo box field, must be equal to or greater than the current date.
f. In Print Notifications, select enable or disable.
g. Active should be enabled.
h. In Pull A/R by combo box field. select either Statement Amount, Budget Amount, or Invoice by Terms.
i. In Pull Tax Separately, select enable or disable.
j. In Refund Budget Credits, select enable or disable.
k. In Prenote sent, select enable or disable.
l. Click Save toolbar button to save the EFT Information record.
m. Click Close toolbar button to close the screen.
11. From Cash Management > click on Bank File Export
a. Select the bank account you wish to generate the ACH file from.
b. To filter the transaction record/s, click on From and To fied.
c. Select ACH or NACHA on Type field.
d. Select the transaction/s on the grid to generate. The selected transaction will be process and will automatically download the generated file.
- Fill in the Name to call the Bank File Formats record in the Name field.
Overview
Content Tools