What is Positive Pay?
Positive pay is the leading method of check fraud deterrence available today. A positive pay process entails a daily reconcilement of a company's issued checks to checks presented for payment to the Bank to identify potentially fraudulent checks. Upon completion of a check run, a company prepares a formatted checks issued data file (including check number, amount and date as well as other bank and account information) and transmits this data to the bank. Stop payments, voided checks and manual checks can also be included in the formatted checks issued file. When checks are presented for payment against a positive pay protected account selected check information is compared to the checks issued file. Checks presented for payment that fail to match with checks issued by a company are rejected and a "suspect check" list is presented to the company for "pay/no pay" decisions. Suspect checks are resolved before the bank authorizes payment and the company retains the right to reject any checks it believes are fraudulent. In addition to providing you with a method of fraud prevention on your account, the positive pay system can also double as a reconciliation tool. As a result of you providing the bank with a list of issued checks, the bank is able to generate month-end reports that can aid with the reconciliation process. Reports can include a listing of checks paid, checks that were issued and not paid, and checks that had stop payments placed.
- From Cash Management > click on Bank File Formats
- If this is a first record, it will default to new Bank File Formats screen to add the bank file format record. Otherwise, it will open the Search Bank File Formats search screen. Click the New toolbar button to open the new Bank File Formats screen.
- In new Bank File Formats screen,
- Fill in the Name to call the Bank File Formats record in the Name field.
i.e. Positive Pay - In Format combo box field select Positive Pay.
- In File Type combo box field select CSV.
- In the grid area > Check Record tab, specify your Positive Pay setup. This is an example how a setup would be.
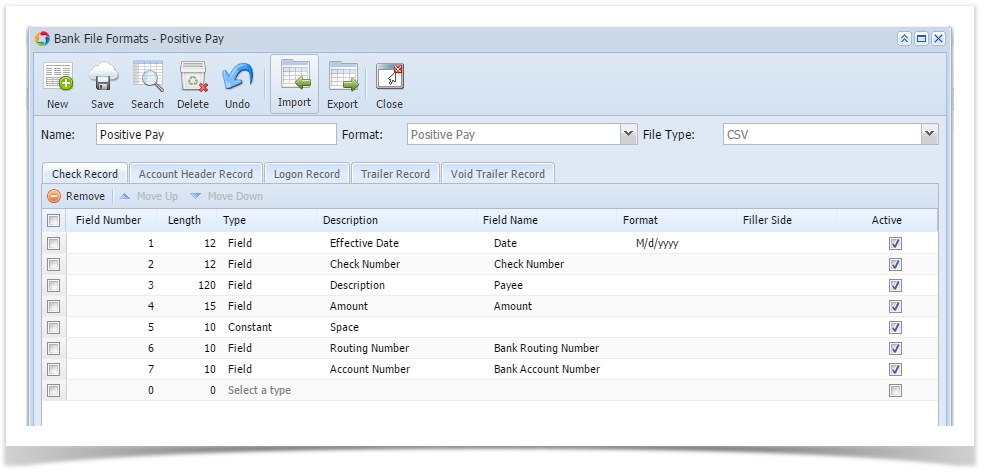
- Click Save toolbar button to save the bank file format record.
- Click Close toolbar button to close the screen.
a. Under Electronic Bank File Information, select the bank file format "Positive Pay" created from step 3.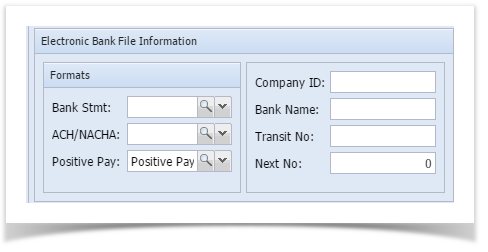
b. Click Save toolbar button to save the bank accounts record.
c. Click Close toolbar button to close the screen.
Note:
Positive Pay transaction should be:
a. Posted
b. Printed
c. Payment Method is not Cash and ACH
5. From Cash Management > click on Bank File Export
a. Select the bank account you wish to generate the file from.
b. To filter the transaction record/s, click on From and To fied.
c. Select Positive Pay on Type field.
d. Select the transaction/s on the grid to generate. The selected transaction will be process and will automatically download the generated file.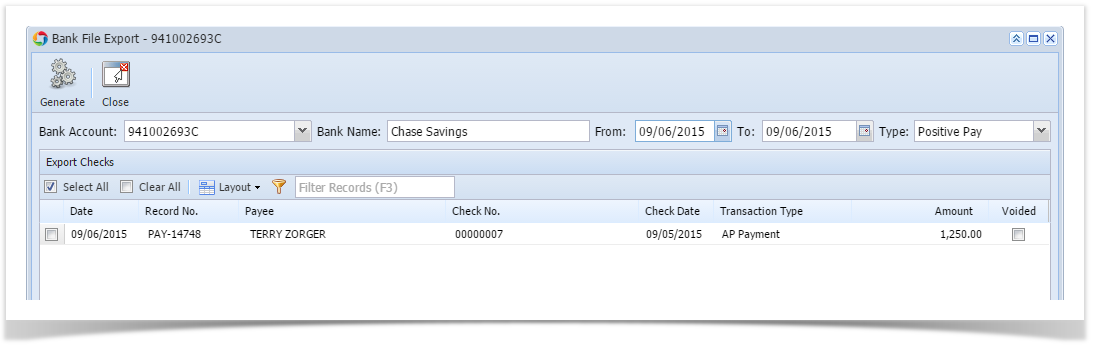
- Fill in the Name to call the Bank File Formats record in the Name field.
Overview
Content Tools