Page History
Details Tab
- The Receipt Order Type field is used to define the type of Inventory Receipt you are to create.
- The Vendor ID field is where you will select the vendor for the Inventory Receipt.
- . There are four IR order types:
- Purchase Contract - when user is processing purchase contracts to inventory receipts.
- Purchase Order - when user is processing purchase orders to inventory receipts.
- Transfer Order - When user is processing Inventory Transfer (Shipment required)
- Direct - when user is directly processing inventory receipt without creating purchase contract, purchase orders or transfer orders.
- The Source Type field determines the source of the receipt. Below are the source types of each order type in IR:
- Purchase Contract
- None - contract is directly from Contract Management.
- Scale - contract is from Scale module.
- Inbound Shipment - contract is from Logistics module.
- Transport - contract is from Transports module.
- Settle Storage - contract is from grains module.
- Delivery Sheet - contract is from grains module.
- Purchase Order
- None - purchase order always come from Purchasing AP.
- Transfer Order
- None - transfer order always come from Inventory Transfer screen.
- Direct
- None - directly created from inventory receipt screen itself.
- Purchase Contract
- The Vendor field is used to identify the vendor of the item/s that will be received.
- The Ship From field is used to determine the vendor location where the items will be coming fromThe Vendor Name field will automatically be filled with the selected vendor from Vendor ID field. This field is disabled.
The Location field is used to select the location to where the item be stored. If you would like to always use your user's Location when creating Inventory Receipt, then setup the Default Location from the Users screen.
System Manager > Users > select your user > in the Default Location field select your default location.
- The Receipt Date field will default to today's date. Change this as needed.
- The Currency field will default to the currency setup from Vendor selected.
- The Receipt No field will show 'Created on Save' on new Inventory Receipt. This will be changed to a generated transaction number from Starting Numbers screen once record is saved. This Starting Numbers screen can be opened from System Manager module > Starting Numbers menu > select Inventory in the Modules panel > Inventory Receipt.
- Source Type is disabled by default with this type.
- Enter Blanket Release No. Enter Vendor Ref No if you have this information.
- Enter BOL No. (Bill of Lading No.).
- Warehouse Ref No. - to identify warehouse reference number of the items.
- Receiver field to identify the receiver of the items from the companyIn the Ship From field select Vendor's location where the items will be coming from.
- The Ship Via field will default to selected Vendor's location Ship Via setup.
- The Receiver field will show the current logged user's User Name.
- Select Freight Terms. Based from the Freight Terms selected, the FOB Point field is filled in.
- In the Vessel field enter the Vessel info if you have this information.
- In the Tax Group field, select a Tax Group if tax applies to this Inventory Receipt transaction.
- Enter Shift Number if you have this information.
- In the Item grid select items to receive. See the following topics to guide you on how to add items.
- Fill up other remaining fields as necessary.
- Save or Receive/post the transaction.
> You can click the Save toolbar button to save it. In case you miss to click this button and you click the Close toolbar button or the x button at the top right corner of the screen, i21 will prompt you if you would like to save it before closing the screen.
>To guide you on how to Receive/Post the transaction, see How to Post/Receive Inventory Receipt.
Item grid
- Last Free whse Date field - this is usef for manufacturing purposes.
Item grid
The Item No field is used to select Item Items available based on Location field selected.
Expand title Note: For an item to be available in Inventory Receipt > Item No. combo box, make sure that the location selected in Inventory Receipt > Location field was added to the item (Item screen > Setup tab > Location tab).

The Description field will show the item description entered from Item screen.
- Charges Link Field - is used to link and identify the other charges for the line item.
In the Receipt UOM fieldQty Field, specify the Quantity and UOM when receiving the item.
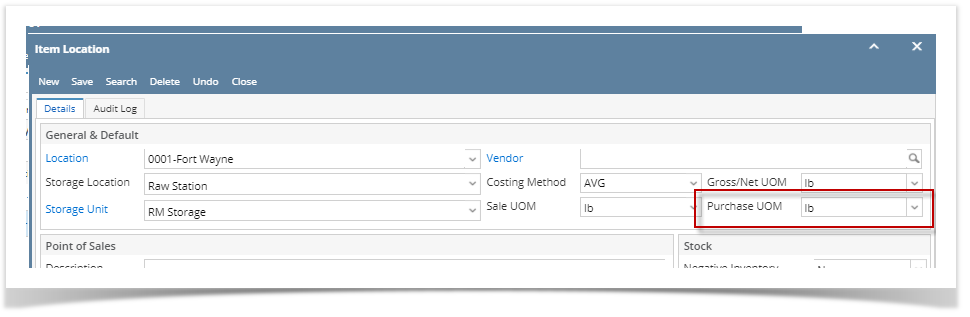
In the Qty to Receive field, enter quantity of item to receiveExpand title By default It will get the UOM setup from Item screen > Setup tab > Location tab > select the Location used in the Inventory Receipt and click View to open the Item Location screen > Purchase UOM.
- Currency Unit field - identify the currency used for the line item.
- The Cost will default to a cost from Last Cost field of Item screen > Pricing tab > Last Cost field. Enter a new cost if necessary.
The Cost UOM will default to the selected Receipt UOM. Change this if necessary.
Expand title Note: Changing the Cost UOM will update the Cost field since these 2 fields are directly connected. The cost to show in the Cost field is the cost per UOM selected from Cost UOM.
The
Tax field will show the tax computed for the item. In this example, since no tax is assigned from the Tax Group field then it will show 0.00.The Gross/Net UOM will default to blank. Select a UOM on this field if you would like to use Gross and Net weights and calculate Line total using the Net weight. Else leave it blank.
Then Gross and Net fields will be computed automatically. See How Gross and Net Quantities are computedComputed.
The Line Total field is computed automatically.
- Tax Group field - will show the tax group used for the item. Depending on the tax setup of the item.
- The Tax field will show the tax computed for the item. In this example, since no tax is assigned from the Tax Group field then it will show 0.00.
- Forex Rate Type field - used for receipts using foreign currency (currency which is not the functional currency of the company). will display automatically from company info setup.
- Forex Rate field - will display the rate from forex rate type setup.
Select Sub Location and Storage Location for the item to receive.
- Discount schedule field - will display the discount schedule from item setup. Grade field
- The Unit Retail field will show the value entered for the item from Item screen > Retail Price for the selected Location.
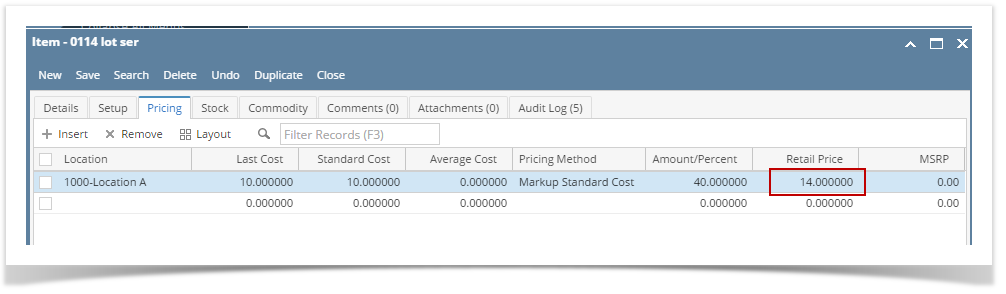
- The Gross Margin field will show a number computed as (Unit Retail - Unit Cost) / Unit Retail.
- The Ownership Type field is shown only when Receipt Type is Direct. This field is defaulted to Own. Change this field as needed.
- The Lot Tracking field will show whether the item is:
- No for Non-lot item
- Yes- Serial Number for Lot Item that generates serial number when receiving item.
- Yes- Manual for Lot Item that asks you to manually enter the serial number when receiving item.
...
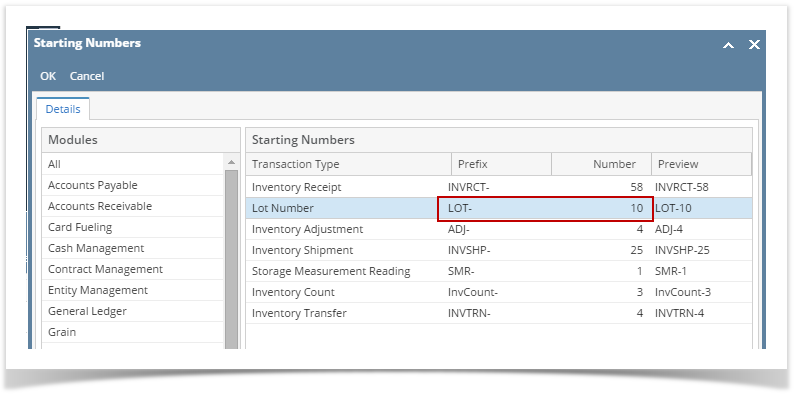
- The Lot Number field is where you enter the Lot Number when item selected from the Item grid is Lot Tracked - Manual. If item selected from the Item grids is Lot Tracked - Serial Number, leave this blank. The system will generate the serial number as you receive the item. Serial Number generated will take the predefined serial number from Starting Numbers screen > Inventory > Lot Number.
- The Lot Alias number
- The Lot UOM field is defaulted by the UOM selected from Gross/Net UOM in the Item grid. Change this as you feel necessary.
- The Quantity field is used to enter the quantity to be received for the selected Lot Number and Lot UOM.
- In the Gross field enter the Gross qty by the Lot Weight UOM.
- In the Tare field enter the tare value by the Lot Weight UOM.
- The Net field will automatically be computed as Gross - Tare.
- The Lot Wgt UOM field will default to the UOM selected from Item grid > Gross/Net UOM for the selected item. You will not be able to change this since this field is read-only.
- The Storage Location field will default to the Storage Location selcted from Item grid > Storage Location for the selected item. You will not be able to change this since this field is read-only.
- The Expiry Date field is used to define the selected lot number's expiration date.
- The Units/Pallet field
- The Stated Gross Per UnitUnit field
- The Stated Tare Per UnitUnit field
- The Stated Net Per UnitUnit field
- The Stated Total NetNet field
- The Phy. Vs. StatedStated field
- The Parent Lot NumberNumber field
- The Container No. field
- The GardenGarden field
- The GradeGrade field
- The OriginOrigin field
- The Season / Crop YearYear field
- The Vendor Lot IDID field
- The Manufactured DateDate field
- The RemarksRemarks field
- The ConditionCondition field
- The CertifiedCertified field
Overview
Content Tools