Page History
If you have licensed the AAD SSO add-on from iRely, then you need to do the following to get it configured for your instance of iRely i21. Please note, Azure Active Directory has been renamed to Microsoft Entra ID.
Below are the 4 3 steps that are required.
Step 1 - Create an i21 Azure Group (User Role)
This group will contain users that will have access to i21 and will serve as their user role.
- Log into your Azure Active Directoryyour Azure Portal as an Administrator.
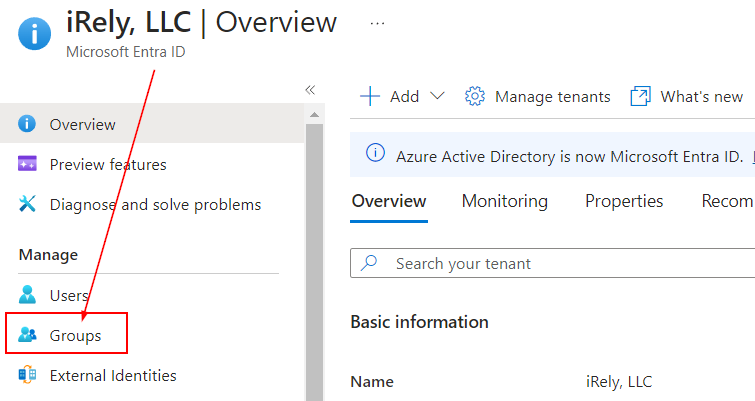
- Select Microsoft Entra ID (previously named Azure Active Directory).
- Click Groups
- Click New group
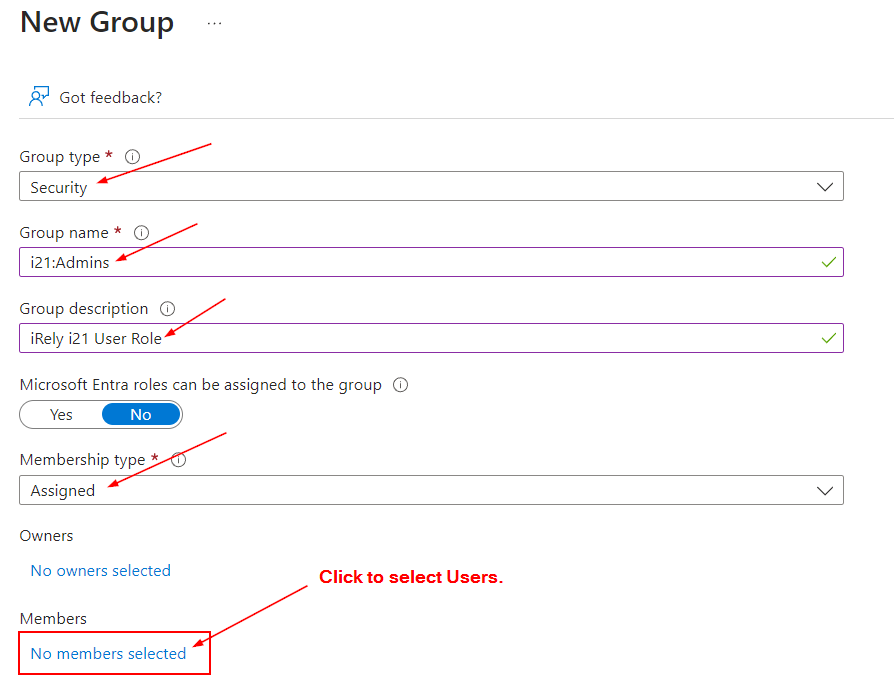
- Enter the following for the New Group:
- Group type = Security
Group name = i21:[i21UserRole]
- Replace [i21UserRole] with any roles from i21. E.g. i21:PETRO ADMIN. Anything after "i21:" will be the role of the users in this group.
- Group description = Enter any description you want for this group.
- Membership type = Assigned
- Under Members, click No members selected hyperlink then add members/users.
- Click Create
- Add all of the 365 accounts that correspond to the active i21 users.


Step 2 - App Registration
- Go to Azure Active Directory
- Click Select App registrations then New registration.
- In the Register an application form, enter the following:
- Name = iRely i21
- Supported account types = Accounts in this organizational directory only (single tenant)
- Important: Follow the steps below depending on what version of iRely i21 you are running.
- iRely i21 version 23.1 and Prior:
- Redirect URI (web) = The URL of the i21 plus /identityserver
- iRely i21 version 24.1 and newer:
- Redirect URI (web) = The URL of the i21 plus /signin-oidc
- E.g. https://helpdesk.irely.com/signin-oidc
- Note: This is case sensitive.
- iRely i21 version 23.1 and Prior:
- Click Register


- Go back to App registrations and select the app that you have just created (iRely i21)
- Click Certificates & secrets and create a Secret

- Copy the Important: Make sure you copy the "value" field of the client secret value and save it locally because you won't be able to read it again after you leave this page.

- Under API permissions, verify that the following are present especially those underlined ones. If not, add those permissions.
- Group.Read.All
- User.Read.All

- Under Authentication, make sure the Access Tokens and ID Tokens checkboxes are checked.
- Ensure your Web Redirect URIs are correct.


Step 3 - Send the following details to iRely
- Go to Azure Active Directory
- Select App registrations and select iRely i21 from the list.
- Copy the following values from the Overview and Certificates & secrets section and provide them to iRely in your help desk ticket.
- See below screenshots for more details on where to find these values.
- Application (client) ID
- Directory (tenant) ID
- Secret Secret


Step 4 - Mapping existing i21 users to Azure Active Directory users
- The Secret value is what you saved to text in the above steps.
- Login as an admin user
- Go to System Manager > Users
- On Search Users screen, click Map Active Directory Users
- On Map Active Directory Users screen, click Template. This will download the template for mapping users.
- Open the template map_activedirectory_users_template.csv
- on i21UserName column, enter the username of the i21 user that you want to map to an Azure AD user
- on ExternalUserName column, enter the email/username of the Azure AD user that you want to map to an i21 user (i21UserName)
- Repeat these steps for multiple user mapping
- Note: i21UserName and ExternalUserName are case sensitive
- Save the file
- On Map Active Directory Users screen, click Browse... and search for the template then click Map
- That should map all the users you entered in the temple
- Note: If for some reason the app redirects you to the same login page, check that the IIS application path is the same as the one you entered on the ApplicationPath and on the AzureADRedirectUri field (case sensitive).
Example: - The IIS application is BoldBIi21 and so the ApplicationPath must be the same and AzureADRedirectUri must be something like https://qc.irely.com/iRelyApp/identityserver/.
-

- The same URI must be configured in Azure Active Directory Redirect URIs.
-


Overview
Content Tools