1. Download and install Wamp.
A. Download the installer here https://sourceforge.net/projects/wampserver/
B. If you encounter the below Popup message, click Yes and proceed to installation wizard.
C. Installer is simple and straight forward. Keep moving ahead by clicking next button on the wizard.
D. Click Install and towards the end of the installation there's a popup message that will appear, just click No for the browser and notepad.
E. Just continue on installing and once the installation is done just click Finish.
2. Create folder
A. C:\wamp\www\scanner
3. Download latest index.php:
A. Version - Windows CE (Motorola) - Low Screen Resolution
- Save this file(right click and Save link as) index.php in C:\wamp\www\scanner folder
B. Version - Android - High Screen Resolution
- Save this file(right click and Save link as) index-04-10-2019.php in C:\wamp\www\scanner folder
- Rename index.php
4. Configure Wamp
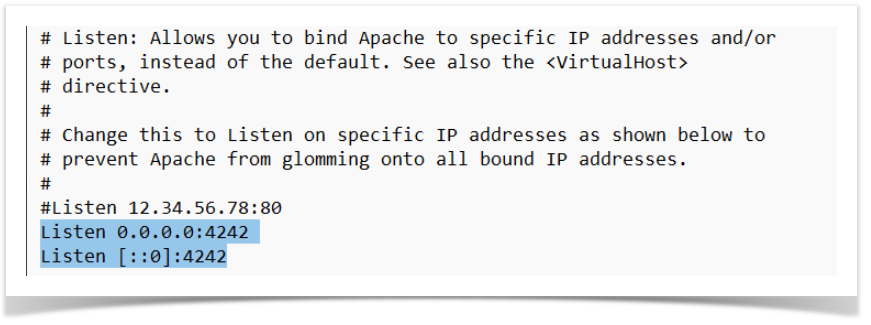
A. Open C:\wamp\bin\apache\apache2.4.54.2\conf\httpd.conf file in Notepad/Notepad++
a. Search for Listen 0.0.0.0:80 and Listen [::0]:80 and Replace both 80 with 4242
b. Open C:\wamp\bin\mysql\mysql8.0.31\my.ini file in Notepad/Notepad++
B. a. Search for innodb_flush_log_at_trx_commit=1 and change to innodb_flush_log_at_trx_commit=0
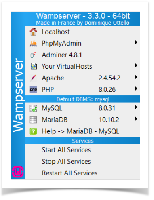
5. Start WampServer on your machine and make sure all three services are running.
A. The WampServer icon will appear green when all the services are running, it will appear orange if it's not and appear red if there's none.
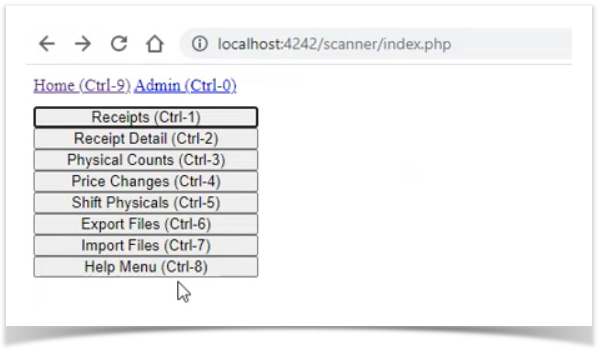
6. Verify that Scanner Web Page is accessible
A. Click on http://localhost:4242/scanner/index.php
7. Update configuration
- Should open on first time launching the website
- Admin > Options
- Font Size
- Windows CE (Motorola) - Low Screen Resolution
- Adjust Font Size as needed - recommend starting size at 13
- Android - High Screen Resolution
- Adjust Font Size as needed - recommend starting size 25
- Windows CE (Motorola) - Low Screen Resolution
- Set Default Export Directory
- c:/irely/import
- Set Default Default Import File
- c:/irely/import/HHPBKMST.TXT
- Set Default Shift Import File
- c:/irely/import/HHPHYMST.TXT
8. Create Dummy HHPHYMST.TXT (not created in i21)
A. Empty file in c:\irely\import\HHPHYMST.TXT
9. Verify that website is not being blocked by firewall for incoming connections
10. Verify that wamp is running on startup
11. After all setup is complete you should be able to see menu on the scanner web page as below.
Overview
Content Tools