Page History
The Lot Selector displays all details of the selected Lot which is to be added to the Blend Sheet. Data is loaded into this section once you double-click any of the Lots in the Available Lots section as shown in the highlighted area of the following screen shot. On clicking the Add button, data is loaded into the Blend Sheet section.
- The Lot Selector displays all details of the selected Lot which is to be added to the Blend Sheet.
- Lot selector section is displayed as below.
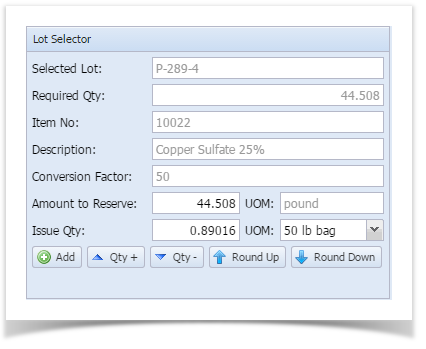
- This Section displays the following data:
Sl.No Column Description 1 Selected Lot Displays the selected lot 2 Required Qty Displays the Required Qty 3 Item No Input material 4 Description Input material description 5 Conversion Factor Displays weight per unit 6 Amount to Reserve Quantity to reserve for Blend Sheet 7 Issue Qty Quantity to add to the blend sheet - Following display control will be used to adjust the "Amount to Reserve" and "Issue Qty"
Button Description 
Allows the user to increase the ‘Issue Quantity’ by 1 and ‘Amount to Reserve’ appropriately based on UOM 
Allows the user to decrease the ‘Issue Quantity’ by 1 and ‘Amount to Reserve’ appropriately based on UOM 
Allows the user to round off the ‘Issue Quantity’ to the upwards 
Allows the user to round off the ‘Issue Quantity’ to the downwards 
Allows the user to create a new Blend Sheet NOTE: Clicking ‘Add’ button adds the selected quantity to the ‘Blend Sheet’.
Overview
Content Tools