| Description | | How To |
|---|
| Create Inventory UOM | | Go to Inventory > Inventory UOM |
| | | Click New toolbar button to add inventory UOM. |
| | | Add Stock UOM. Example: pound - Enter Unit Measure, Symbol and Unit Type.
- Click Save.
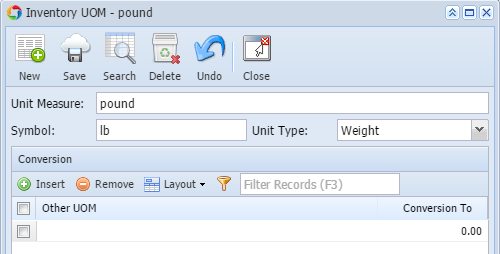
Note: Stock UOM is the basis of conversion to other UOMs. |
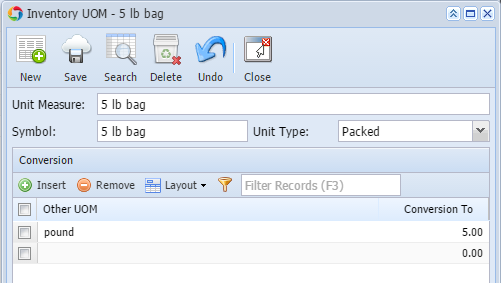
| | | Click New toolbar button to add another inventory UOM. |
| | | Add Other UOM - 5-lb bag - Enter Unit Measure, Symbol.
- Select Packed in the Unit Type field.
- In the Other UOM field select the Stock UOM, in our example pound.
- In the Conversion To field enter how many pounds in a 5-lb bag.
- Click Save.
|
| | | Click New toolbar button to add another inventory UOM. |
| | | Add Other UOM - 10-lb bag - Enter Unit Measure and Symbol.
- Select Packed in the Unit Type field.
- In the Other UOM field select the Stock UOM, in our example pound.
- In the Conversion To field enter how many pounds in a 5-lb bag.

|
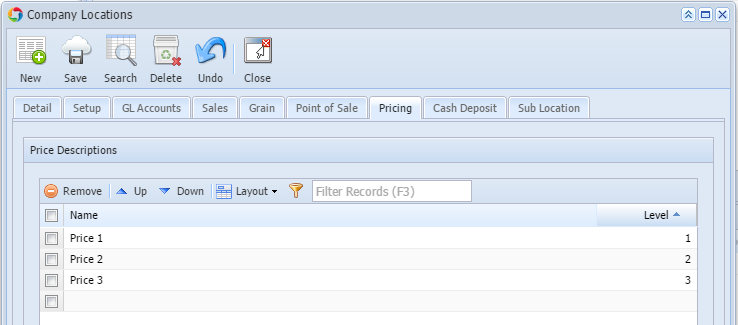
| Create Pricing Level | | Go to Common Info > Company Locations |
| | | In a selected Company Location go to Pricing tab. |
| | | Add Pricing. - In the Name field enter a name for the pricing.
- As soon as Name is added, Level field will automatically be filled with a number.
|
| Create Sub Location | | Go to Common Info > Company Locations |
| | | In a selected Company Location go to Sub Location tab. |
| | | Add Sub Location. 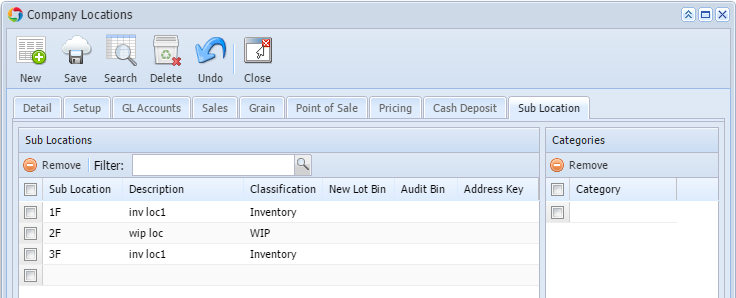
|
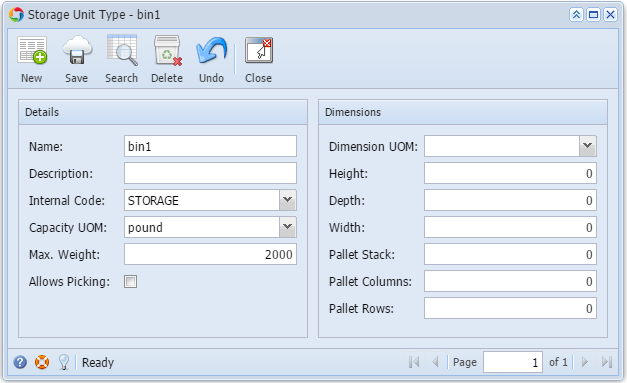
| Create Storage Unit | | Go to Inventory > Storage Unit Types |
| | | Click New toolbar button to add Storage Unit. |
| | | Add a Storage Unit Type. - Enter the Name and Description.
- In the Internal Code field select what this bin is for.
- Select the Capacity UOM.
- Enter Max Weight for the storage unit type.
- Fill in other information you feel necessary.
- Click Save and Close.
|
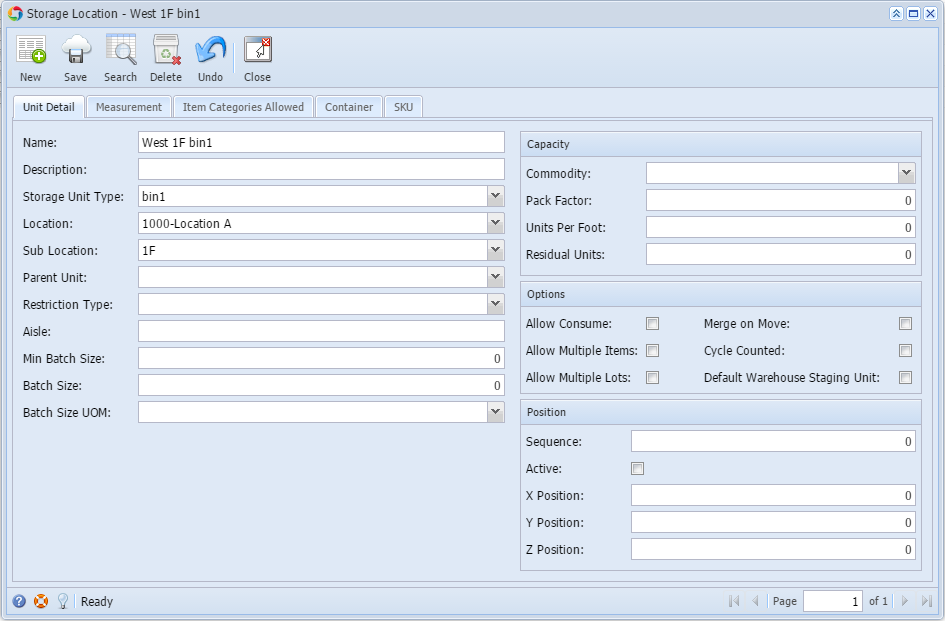
| Create Storage Locations | | Go to Inventory > Storage Locations |
| | | Click New toolbar button to add Storage Location. |
| | | Add Storage Location. - Enter Name and Description.
- Select Storage Unit Type.
- Select Location.
- Select Sub Location
- Fill in other information you feel necessary.
- Click Save and close.
|
| Create item | Item is lot tracked - yes - serial number | Go to Inventory > Items |
| | | Click New toolbar button to add Item. |
| | | Add new item. - Enter Item No and Description.
- In the Type field select the item type. In this example, let's use Inventory.
- In the Lot Tracking field select Yes - Serial Number
Add Unit of Measure for the item. - Click Insert button.
- Select the Stock UOM, in this example: pound, and check the Stock Unit checkbox.
- Select Other UOMs.
Notice that as you add other UOMs, the Unit Qty is automatically updated with the converted qty. That is why it is recommended that you setup your Inventory UOMs properly so that when you add it to your item, the system will calculate/convert it for you. This will save you extra step with entering/converting the qty per uom added. 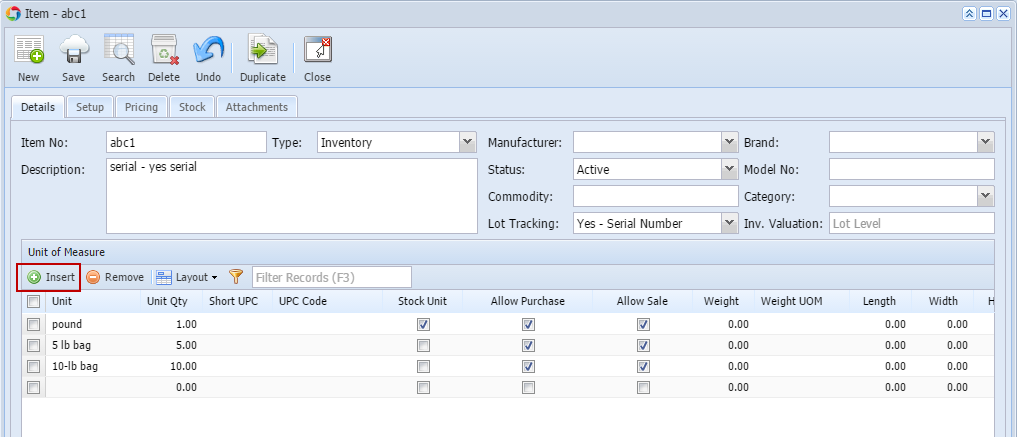
|
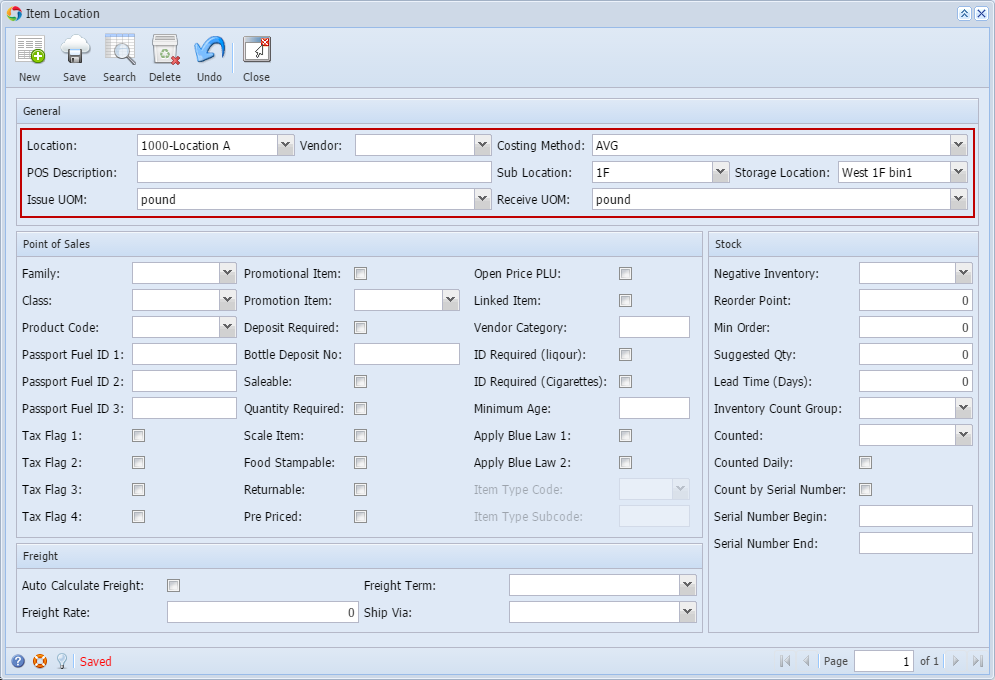
| | | Add Location/s for the item. - Locations are where the items are physically stored.
- Go to Setup tab > Location tab.
- Click Insert button.
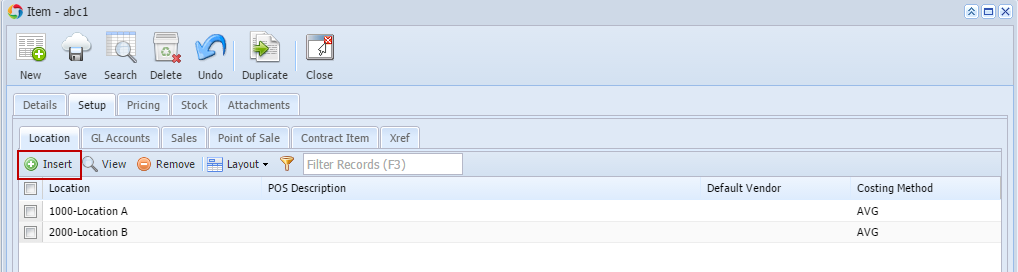
- Select the location.
- In the Costing Method field select the costing method for the item.
- Select the Sub Location.
- Select the Storage Location.
- In the Issue UOM field select the default UOM for the item when creating Sales Order, Quote, Invoice and Inventory Shipment.
- In the Receive UOM select the default UOM for the item when creating Purchase Order, Bill and Inventory Receipt.
- Fill in all other information you feel necessary.
- Click Save and Close.
|
| | | Add GL Account defaults for the item. - GL Account defaults are accounts defined to automatically assign Account Ids to a transaction then is being used when posting transactions to the General Ledger Detail.
- Go to Setup tab > GL Accounts tab.
- Click Insert button.
- Select Account Category and assign Account Id for that category.
Note: The following Account Categories are required based on transaction you create.- Inventory Receipt
- Inventory account category
- AP Clearing account category
- Inventory Shipment
- Inventory In-Transit account category
- Inventory account category
- Invoice
- Cost of Goods Sold account category
- Inventory In-Transit account category
- Sales account category
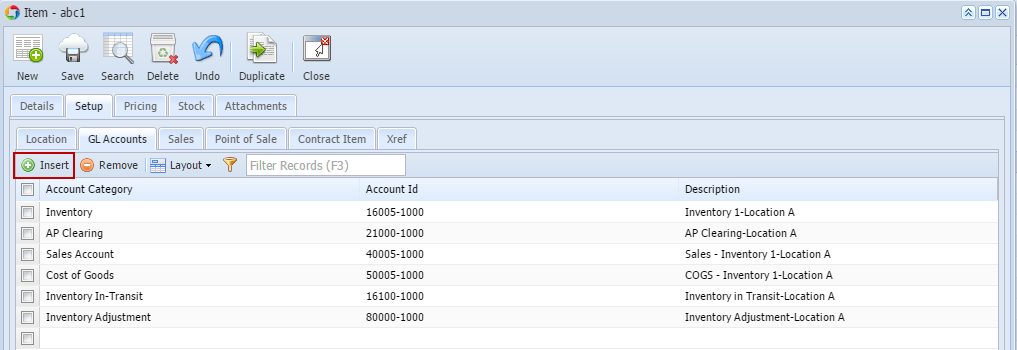
Also, for the Account Id to be selected, you will have to assign the Account Category to the Account ID. 
|
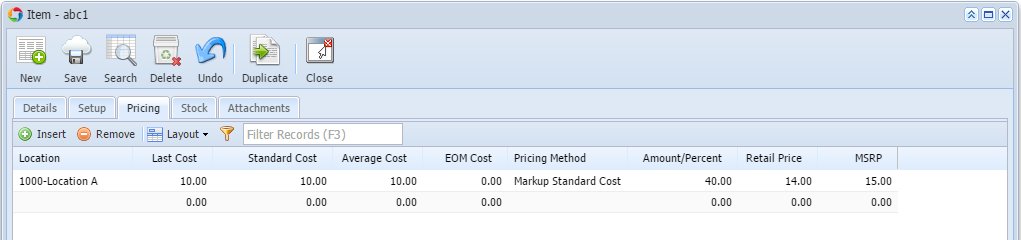
| | | Add Pricing for the item. - Pricing may vary by location that is why pricing information can be setup per location.
- Go to Pricing tab.
- Select a Location
- Enter Last Cost. If this is a new item entry, then it is recommended to enter a value the same with Standard Cost. This field will be updated by the cost of the item when received.
- Enter Standard Cost.
- Select a Pricing Method.
- Enter Amount/Percent based on selected Pricing Method.
- Retail Price will then be updated with a price based on Standard/Last Cost, Pricing Method and Amount/Percent.
- Enter MSRP.
|
| | | Add Pricing Level for the item. - Pricing Level is used to setup Pricing for the item that is off by a certain percentage/amount of the Retail Price. This is a pricing scheme to attract customers from purchasing items in volume/bulk. The more they purchase, the more they get a bigger discount.
- Go to Pricing tab > Pricing Level.
- Select Location.
- Select Price Level.
- Select UOM.
- Enter Min and Max qty.
- Select Pricing Method.
- Enter Amount/Percent based on selected Pricing Method.
- Unit Price will then be updated with a price based on Retail Price (if UOM selected is not Stock UOM, then Retail Price is converted on that Other UOM), Pricing Method and Amount/Percent.
- In the Commission On field select where to base the commission.
- In the Comm Amount/Percent enter the commission amount or percentage.
- Click Save and Close.

|
| Use Item in a transaction | | |
| Create Inventory Receipt | | |
| | Create Inventory Receipt directly | Go to Inventory > Inventory Receipts |
| | | Click New toolbar button to add Inventory Receipt. |
| | | Add Inventory Receipt. - In the Receipt Type select Direct.
- In the Vendor ID field select a vendor.
- Select a Location.
- Fill in other information you feel necessary.
- In the grid select item/s.
- In the Item No. field select the item.
- The Receipt UOM field will be defaulted to the UOM set in the Item Location > Receive UOM. Change this as necessary.
- Enter Qty to Receive.
- Select Lot Wgt UOM.
- The Cost field will show the Last Cost entered for the item.
- Select a Sub Location to where the item will be placed when received.
- Highlight the item. The Lot Tracking grid will be shown.
- Leave Lot Number field blank. Lot Number will be automatically generated for item that is Lot Tracked - Yes-Serial Number.
- Select Lot UOM.
- In the Quantity field enter the Quantity to be received and press enter.
- Enter Tare value if there is. The Net will automatically be computed.
- Enter Expiry Date.
- Select Storage Location.
- Click Receive toolbar button to receive the items.
Notice that Lot Numbers are assigned for each line item in the Lot Tracking grid. 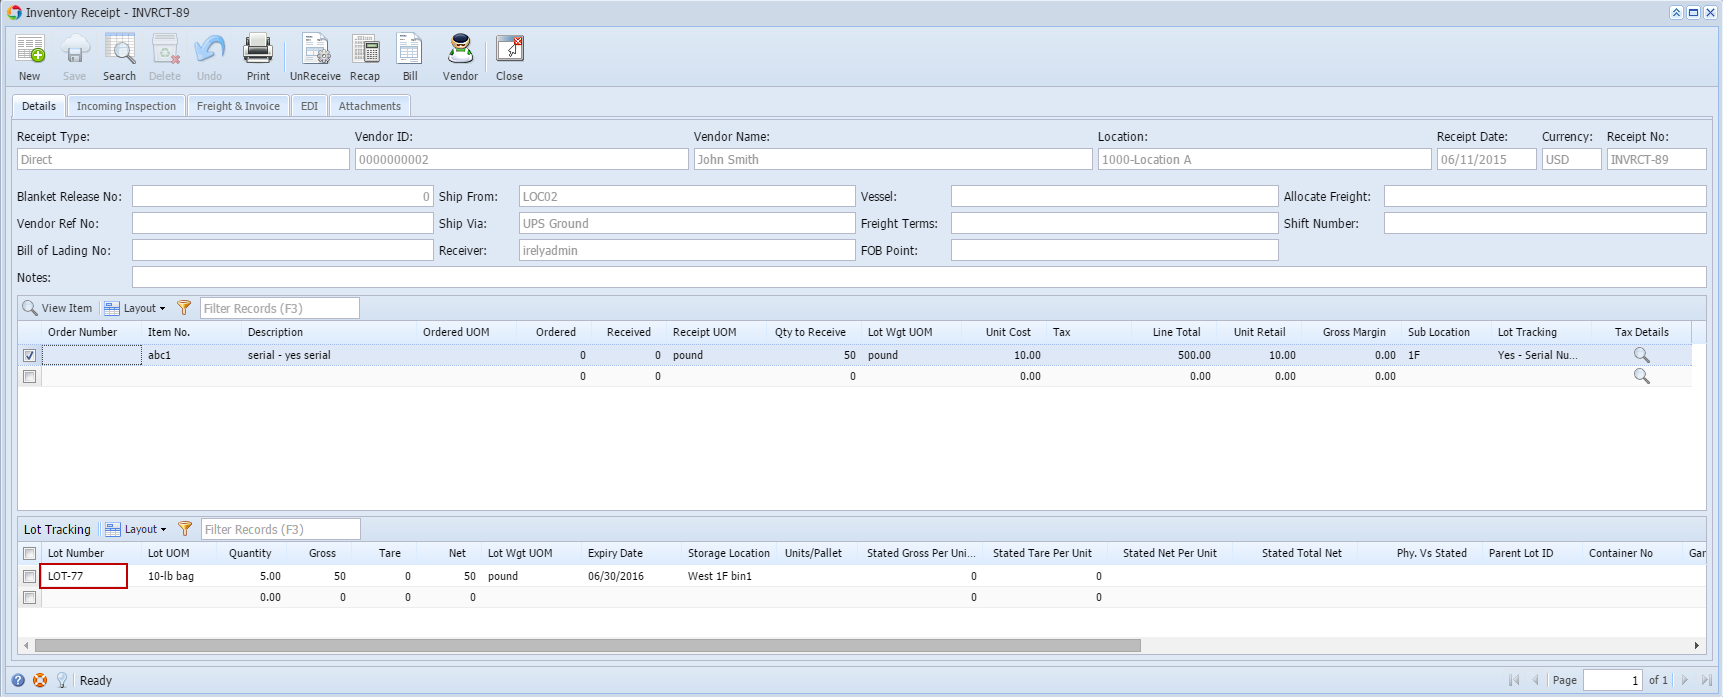
The Lot Number generated is from Starting Numbers screen setup. 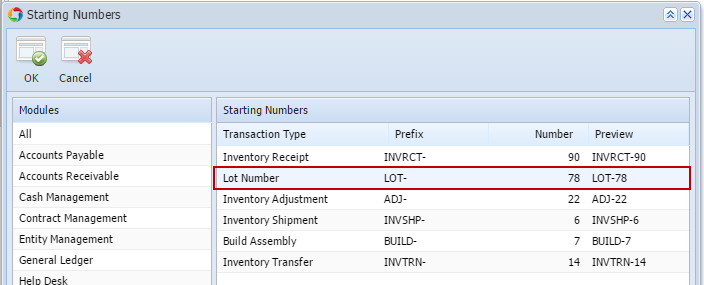
|
| | Create PO and Process it to Inventory Receipt | Go to Purchasing > Purchase Orders |
| | | Click New toolbar button to add Purchase Order. |
| | | Add Purchase Order - In the Vendor ID field select a vendor.
- Select a Location.
- In the Ship To field select a Location where to receive the item.
- Fill in other information you feel necessary.
- In the grid select the item to order.
- In the Item No. field select the item.
- The UOM field will be defaulted to the UOM set in the Item Location > Receive UOM. Change this as necessary.
- The Cost field will show the Last Cost entered for the item.
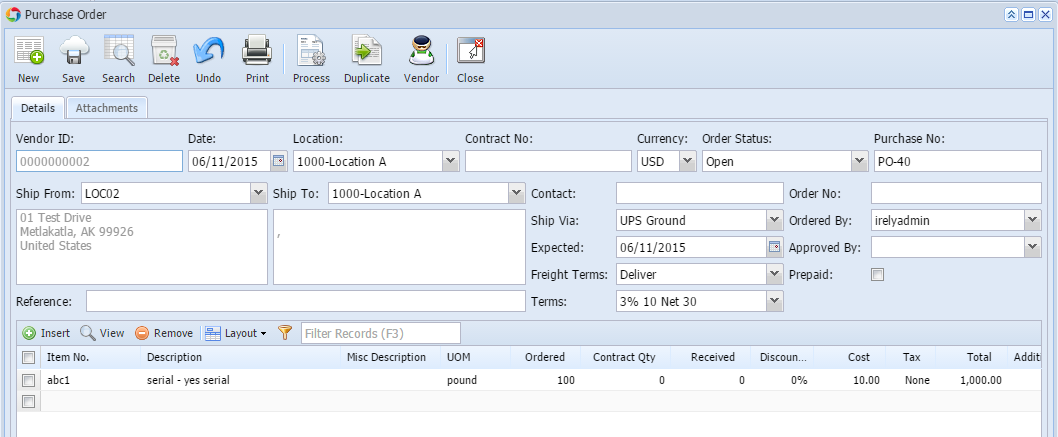
- Click Process toolbar button to process the Purchase Order to Inventory Receipt.
- In the Inventory Receipt screen > Item grid
- Enter Qty to Receive.
- Select Lot Wgt UOM.
- Select a Sub Location to where the item will be placed when received.
- Highlight the item. The Lot Tracking grid will be shown.
- Select Lot UOM.
- In the Quantity field enter the Quantity to be received and press enter.
- Enter Tare value if there is. The Net will automatically be computed.
- Enter Expiry Date.
- Select Storage Location.
- Click Receive toolbar button to receive the items.
Notice that Lot Numbers are assigned for each line item in the Lot Tracking grid. 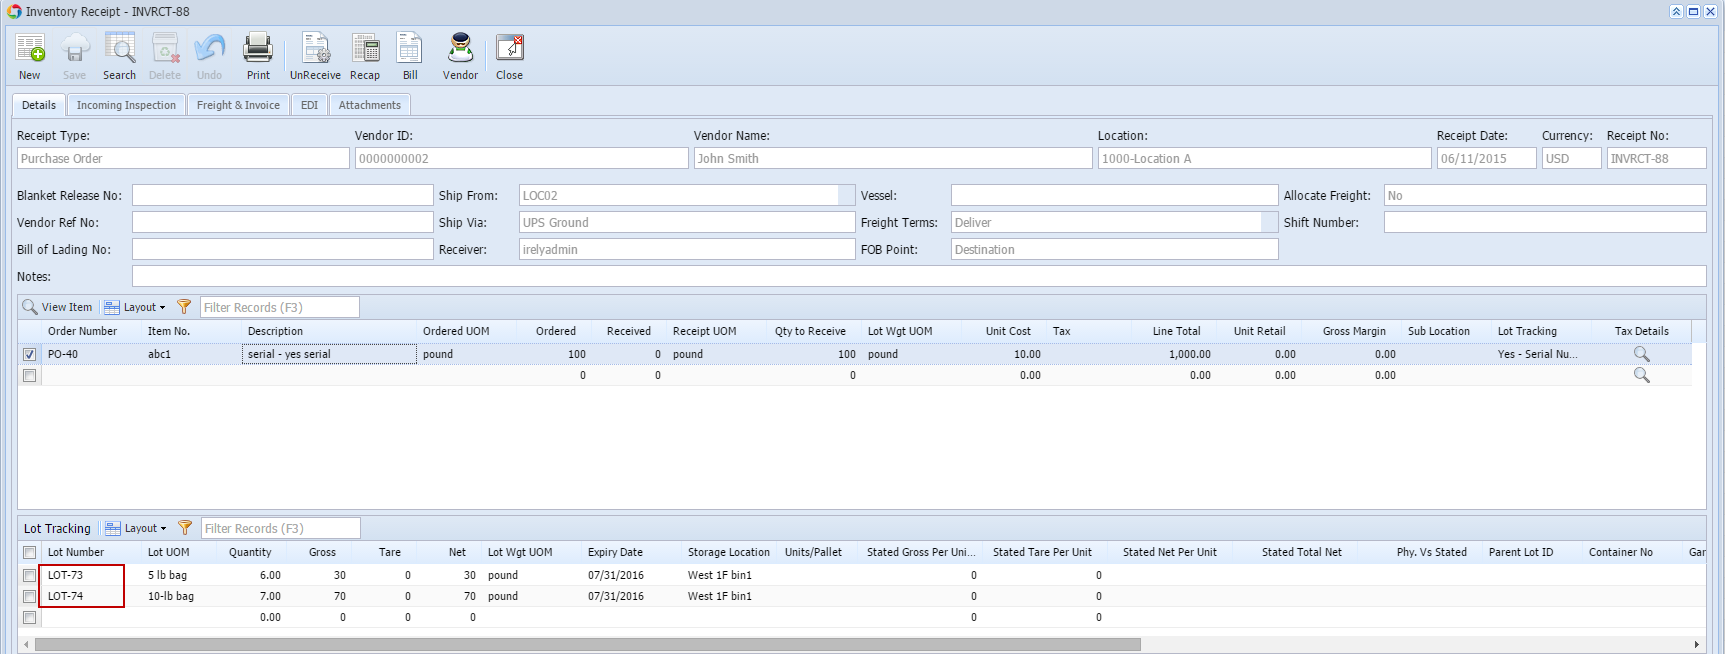
|
| | Create Purchase Receipt and pull it from Inventory Receipt | Go to Purchasing > Purchase Orders |
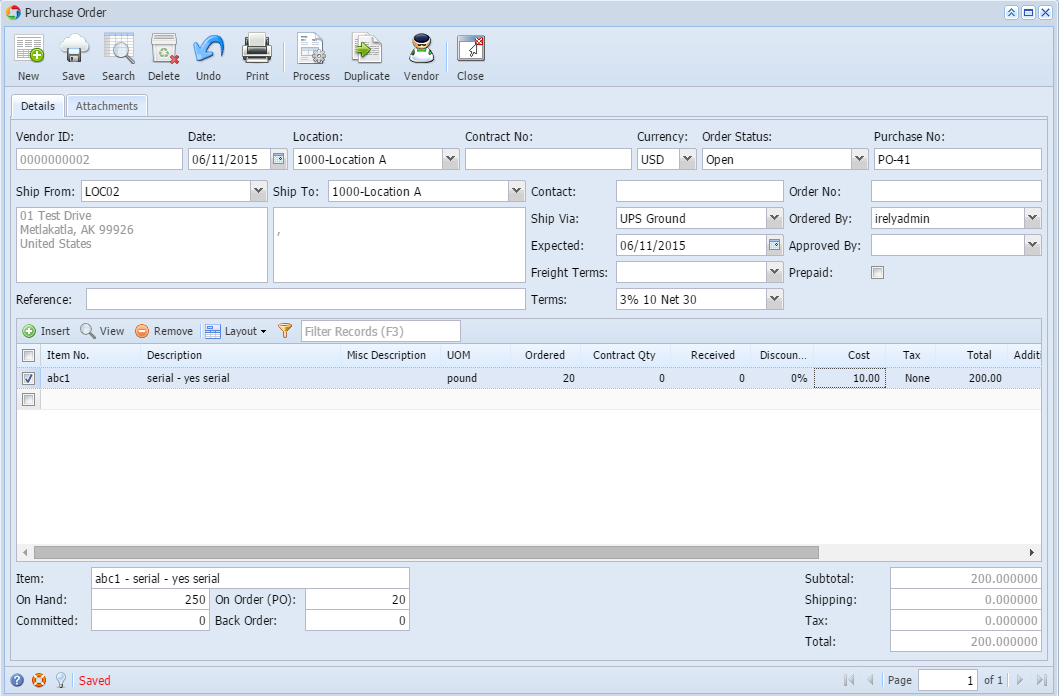
| | | Click New toolbar button to add Purchase Order. |
| | | Add Purchase Order - In the Receipt Type select Purchase Order.
- In the Vendor ID field select a vendor.
- Select a Location.
- In the Ship To field select a Location where to receive the item.
- Fill in other information you feel necessary.
- In the grid select the item.
- In the Item No. field select the item.
- The UOM field will be defaulted to the UOM set in the Item Location > Receive UOM. Change this as necessary.
- The Cost field will show the Last Cost entered for the item.
- Click Save and Close.
|
| | | Go to Inventory > Inventory Receipts |
| | | Click New toolbar button to add Inventory Receipt. |
| | | Add Inventory Receipt. - In the Receipt Type select Purchase Order.
- In the Vendor ID field select a vendor.
- Select a Location.
- Fill in other information you feel necessary.
- In the grid select item/s.
- In the Order Number field select the Purchase Order created.
- Enter Qty to Receive.
- Select Lot Wgt UOM.
- Select a Sub Location to where the item will be placed when received.
- Highlight the item. The Lot Tracking grid will be shown.
- Leave Lot Number field blank. Lot Number will be automatically generated for item that is Lot Tracked - Yes-Serial Number.
- Select Lot UOM.
- In the Quantity field enter the Quantity to be received and press enter.
- Enter Tare value if there is. The Net will automatically be computed.
- Enter Expiry Date.
- Select Storage Location.
- Click Receive toolbar button to receive the items.
Notice that Lot Numbers are assigned for each line item in the Lot Tracking grid. 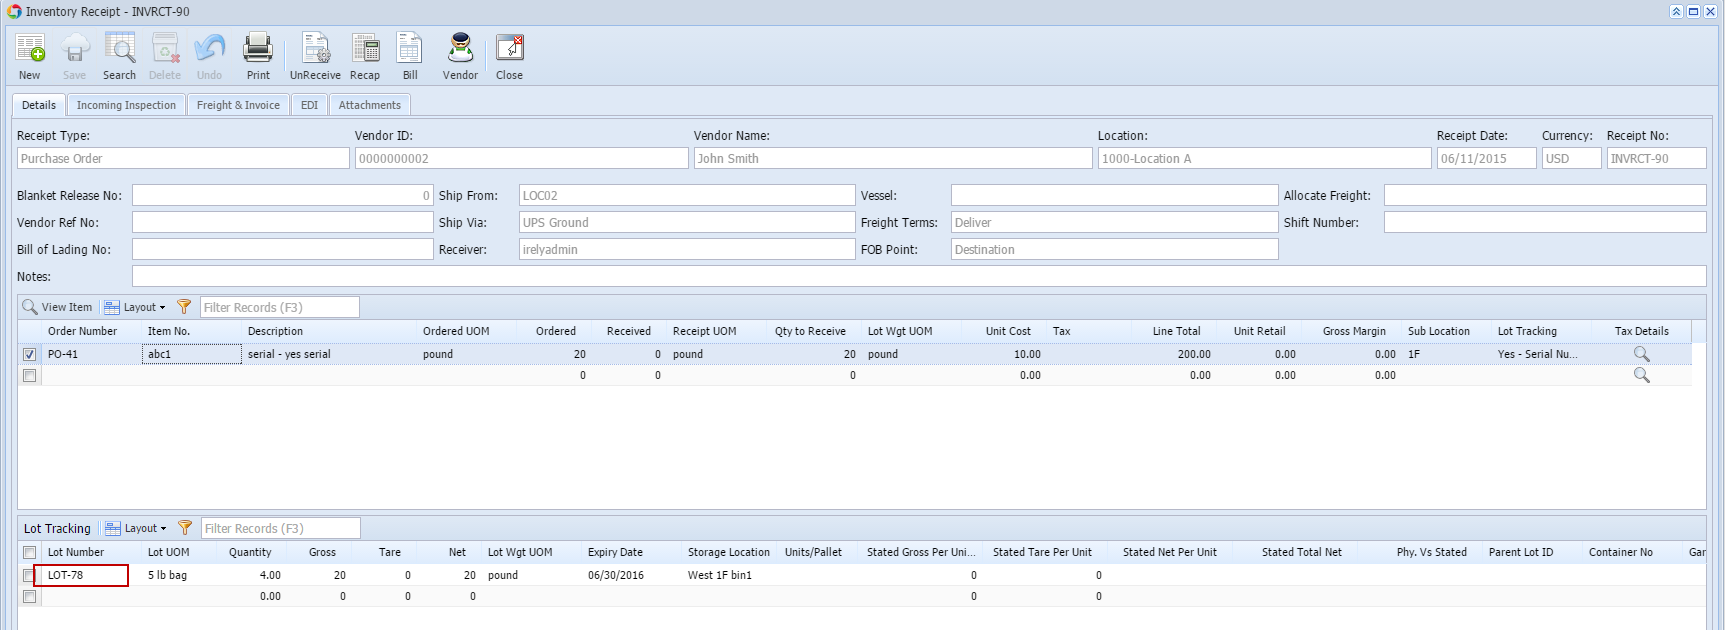 Image Added Image Added
|
| Process Inventory Receipt to Bill | via Inventory Receipt > Bill toolbar button | From Inventory Receipt screen, click Bill toolbar button. Click Yes to view the bill transaction. Click Post. 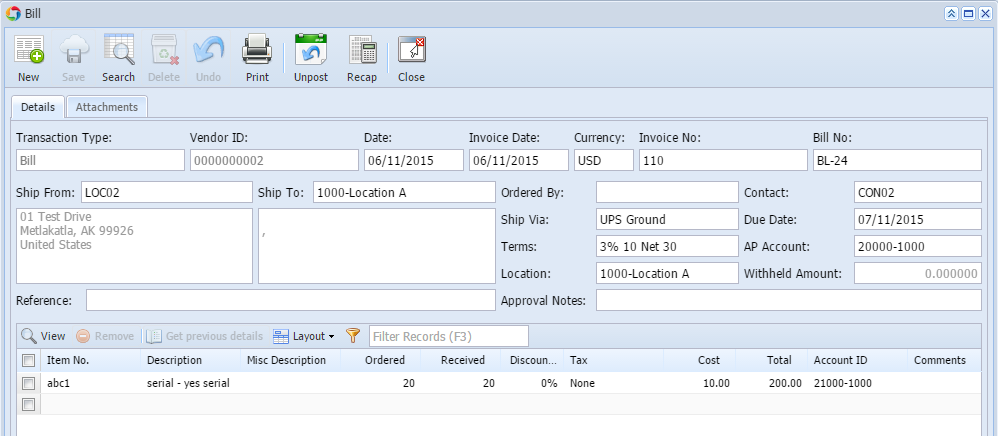 Image Added Image Added
|
| | via Bill | Go to Purchasing > Bills |
| | | Click New toolbar button to add Bill. |
| | | Add Bill. - In the Vendor ID field select a vendor.
- The Add Inventory Receipt screen will open. Select Purchase Order/Inventory Receipt to add to bill and click Add toolbar button.
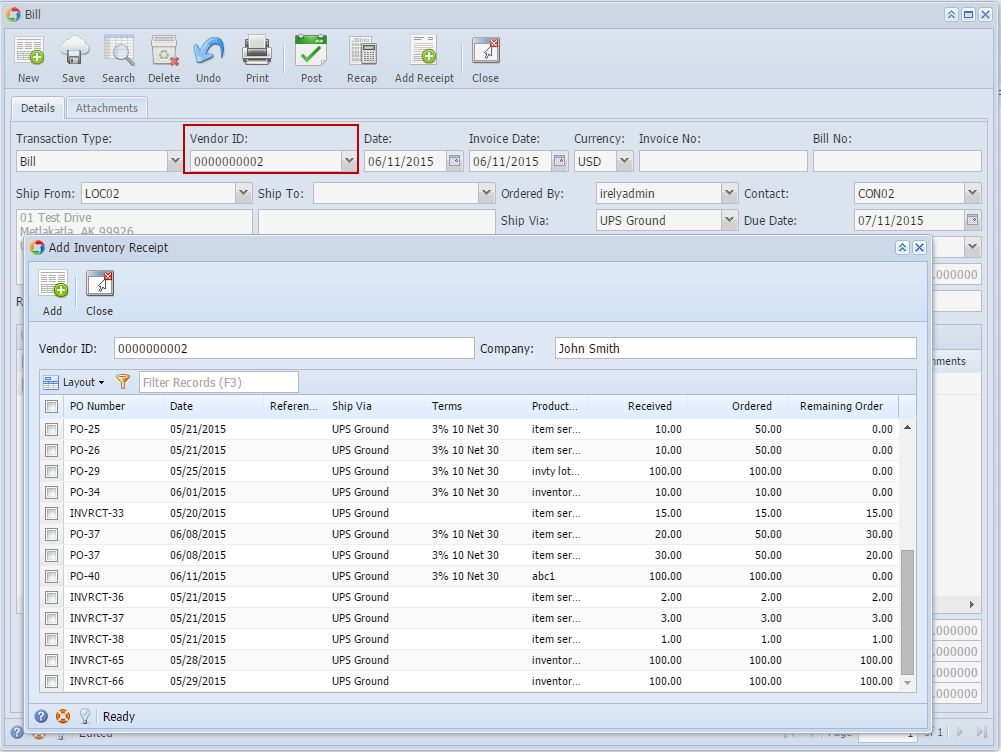 Image Added Image Added - Select a Ship To location.
- Select a Location.
- Fill in other information you feel necessary.
- Click Post.
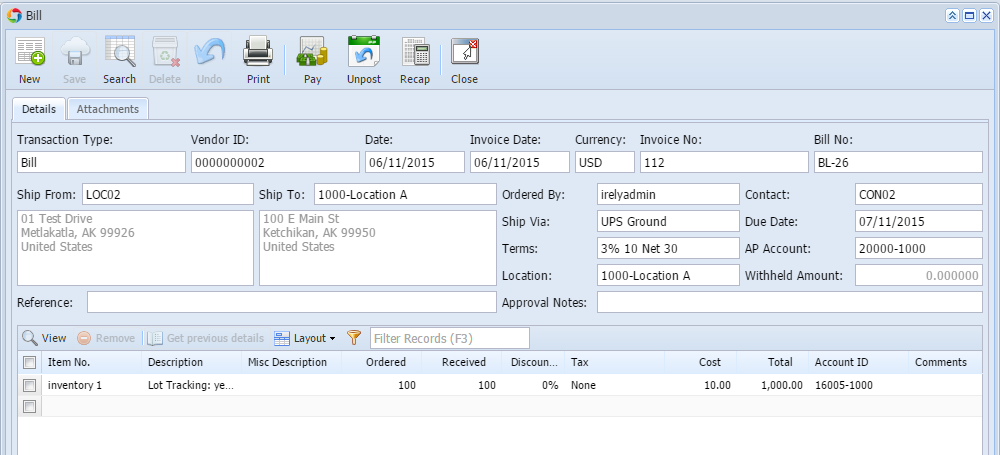 Image Added Image Added
|
| Create Inventory Transfer | Location to Location | Go to Inventory > Inventory Transfers |
| | | Click New toolbar button to add Inventory Transfer. |
| | | Add Inventory Transfer. - Select Transfer Type of Location to Location. This will transfer item from one location to another.
- Select From Location.
- Select To Location that is different from that of From Location.
- Leave Shipment Required uncheck if transfer will not require shipment.
- In the item grid
- In the Item field select an item to transfer
- Select a From Sub Location and Storage Location.
- In the Lot Number field select the lot number where the item to be transferred is part of.
- Select the To Sub Location and To Storage.
- Enter Transfer Qty.
- In the UOM field select the same UOM as that of the UOM after the Available Qty.
- Select Weight UOM.
- Leave New Lot Number field blank. This will be generated since item is Lot Tracked - Yes - Serial Number.
- Click Post toolbar button.
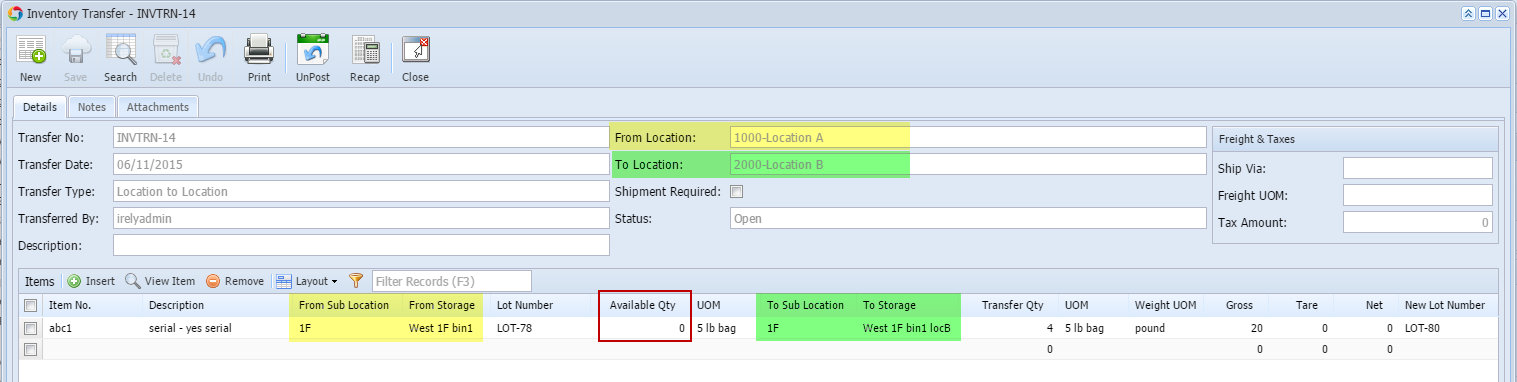 Image Added Image Added
Notice that Available Qty is updated. |
| | Storage to Storage | Go to Inventory > Inventory Transfers |
| | | Click New toolbar button to add Inventory Transfer. |
| | | Add Inventory Transfer. - Select Transfer Type of Storage to Storage. This will transfer item from storage to storage within the same Location.
- Select From Location.
- Select To Location that is the same as that of From Location.
- Leave Shipment Required uncheck if transfer will not require shipment.
- In the item grid
- In the Item field select an item to transfer
- Select a From Sub Location and Storage Location.
- In the Lot Number field select the lot number where the item to be transferred is part of.
- Select the To Sub Location and To Storage.
- Enter Transfer Qty.
- In the UOM field select the same UOM as that of the UOM after the Available Qty.
- Select Weight UOM.
- Leave New Lot Number field blank. This will be generated since item is Lot Tracked - Yes - Serial Number.
- Click Post toolbar button.
Notice that Available Qty is updated. 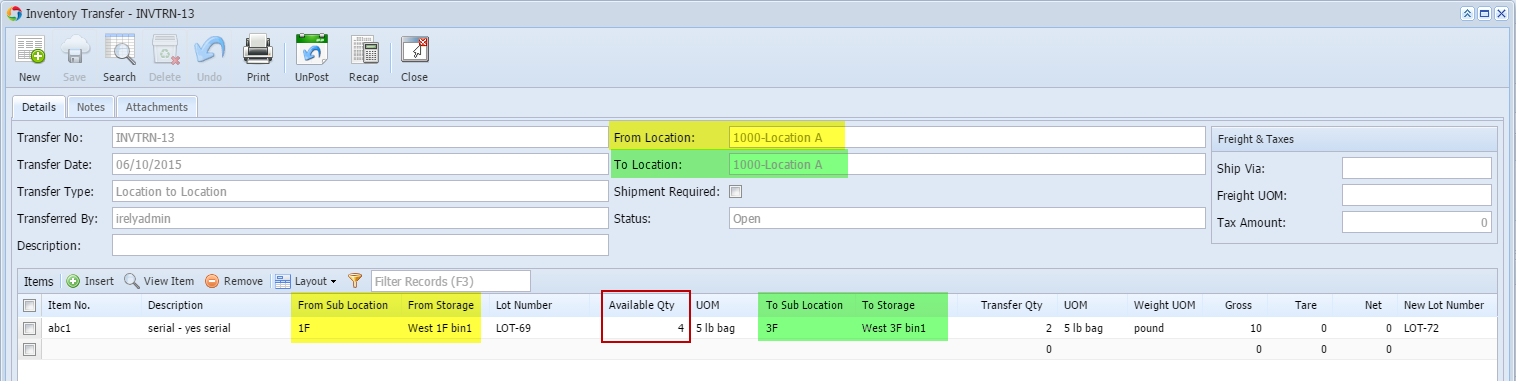 Image Added Image Added
|
| | | |
| | | |
| | | |