You can receive multiple payments from multiple customers on this screen. Posting receivables in this screen will automatically generate a Receive Payments Detail record.
The following are the steps in posting receivables on this screen.
- Open the Receive Payments screen from Sales | Receive Payments menu.
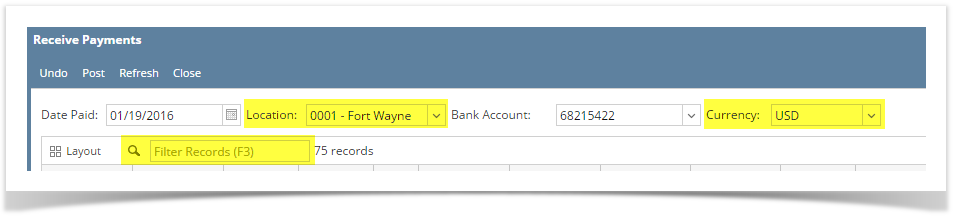
- Fill out the header fields. Refer to Receive Payments | Field Description | Header Details for the definition of each field.
- Enter a new Date Paid if necessary.
- Select a new Location if necessary.
- Select a new Date Paid if necessary.
- Select the Bank Account where the payments will be deposited.
Enter the grid details. Refer to Receive Payments | Field Description | Grid Details for the definition of each field.
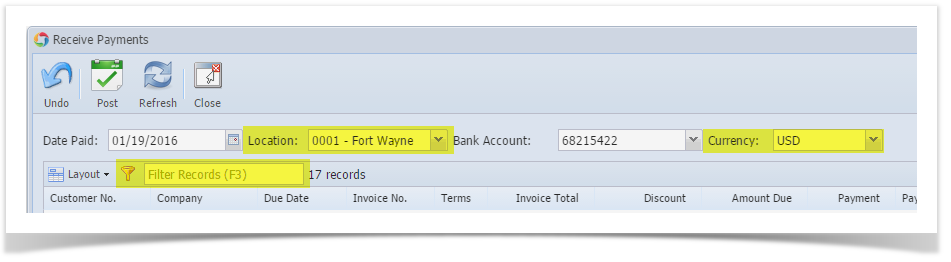
You can use the Filter field, Location, and Currency to filter and narrow down the number of records in the grid.
Enter a different Discount or Interest amount if necessary.
Enter the Payment amount in the line item that you wish to receive the payment from. You can also double click in the Payment field to automatically enter the entire Amount Due into the Payment field.
Select from the Payment Method combo list box the type of payment the customer used.
If necessary, enter any additional information about the payment in the Notes field.
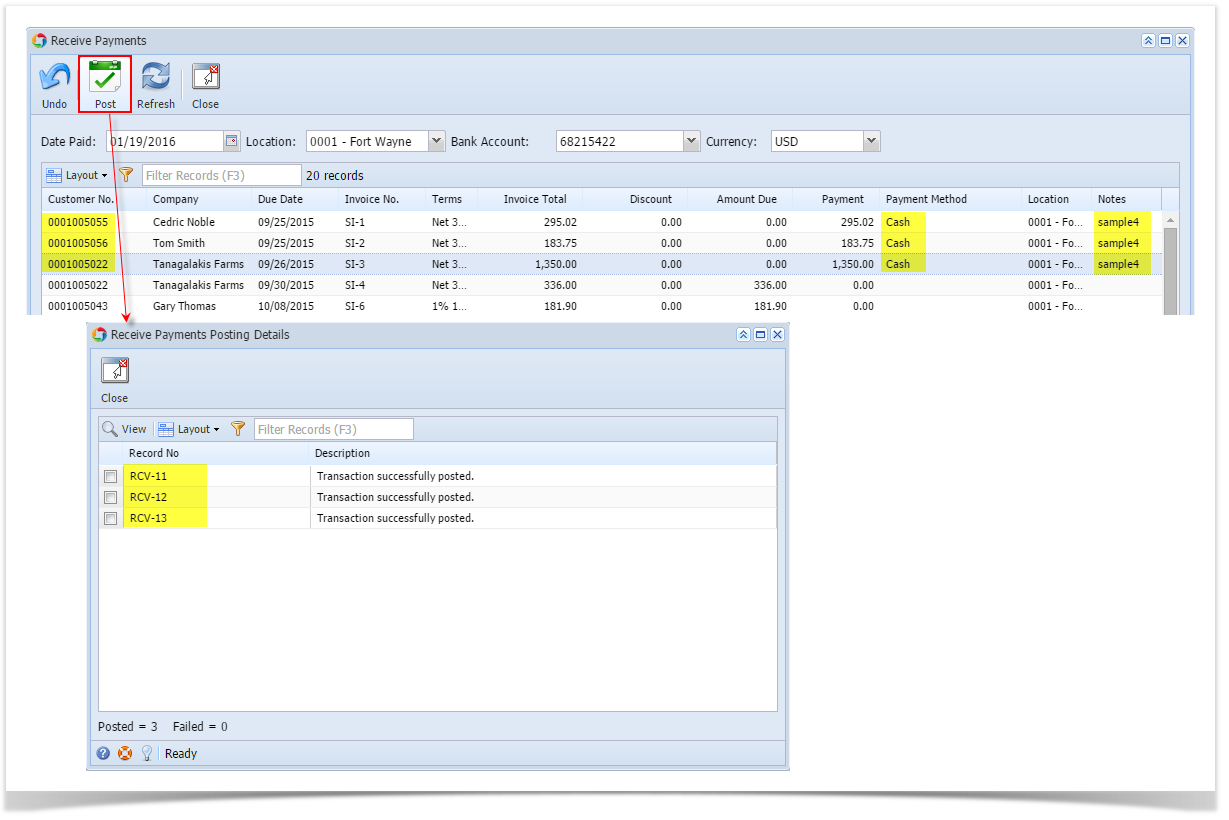
- Click the Post button. The Receive Payments Posting Details screen will be displayed. This screen will give you an overview of the posting results.
- Close the Receive Payments Posting Details screen. The transaction will be removed in the list if fully paid. Otherwise, it will remain on the grid, but with updated Amount Due.
Here is what you need to know when posting multiple receivables using this screen.
- Posting different receivables from the same customer.
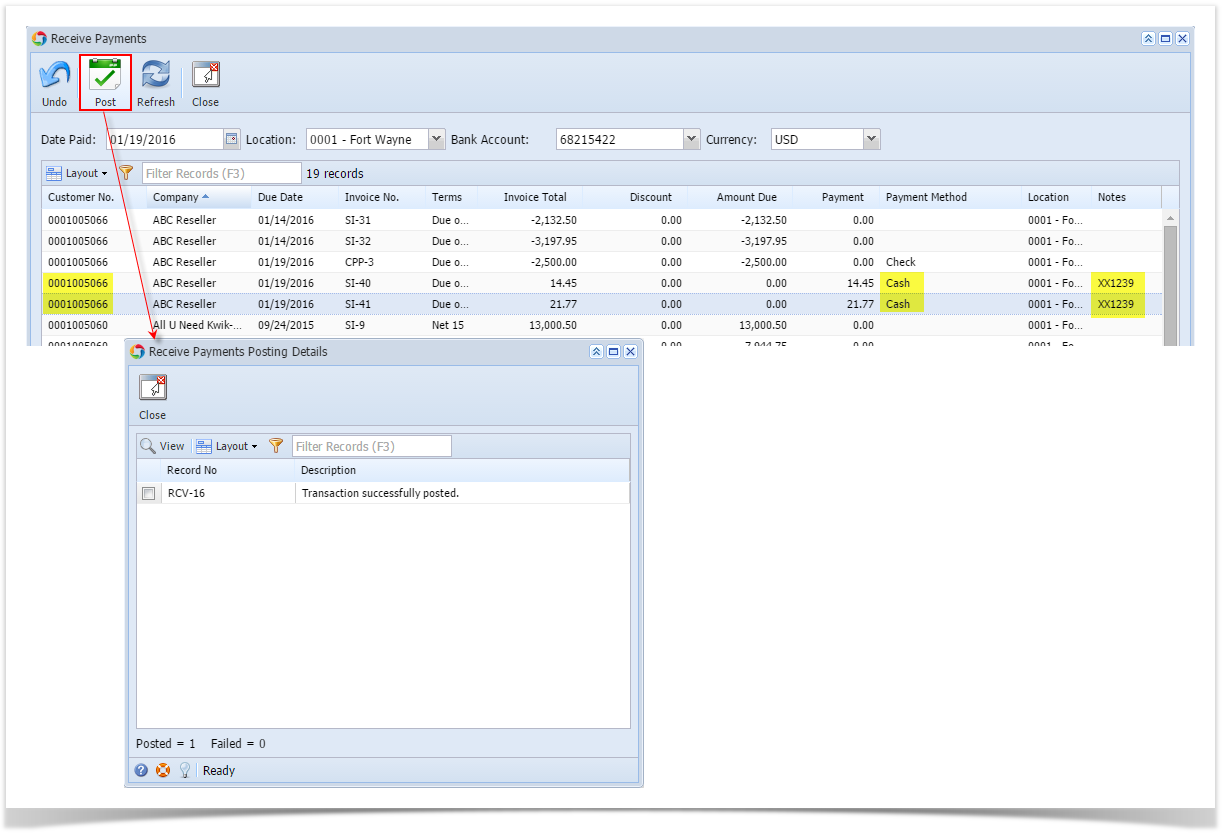
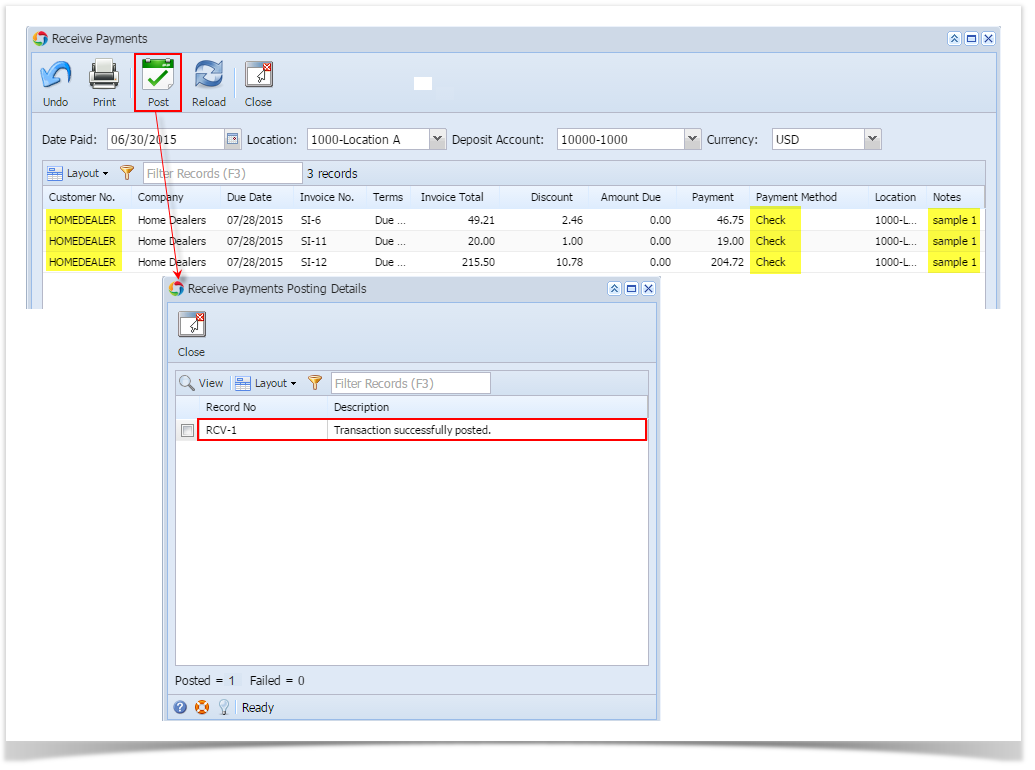
- Transactions having the same Customer No., Payment Method, and Notes will be grouped and posted in one Receive Payments Detail record.
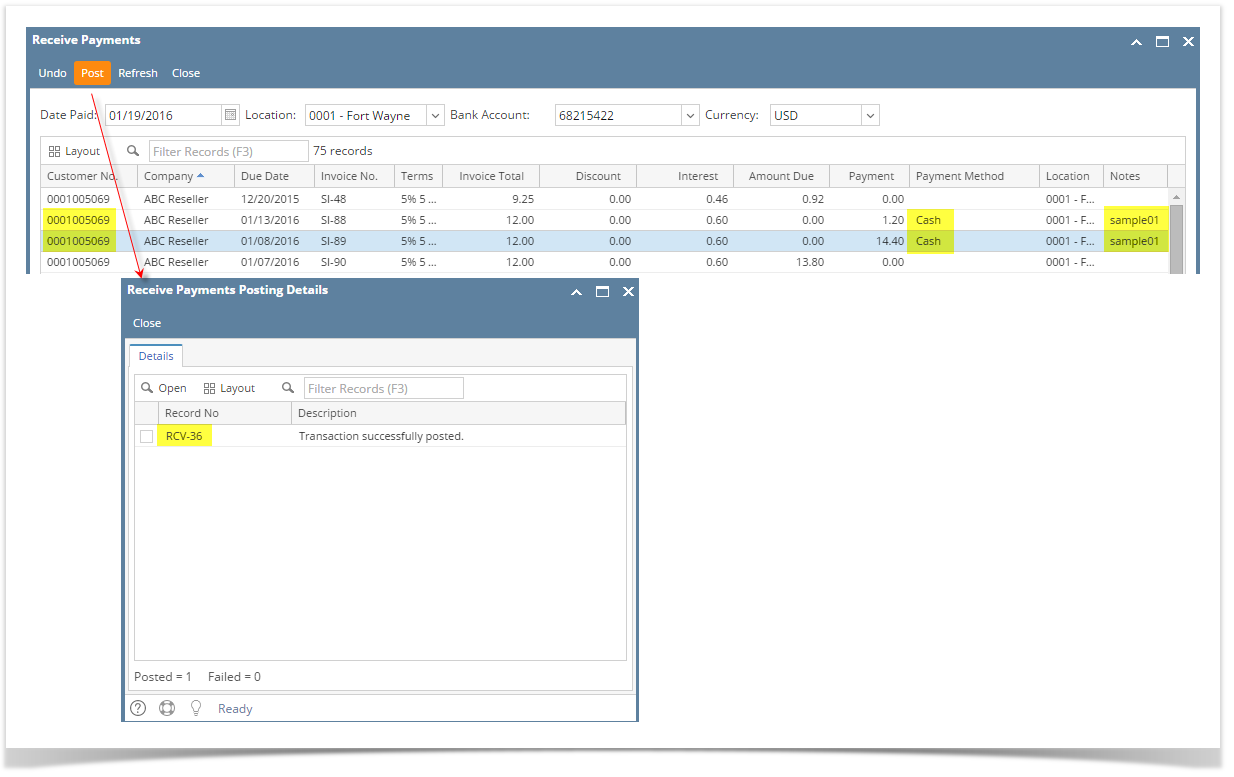
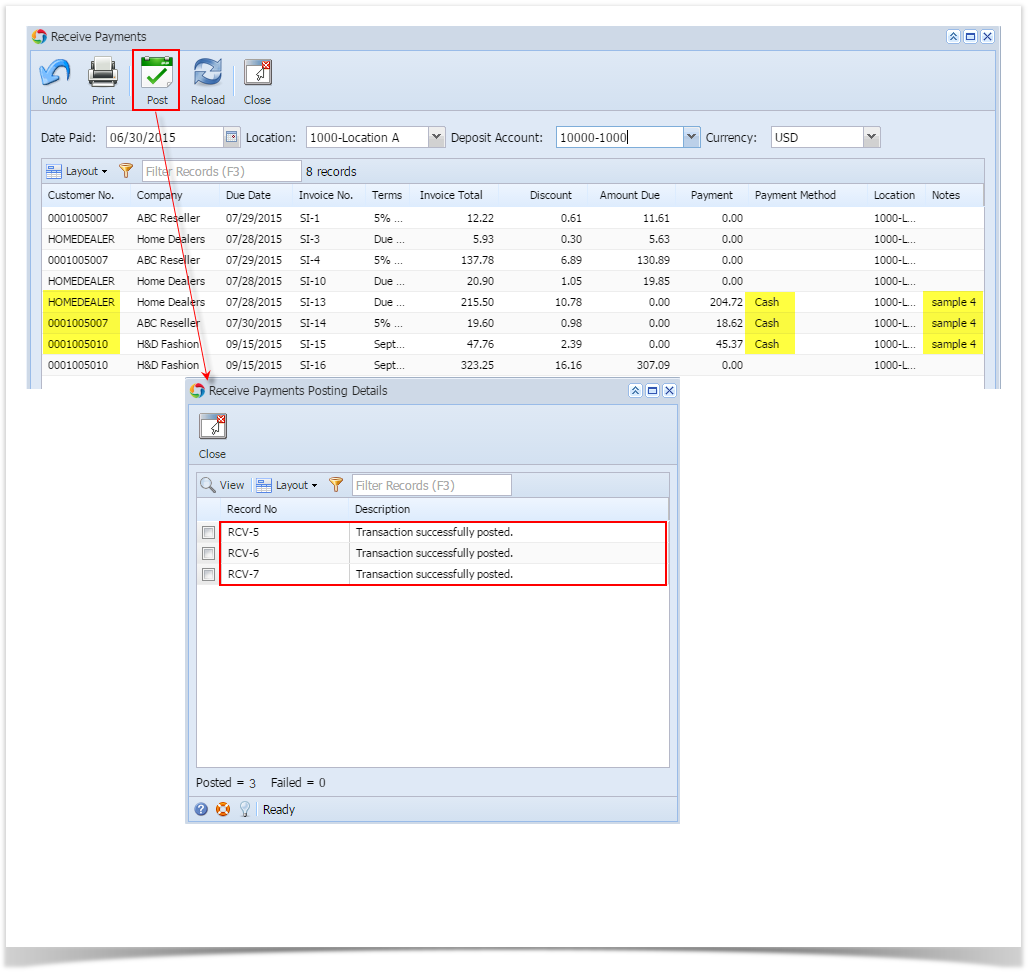
- Transactions having the same Customer No., but different Payment Method or Notes will each have a separate Receive Payments Detail record.

- Transactions having the same Customer No., Payment Method, and Notes will be grouped and posted in one Receive Payments Detail record.
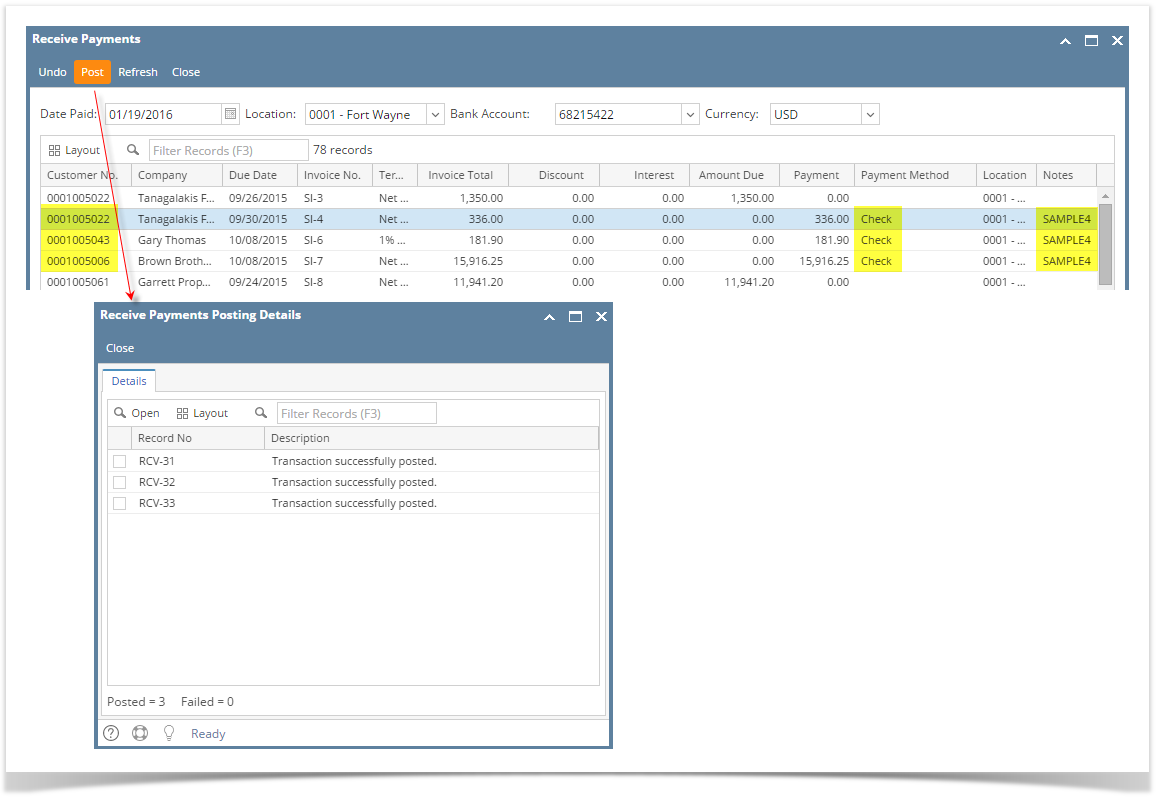
- Posting different receivables from different customers. Transactions having different Customer No will each have a separate Receive Payments Detail record.
You can receive multiple payments from multiple customers on this screen. Posting receivables in this screen will automatically generate a Receive Payments Detail record. Here is what you need to know when posting multiple receivables using this screen.
- Posting different receivables from the same customer.
- Transactions having the same Customer No., Payment Method, and Notes will be grouped and posted in one Receive Payments Detail record.
- Transactions having the same Customer No., but different Payment Method or Notes will each have a separate Receive Payments Detail record.

- Transactions having the same Customer No., Payment Method, and Notes will be grouped and posted in one Receive Payments Detail record.
- Posting different receivables from different customers. Transactions having different Customer No will each have a separate Receive Payments Detail record.
The following are the steps in posting receivables on this screen.
- Open the Receive Payments screen from Sales | Receive Payments menu.
- Fill out the header fields. Refer to Receive Payments | Field Description | Header Details for the definition of each field.
- Enter a new Date Paid if necessary.
- Select a new Location if necessary.
- Select a new Date Paid if necessary.
- Select the Bank Account where the payments will be deposited.
Enter the grid details. Refer to Receive Payments | Field Description | Grid Details for the definition of each field.
You can use the Filter field, Location, and Currency to filter and narrow down the number of records in the grid.
Enter a different Discount amount if necessary.
Enter the Payment amount in the line item that you wish to receive the payment from. You can also double click in the Payment field to automatically enter the entire Amount Due into the Payment field.
Select from the Payment Method combo list box the type of payment the customer used.
If necessary, enter any additional information about the payment in the Notes field.
- Click the Post toolbar button. The Receive Payments Posting Details screen will be displayed. This screen will give you an overview of the posting results.
- Close the Receive Payments Posting Details screen. The transaction will be removed in the list if fully paid. Otherwise, it will remain on the grid, but with updated Amount Due.
You can receive multiple payments from multiple customers on this screen. Posting receivables in this screen will automatically generate a Receive Payments Detail record. Here is what you need to know when posting multiple receivables using this screen.
- Posting different receivables from the same customer.
- Transactions having the same Customer No., Payment Method, and Notes will be grouped and posted in one Receive Payments Detail record.
- Transactions having the same Customer No., but different Payment Method or Notes will each have a separate Receive Payments Detail record.

- Transactions having the same Customer No., Payment Method, and Notes will be grouped and posted in one Receive Payments Detail record.
- Posting different receivables from different customers. Transactions having different Customer No will each have a separate Receive Payments Detail record.
The following are the steps in posting receivables on this screen.
- Open the Receive Payments screen from Accounts Receivable > Activities > Receive Payments menu. Refer to Receive Payments for the definition of each field.
- Select a new Date Paid if necessary.
- Select the Deposit Account where the payments will be credited.
Enter the grid details:
You can use the Filter field, Location, and Currency to filter and narrow down the number of records in the grid.

Enter the Payment amount in the line item that you wish to receive the payment from. You can also double click in the Payment field to automatically enter the entire Amount Due into the Payment field.
Select from the Payment Method combo list box the type of payment the customer used.
If necessary, enter any additional information about the payment in the Notes field.
- Click the Post toolbar button. The Receive Payments Posting Details screen will be displayed. This screen will give you an overview of the posting results.
- Close the Receive Payments Posting Details screen. The transaction will be removed in the list if fully paid. Otherwise, it will remain on the grid, but with updated Amount Due.
You can receive multiple payments from multiple customers on this screen. Posting receivables in this screen will automatically generate a Receive Payments Detail record. Here is what you need to know when posting multiple receivables using this screen.
- Posting different receivables from the same customer.
- Transactions having the same Customer No., Payment Method, and Notes will be grouped and posted in one Receive Payments Detail record.

- Transactions having the same Customer No., but different Payment Method or Notes will each have a separate Receive Payments Detail record.

- Transactions having the same Customer No., Payment Method, and Notes will be grouped and posted in one Receive Payments Detail record.
- Posting different receivables from different customers. Transactions having different Customer No will each have a separate Receive Payments Detail record.

The following are the steps in posting receivables on this screen.
- Open the Receive Payments screen from Accounts Receivable > Activities > Receive Payments menu. Refer to Receive Payments for the definition of each field.
- Select a new Date Paid if necessary.
- Select the Deposit Account where the payments will be credited.
Enter the grid details:
You can use the Filter field, Location, and Currency to filter and narrow down the number of records in the grid.

Enter the Payment amount in the line item that you wish to receive the payment from. You can also double click in the Payment field to automatically enter the entire Amount Due into the Payment field.
Select from the Payment Method combo list box the type of payment the customer used.
If necessary, enter any additional information about the payment in the Notes field.
- Click the Post toolbar button. The Receive Payments Posting Details screen will be displayed. This screen will give you an overview of the posting results.

- Close the Receive Payments Posting Details screen. The transaction will be removed in the list if fully paid. Otherwise, it will remain on the grid, but with updated Amount Due.
Overview
Content Tools