- Login into Notes Receivable system as a manager.

- Click on Find button, select the note which you want to reverse the payment.

- Click on the Reverse Payment button in Maintenance screen.

- On click of Reverse Payment button, Reverse payment screen will be opened.

- Reverse Payment screen contains following fields:
- Customer No: This field is non editable and used to view the customer number for the selected note.
- Note Number: This field is non editable and used to view the selected Note number
- Note Type: This field is non editable and used to view the Note type of Selected note.
- Notes Payoff Balance: This field is non editable and used to view the latest Payoff Balance for the selected note.
- Select Payment: This field is used to select the payment which user is trying to reverse by clicking the button (
 ), one window will be popped; it will contain the payment information about for the note.
Payment Popup window contains Grid control. The Grid control has following fields:- Date: This field contains payment dates which are made for the note.
- Check Number: This field contains check number which is entered in the Receive payment screen. The payment will be reversed based on the check number.
- Payment amount: This field contains payment amount which is entered in the receive payment screen.
- Batch Number: This field contains batch number which is entered in the receive payment screen.
- Location: This field contains Location number which is entered in the receive payment screen.

If User doesn’t selected any payment then following validation message will be displayed.
If there is no payments to reverse for the selected notes, on click of select payment button following validation message will be displayed. And Ok button will be disabled.
- Location: This field is non editable and Location number will be displayed based on the selected Payment.

- Batch Number: This field is editable. By default this field contains batch number based on the selected payment.

- Amount: This field is non editable and it will contain the payment amount which user trying to reverse.

- Comments: User can enter his/her comments for reversing the payments. It’s not a mandatory field. It will accept maximum of 250 characters.

- Ok button: Ok button will be enabled if all mandatory fields contain data. On click of “ok “button selected payment will be reversed.
- Cancel Button: This button is used to cancel the reverse payment transaction and return to Maintenance screen. On click of cancel button following validation message will be displayed.

If user clicks on the button “Yes” then Reverse Payment screen will be closed and returned to Maintenance screen.
If user clicks on the button “No” then warning message screen will be closed and Reverse Payment screen will be displayed.
Integration with General Ledger
When user makes the reverse payment then two entries will be inserted into GL (Journal Entries) with a reverse payment amount. One record will be debit to “GL Notes Receivable“ account which is configured in the Control file settings and another record will Credit to “General Ledger cash Account”.
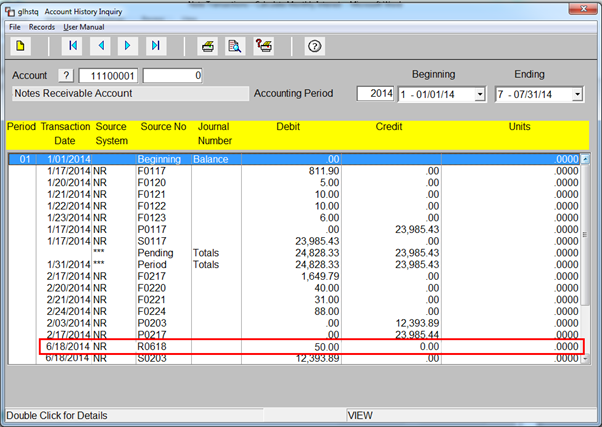
- Login to summit application
- Select /Click General Ledger Menu

- Select Report and Inquiry Menu

- Select View Account History

- Enter Account number, Accounting Year, Period (Beginning and ending)
Below report will give the required details

- To view Note creation details, select the record and double click.
- Example: Below account Number: 11200010 is Cash Account, so payment amount will debit to this account.
Double click on the record.

- Below account number: 11100099 is “Cash Account”, so payment amount will be credit to this account.

Double click on the record

- Example: Below account Number: 11200010 is Cash Account, so payment amount will debit to this account.
OR
- Login to summit application

- Select /Click Petrolac Menu

- Petrolac Dates screen will appear. Click OK.

- Select End of Period Menu on Petrolac Main Menu screen.

- Select G/L Distribution Report Menu on End of Period Menu screen.
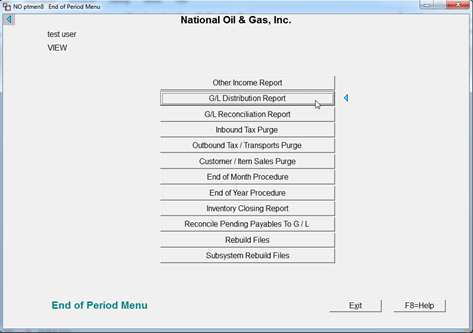
- Enter Transaction Date (Beginning and ending) and click on View Report button.

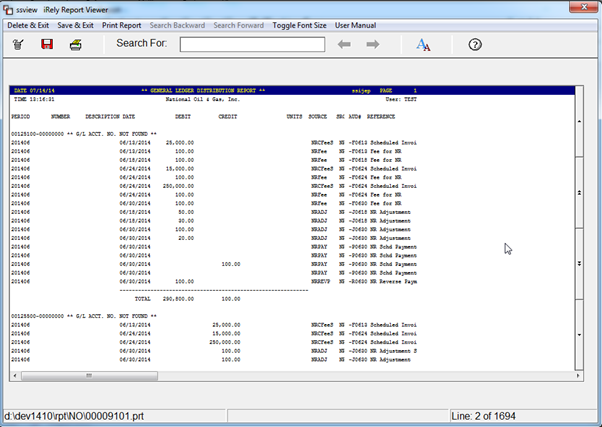
- Below report will give the required details
Overview
Content Tools