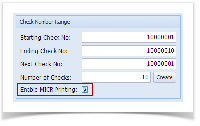
- Check the Enable MICR Printing checkbox.
- Click the MICR toolbar button to open the MICR Setup screen.

- When MICR Setup screen opens, configure the MICR line.

- In the Description field, enter a description for the MICR Setup.

- Configure the MICR Line. Below is a sample of how MICR line can be setup. The fields are colored and the same color had been applied in the MICR Preview to see how the placement of information be actually shown on checks.

- The Check Length dictates how many characters to show in the MICR line for Check No.
- The Check Position dictates where is the placement of the Check No. In this example, shown at the leftmost
- In the Description field, enter a description for the MICR Setup.
Overview
Content Tools