- Created by Beverly Dellosa, last modified on 06-24-2016
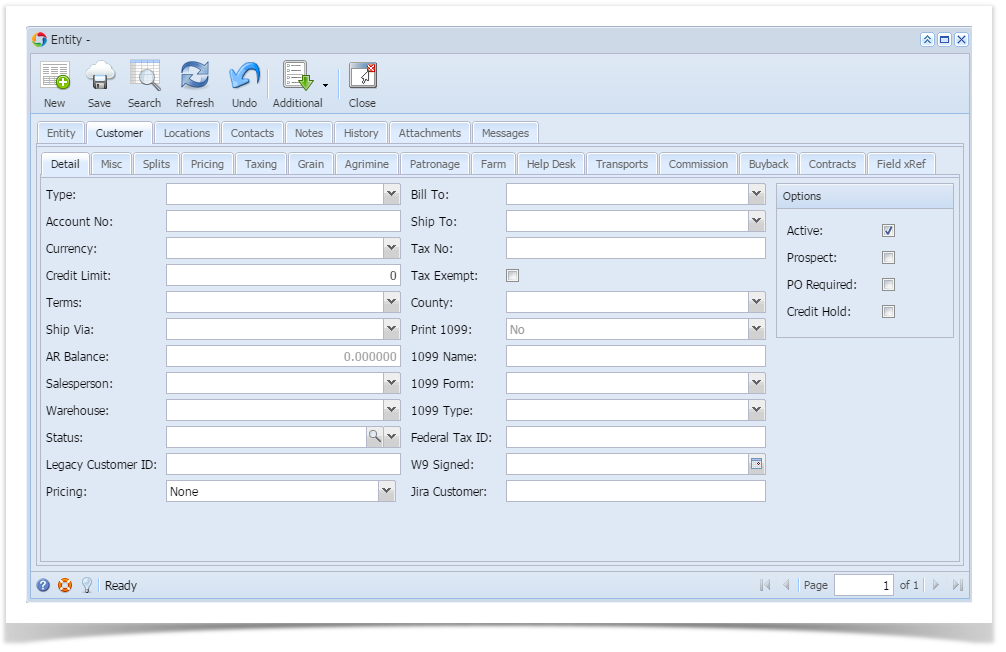
The Customer Entity screen is used to maintain all the detailed information about the customer. This is the master record of the customer. Open the screen from Sales | Customers menu.
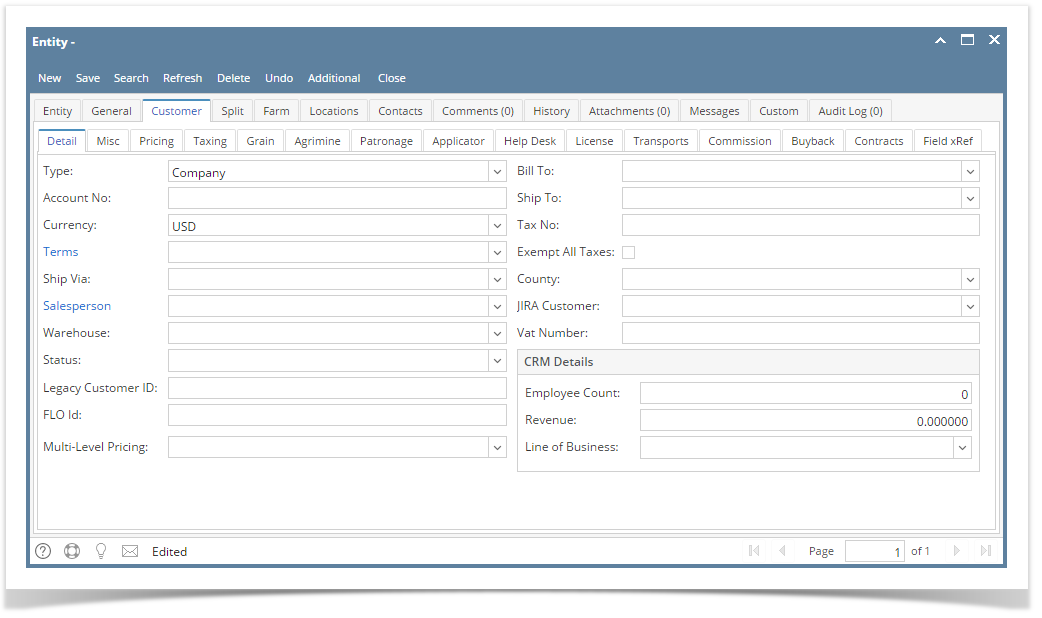
Field Description
Type - Select the appropriate customer type from the combo box list. The combo box selections are Company and Person.
Account No - Enter the customer's account number.
Currency - Select from the combo box list the default currency that will be used by the customer. The combo box list will retrieve the record from the Currency screen.
Terms - Click the combo box button, then select the appropriate Terms for the location. The combo box list will retrieve the active terms record from the Terms screen.
Ship Via - Click the combo box button, then select the appropriate Ship Via for the location. The combo box list will retrieve the records from the Ship Via [OBSOLETE] screen.
Salesperson - Select the salesperson Id associated to the customer. The combo box list will show all the active salesperson on the system.
Warehouse - This is the customer's default warehouse. This field will get its data from the primary Location, but you can change the value of this field if necessary.
Status - Select the appropriate account status of the customer. The combo box list will show all the records on Account Status Code. This field will allow you to assign multiple status codes to a customer.
Legacy Customer ID - This is a read-only field which will show the origin customer number of the imported customer. If the customer is created in i21, this field will show the same value in Entity No field.
FLO Id -
Pricing - The default value is set to None. Select the specific pricing discount for the customer. The combo box selections are Discount Sales Price, Markup Standard Cost, Percent of Margin, Multi-Level Pricing, Retail Price, Last Price, Inventory Price List, and None.
Bill To - This will default to the value in Location Name field when adding a customer. For an existing customer record, you can assign a different Bill To by selecting on the combo box list. The combo box list will show the locations added on the Locations tab.
Ship To - This will default to the value in Location Name field when adding a customer. For an existing customer you can select the appropriate location where purchases of the customer will be shipped. The combo box list will show the location added on the Locations tab.
Tax No - Enter the customer's tax number.
Exempt All Taxes - Check this check box if the customer will be exempted from tax charges on any transaction.
County - Select the Country where the customer belongs to. The combo box list will show the County used in Tax Codes.
JIRA Customer - Select the corresponding customer name on JIRA.
Vat Number - Enter the cutomer's VAT number.
Employee Count - Enter the number of employees in the customer's company.
Revenue - Enter the revenue amount of the customer.
Line of Business - Select the appropriate line of business. The combo box list will show all the records on CRM | Line of Business.
Credit Limit - Enter the credit limit amount available to this customer.
AR Balance - This is a disabled and computed field showing the customer's outstanding balance.
Active - Check the button to activate a customer. Otherwise, deselect it. Inactive Customers are not selectable on customer related combo box lists. Refer also to How to Activate/Deactivate a Customer
PO Required - Check this option if a purchase order number is required to be entered in the invoice. Otherwise, deselect the button.
Budget Begin Date - Enter the starting date of the new budget schedule to be generated. You can click on the mini-calendar button and select the date, or manually type the date.
Monthly Budget - Enter the default monthly amount of budget.
No of Periods - Enter the number of periods the budget will be generated.
Statement Format - Select the type of statement report for the customer. The options are Open Item, Balance Forward, Budget Reminder, Payment Activity, none.
Service Charge - Select the appropriate service charge code that will be used when computing the customer's service charges.
Include Entity Name in address - Check this option if the Entity Name will be displayed on Bill To and Ship To field of Quote/ Sales Order/ Invoice / Pick Ticket report.
**Note: Business process of other fields are not yet implemented.
Pages
- How to Add a Customer
- How to Delete Customer
- How to Activate/Deactivate a Customer
- How to Setup Email Distribution
- How to Add Customer Budget Schedule
- How to Edit or Delete Customer Budget
- How to Add Customer Special Pricing
- How Include Entity Name on Address works
- Set up for Customer Credit
- EFT Information
- Import Customer Special Price From CSV
- How to Add Credit Card to Customer
Field Description
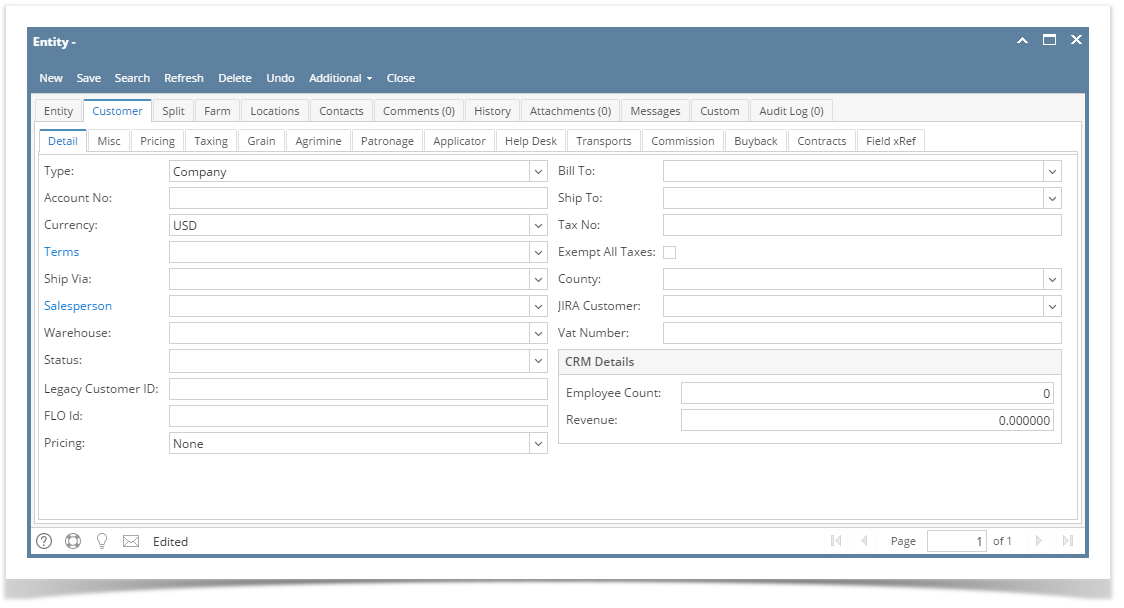
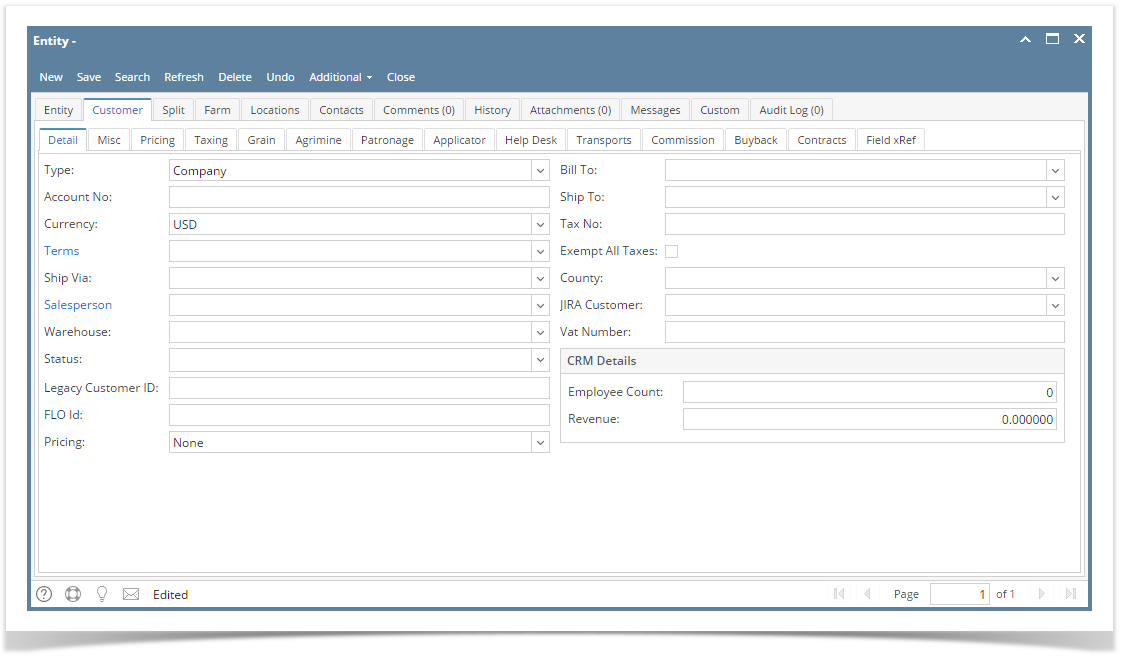
Same with 16.2 except for these fields:
Pricing - The default value is set to None. Select the specific pricing discount for the customer. The combo box selections are Discount Sales Price, Markup Standard Cost, Percent of Margin, Multi-Level Pricing, Retail Price, Last Price, Inventory Price List, and None.
Line of Business - not yet available on 16.1
Field Description
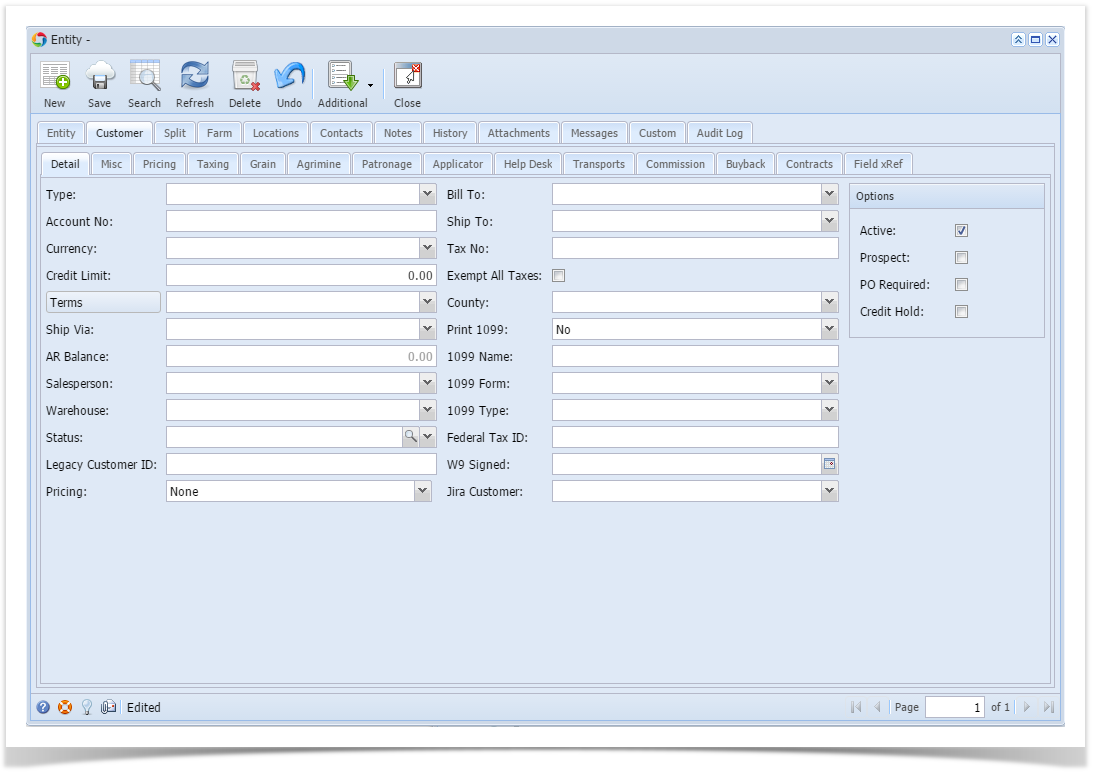
Type - Select the appropriate customer type from the combo box list. The combo box selections are Company and Person.
Account No - Enter the customer's account number.
Currency - Select from the combo box list the default currency that will be used by the customer. The combo box list will retrieve the record from the Currency screen.
Terms - Click the combo box button, then select the appropriate Terms for the location. The combo box list will retrieve the active terms record from the Terms screen.
Ship Via - Click the combo box button, then select the appropriate Ship Via for the location. The combo box list will retrieve the records from the Ship Via [OBSOLETE] screen.
Salesperson - Select the salesperson Id associated to the customer. The combo box list will show all the active salesperson on the system.
Warehouse - This is the customer's default warehouse. This field will get its data from the primary Location, but you can change the value of this field if necessary.
Status - Select the appropriate account status of the customer. The combo box list will show all the records on Account Status Code. This field will allow you to assign multiple status codes to a customer.
Legacy Customer ID - This is a read-only field which will show the origin customer number of the imported customer. If the customer is created in i21, this field will show the same value in Entity No field.
Pricing - The default value is set to None. Select the specific pricing discount for the customer. The combo box selections are Discount Sales Price, Markup Standard Cost, Percent of Margin, Multi-Level Pricing, Retail Price, Last Price, Inventory Price List, and None.
Bill To - This will default to the value in Location Name field when adding a customer. For an existing customer record, you can assign a different Bill To by selecting on the combo box list. The combo box list will show the locations added on the Locations tab.
Ship To - This will default to the value in Location Name field when adding a customer. For an existing customer you can select the appropriate location where purchases of the customer will be shipped. The combo box list will show the location added on the Locations tab.
Tax No - Enter the customer's tax number.
Tax Exempt All Taxes - Check this check box if the customer will be exempted from tax charges on any transaction.
County - Select the Country where the customer belongs to. The combo box list will show the County used in Tax Codes.
JIRA Customer - Select the corresponding customer name on JIRA.
Credit Limit - Enter the credit limit amount available to this customer.
AR Balance - This is a disabled and computed field showing the customer's outstanding balance.
Active - Check the button to activate a customer. Otherwise, deselect it. Inactive Customers are not selectable on customer related combo box lists. Refer also to How to Activate/Deactivate a Customer
Prospect - Check this combo box if the current record is still a prospect.
PO Required - Check this option if a purchase order number is required to be entered in the invoice. Otherwise, deselect the button.
Credit Hold - You may put the customer on credit hold by checking this option.
Budget Begin Date - Enter the starting date of the new budget schedule to be generated. You can click on the mini-calendar button and select the date, or manually type the date.
Monthly Budget - Enter the default monthly amount of budget.
No of Periods - Enter the number of periods the budget will be generated.
Service Charge - Select the appropriate service charge code that will be used when computing the customer's service charges.
**Note: Business process of other fields are not yet implemented.
Field Description
Same with 15.4.
Field Description
Same with above.
The Customer screen is used to maintain all the detailed information about the customer. This is the master record of the customer.
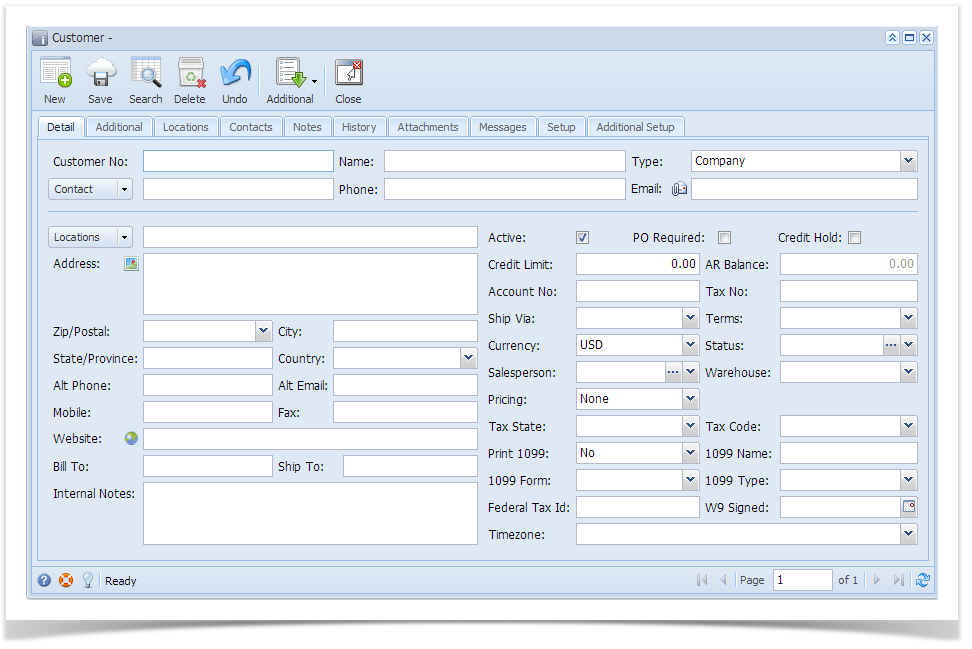
Field Descriptions
Customer No - Enter a unique code that you wish to represent the customer. This field will accept a maximum of 10 characters.
Name - Enter the full name, or the company name of the customer.
Type - Select the appropriate customer type from the combo box list. The combo box selections are Company and Person.
Contact - Enter the name of the primary contact person for the account. If there this customer have existing contacts, select the new contact from the Contact combo box list.
Phone - Enter the phone number and if applicable, extension of the contact. This field will be disabled after saving the record, and will get its data from the primary Contact.
Email - Enter the email address of the contact. This field will be disabled after saving the record, and will get its data from the primary Contact.
Locations - Enter the name or code you wish to assign the primary location.
Address - Enter the primary Address of the customer. This field will be disabled after saving the record, and will get its data from the primary Location. Click the Address Mapper to launch the Google Maps to a new tab of the default browser.
Zip/Postal - Select the primary zip code of the customer from the combo box list. This field will be disabled after saving the record, and will get its data from the primary Location.
City - This field is auto-populated when a zip code is selected. However, you can edit this if necessary. This field will be disabled after saving the record, and will get its data from the primary Location.
State/Province - This field is auto-populated when a zip code is selected. However, you can edit this if necessary. This field will be disabled after saving the record, and will get its data from the primary Location.
Country - This field is auto-populated when a zip code is selected. However, you can edit this if necessary. This field will be disabled after saving the record, and will get its data from the primary Location.
Alt Phone - Enter the secondary phone number and if applicable, its extension of the contact. This field will be disabled after saving the record, and will get its data from the primary Contact.
Alt Email - Enter the secondary email address of the contact. This field will be disabled after saving the record, and will get its data from the primary Contact.
Mobile - Enter the mobile number of the customer. This field will be disabled after saving the record, and will get its data from the primary Contact.
Fax - Enter the fax number of the customer. This field will be disabled after saving the record, and will get its data from the primary Contact.
Website - Enter the customer's website. Click the URL Launcher button to launch the website to a new tab of the default browser.
Bill To - This is read-only and will default to the value in Locations field when adding a customer. For an existing customer record, you can assign a different Bill To by selecting on the combo box list.
Ship To - This is read-only and will default to the value in Locations field when adding a customer. However, for an existing customer you can select the appropriate location where purchases of the customer will be shipped. The combo box list will show the locations entered in the Locations tab.
Internal Notes - Enter any additional notes or info for the customer.
Active - Check the button to activate a customer. Otherwise, deselect it. Inactive Customers are not selectable on customer related combo box lists.
PO Required - Check this option if a purchase order number is required to be entered in the invoice. Otherwise, deselect the button.
Credit Hold - You may put the customer on credit hold by checking this option.
Credit Limit - Enter the credit limit amount available to this customer. This field will be disabled after saving the new record, and will show a computed value.
AR Balance - This is a disabled and computed field showing the customer's outstanding balance.
Account No - Enter the customer's account number.
Tax No - Enter the customer's tax number.
Ship Via - Click the combo box button, then select the appropriate Ship Via for the location. The combo box list will retrieve the records from the Ship Via screen. This field will be disabled after saving the new record, and its value will depend on the Ship Via used by the primary Location. See also Ship Via.
Terms - Click the combo box button, then select the appropriate Terms for the location. The combo box list will retrieve the active terms record from the Terms screen. This field will be disabled after saving the new record, and its value will depend on the Terms used by the primary Location. See also Terms.
Currency - Select from the combo box list the default currency that will be used by the customer. The combo box list will retrieve the record from the Currency screen. See also Currency.
Status - Select the appropriate account status of the customer. The combo box list will show all the records on Account Status Codes. See also Account Status Code.
Salesperson - Select the salesperson Id associated to the customer. The combo box list will show all the active salesperson on the system. See also Salesperson.
Warehouse - This is the customer's default warehouse. This field will be disabled after saving the record, and will get its data from the primary Location.
Pricing - Select the specific pricing discount for the customer. The combo box selections are Discount Sales Price, Markup Standard Cost, Percent of Margin, Multi-Level Pricing, Retail Price, Last Price, Inventory Price List, and None.
Tax State - Click the combo box button then select the state for the applicable state sales tax rate. The combo box will show a list of states.
Tax Code - Click the combo box button then select the tax code from the list of customer tax codes. This field will be disabled after saving the record, and will get its data from the primary Location.
Print 1099 - This will state if a 1099 is required or not. This will determine the type of 1099 information to be tracked. The selections are Yes and No.
1099 Name - Enter the name that will appear in the 1099 form.
1099 Form - Select from the predefined list of 1099 forms.
1099 Type - Select from the predefined list of 1099 types.
Federal Tax Id - Enter the customer's federal identification.
W9 Signed - Enter the date this customer signed a W9 form.
Timezone - Click the combo box button then select the timezone the contact is in. This is helpful when using the Help Desk.
- No labels
Overview
Content Tools